<?xml version="1.0" encoding="utf-8"?><feed xmlns="http://www.w3.org/2005/Atom" ><generator uri="https://jekyllrb.com/" version="4.4.1">Jekyll</generator><link href="https://jaredrhodes.com/feed.xml" rel="self" type="application/atom+xml" /><link href="https://jaredrhodes.com/" rel="alternate" type="text/html" /><updated>2026-02-16T14:25:10+00:00</updated><id>https://jaredrhodes.com/feed.xml</id><title type="html">Cloud | Mobile | Edge</title><subtitle>Jared Rhodes - Microsoft Azure MVP and software architect building edge and hybrid cloud demos across Azure, AWS, and local infrastructure.</subtitle><author><name>Jared Rhodes</name><uri>https://jaredrhodes.com/about</uri></author><entry><title type="html">Home Lab - Tenstorrent Buildout for Multi-Cloud Edge Demos</title><link href="https://jaredrhodes.com/blog/home-lab-tenstorrent-buildout-multi-cloud-edge/" rel="alternate" type="text/html" title="Home Lab - Tenstorrent Buildout for Multi-Cloud Edge Demos" /><published>2026-02-15T00:00:00+00:00</published><updated>2026-02-15T00:00:00+00:00</updated><id>https://jaredrhodes.com/blog/home-lab-tenstorrent-buildout-multi-cloud-edge</id><content type="html" xml:base="https://jaredrhodes.com/blog/home-lab-tenstorrent-buildout-multi-cloud-edge/"><![CDATA[<h2 id="buildout-overview">Buildout Overview</h2>

<p>The basement is now doing two jobs at once: studio and server host. The studio is intentionally simple, just a green screen wall and a demo table, because the focus is repeatable technical demonstrations across multiple industry verticals. Right behind that space is the local compute footprint that powers the demos.</p>

<p>This buildout now includes two custom Tenstorrent server paths mixed into my existing NVIDIA-enabled and general-purpose server stack. The point is not to build isolated one-off demos, but to create a reusable local platform that can be switched between demo scenarios with minimal rework.</p>

<p>The broader architecture is hybrid by design. I want the same local inference flow to run with multiple cloud providers, plus a purely local mode when needed. That gives us a practical way to show customers and internal teams what edge-first compute can do, and where cloud orchestration adds value.</p>

<h3 id="terminology-rule">Terminology Rule</h3>

<ul>
  <li><code class="language-plaintext highlighter-rouge">Private Cloud</code> means self-hosted infrastructure in my server room.</li>
  <li><code class="language-plaintext highlighter-rouge">Local</code> means local-only execution paths and equivalent services running in Kubernetes.</li>
  <li>This write-up consistently uses <code class="language-plaintext highlighter-rouge">Private Cloud</code> or <code class="language-plaintext highlighter-rouge">Local</code> terminology based on context.</li>
</ul>

<h3 id="private-cloud-topology">Private Cloud Topology</h3>

<pre><code class="language-mermaid">flowchart LR
  subgraph Studio["Studio Room"]
    CamA["Camera A"]
    CamB["Camera B"]
    WinRTSP["Windows RTSP Host"]
  end

  subgraph Server["Private Cloud Server Room"]
    TrueNAS["TrueNAS Storage Host"]
    TT["Tenstorrent Servers (Wormhole + Blackhole)"]
    Nvidia["NVIDIA Servers"]
    Proxmox["Proxmox Hosts"]

    subgraph K8sA["Kubernetes Edge Cluster"]
      Ingest["RTSP Ingest Service"]
      Broker["Message Broker"]
      Runtime["Unified Edge Inference Runtime"]
      Flows["Event Processing Pipeline"]
      ObsEdge["Edge Observability"]
    end
  end

  CamA -- "RTSP" --&gt; WinRTSP
  CamB -- "RTSP" --&gt; WinRTSP
  WinRTSP -- "RTSP relay" --&gt; Ingest
  Ingest -- "frame topics" --&gt; Broker
  Broker -- "frame contracts" --&gt; Runtime
  Runtime -- "detections/traffic" --&gt; Flows
  Runtime -- "health" --&gt; ObsEdge

  TT --&gt; Runtime
  Nvidia --&gt; Runtime
  Proxmox -- "hosts cluster nodes" --&gt; Runtime
  TrueNAS --&gt; Ingest
  TrueNAS --&gt; Flows
</code></pre>

<h3 id="azure-integration-view">Azure Integration View</h3>

<pre><code class="language-mermaid">flowchart LR
  subgraph Edge["Private Cloud Edge Runtime"]
    Ingest["RTSP Ingest Service"]
    Runtime["Unified Edge Inference Runtime"]
    Package["Event Packaging + Thresholding"]
  end

  subgraph Azure["Azure Platform"]
    MQTT["IoT Operations MQTT Broker"]
    Flows["IoT Operations Data Flows"]
    Hot["Hot Path Stream Processing"]
    Alerts["Alert Rules + Notifications"]
    Fabric["Fabric Eventstream"]
    Foundry["Microsoft Foundry Endpoint"]
    subgraph Cold["Cold Path (Medallion Architecture)"]
      Bronze["Bronze Lakehouse"]
      Silver["Silver Lakehouse"]
      Gold["Gold Lakehouse"]
    end
    PBI["Power BI Dashboard"]
  end

  Ingest --&gt; MQTT
  MQTT --&gt; Runtime
  Runtime --&gt; Package
  Package --&gt; Flows

  Flows -- "hot path" --&gt; Hot
  Hot --&gt; Alerts

  Flows -- "cold path" --&gt; Fabric
  Fabric --&gt; Bronze
  Bronze --&gt; Silver
  Silver --&gt; Gold
  Gold --&gt; PBI

  Flows -- "cloud verify" --&gt; Foundry
  Foundry -- "verification feedback" --&gt; Flows
</code></pre>

<h3 id="control-plane-overlay-azure--private-cloud">Control Plane Overlay (Azure + Private Cloud)</h3>

<pre><code class="language-mermaid">flowchart LR
  Arc["Azure Arc"]
  Flux["Flux GitOps"]
  Policy["Policy + Config Baselines"]
  EdgeK8s["Private Cloud Kubernetes Cluster"]
  EdgeRuntime["Unified Edge Inference Runtime"]
  EdgeFlow["Event Processing Pipeline"]
  AzureSvc["Azure Integration Services"]

  Arc --&gt; Flux
  Flux --&gt; Policy
  Policy -. "deploy + reconcile" .-&gt; EdgeK8s
  Arc -. "governance + extensions" .-&gt; EdgeK8s
  Arc -. "service policy" .-&gt; AzureSvc
  EdgeK8s --&gt; EdgeRuntime
  EdgeK8s --&gt; EdgeFlow
</code></pre>

<pre><code class="language-mermaid">flowchart LR
  A["Solid arrow: data plane"] --&gt; B["Dashed arrow: control plane"]
  C["RTSP: camera transport"] --&gt; D["MQTT: edge message bus"]
  D --&gt; E["Kafka/HTTPS: cloud egress"]
</code></pre>

<h3 id="aws-integration-view">AWS Integration View</h3>

<pre><code class="language-mermaid">flowchart LR
  subgraph Edge["Private Cloud Edge Runtime"]
    Flows["Event Processing Pipeline"]
  end

  subgraph AWS["AWS Platform"]
    IoTCore["IoT Core"]
    SiteWise["SiteWise"]
    GG["Greengrass"]
    SSM["Systems Manager"]
    Bedrock["Bedrock"]
    AwsOps["CloudWatch Dashboards"]
  end

  Flows -- "telemetry bridge" --&gt; IoTCore
  IoTCore --&gt; SiteWise
  IoTCore --&gt; GG
  SSM -- "fleet ops" --&gt; GG
  Bedrock -- "model artifacts" --&gt; GG
  GG --&gt; AwsOps
</code></pre>

<h3 id="local-only-implementation-specific-self-hosted-tools">Local-Only Implementation (Specific Self-Hosted Tools)</h3>

<pre><code class="language-mermaid">flowchart LR
  Cam["RTSP Cameras"] --&gt; MediaMTX["MediaMTX (RTSP ingest/relay)"]
  MediaMTX --&gt; EMQX["EMQX (MQTT frame contracts)"]

  subgraph K3s["K3s Edge Runtime"]
    TTWorker["TT-Forge Inference Worker"]
    NVWorker["Triton Inference Worker"]
  end

  EMQX --&gt; TTWorker
  EMQX --&gt; NVWorker
  TTWorker --&gt; Redpanda["Redpanda (event publish)"]
  NVWorker --&gt; Redpanda
  Redpanda --&gt; Flink["Apache Flink (thresholding + enrichment)"]
  Flink --&gt; MinIO["MinIO (packaged frame/event artifacts)"]
  Flink --&gt; ClickHouse["ClickHouse (cold analytics store)"]
  Flink --&gt; Alertmanager["Alertmanager (hot alerts)"]

  TTWorker --&gt; Prom["Prometheus + Loki (health metrics)"]
  NVWorker --&gt; Prom
  EMQX --&gt; Prom
  Flink --&gt; Prom
  ClickHouse --&gt; Grafana["Grafana (local ops dashboards)"]
  Alertmanager --&gt; Grafana
  Prom --&gt; Grafana
</code></pre>

<p>In this local view, each stage is concrete and self-hosted, but still interchangeable by contract. The handoff boundaries are RTSP ingest, MQTT frame topics, event stream topics, and packaged artifact output.</p>

<h2 id="physical-lab-and-studio-layout">Physical Lab and Studio Layout</h2>

<p>The studio side is optimized for fast context switching. I can record walkthroughs, run live demos, and pivot from one vertical scenario to another without rebuilding the room. The server side is optimized for shared hardware utilization across those same scenarios.</p>

<p>This setup makes it easier to:</p>

<ul>
  <li>Reuse the same edge hardware for multiple business demos.</li>
  <li>Keep model and telemetry pipelines consistent across environments.</li>
  <li>Demonstrate cloud-assisted operations without requiring cloud-only inference.</li>
  <li>Keep local fallback paths available when connectivity is constrained.</li>
</ul>

<pre><code class="language-mermaid">flowchart LR
  subgraph StudioRoom["Studio Room"]
    CamWide["Camera A (wide)"]
    CamClose["Camera B (table)"]
    RTSPHost["Windows RTSP Host"]
  end

  subgraph ServerRoom["Server Room"]
    TrueNASHost["TrueNAS Host"]
    Prox1["Proxmox Host 1"]
    Prox2["Proxmox Host 2"]
    K8sCP["K8s Control Plane Host"]
    K8sWTT["K8s Worker Host (TT)"]
    K8sWNV["K8s Worker Host (NVIDIA)"]
    Mon["Grafana Monitoring Wall"]
  end

  CamWide -- "RTSP feed" --&gt; RTSPHost
  CamClose -- "RTSP feed" --&gt; RTSPHost
  RTSPHost -- "RTSP relay" --&gt; K8sCP
  K8sCP --&gt; K8sWTT
  K8sCP --&gt; K8sWNV
  TrueNASHost --&gt; K8sWTT
  TrueNASHost --&gt; K8sWNV
  Prox1 --&gt; K8sCP
  Prox2 --&gt; K8sWNV
  K8sCP --&gt; Mon
  K8sWTT --&gt; Mon
  K8sWNV --&gt; Mon
</code></pre>

<p><img src="/assets/media/2026/02/dirty_studio.jpg" alt="studio layout shot" /></p>

<h2 id="current-lab-inventory">Current Lab Inventory</h2>

<p>Current internal lab components include:</p>

<ul>
  <li>Windows RTSP stream host</li>
  <li>Wormhole server</li>
  <li>Blackhole server path: staged and not fully onboarded yet</li>
  <li>Two active web cams for a high shot and a low shot</li>
  <li>TrueNAS storage box with two Tesla P400 GPUs running Ollama and other workloads</li>
  <li>Proxmox hosts for general private cloud workloads</li>
</ul>

<p>The practical goal is to run a mixed accelerator lab where workload placement can be tuned by use case, latency target, and cost profile.</p>

<p><img src="/assets/media/2026/02/server_and_printing.jpg" alt="rack inventory" /></p>

<h2 id="azure-path-iot-operations-arc-and-edge-feedback-loops">Azure Path: IoT Operations, Arc, and Edge Feedback Loops</h2>

<p>On Azure, the control pattern is centered around <a href="https://learn.microsoft.com/en-us/azure/iot-operations/overview-iot-operations">Azure IoT Operations</a> on <a href="https://learn.microsoft.com/en-us/azure/azure-arc/kubernetes/overview">Azure Arc-enabled Kubernetes</a>. In the demo repository, this aligns with the <code class="language-plaintext highlighter-rouge">Azure/Demo/Shared/AzureInternetOfThingsOperations</code> assets and the shared <code class="language-plaintext highlighter-rouge">EdgeInference</code> service.</p>

<p>The local flow is:</p>

<ol>
  <li>Cameras publish RTSP to the Windows RTSP host.</li>
  <li>The AIO RTSP Adapter ingests RTSP and publishes frames to the local MQTT frame topic.</li>
  <li>Edge inference services consume those frame topics and publish detections, traffic, and enriched messages.</li>
  <li>AIO Data Flows process, normalize, and extract delta events.</li>
  <li>Data Flows push upstream to Fabric RTI and call a Foundry endpoint for cloud verification.</li>
  <li>Results flow into cloud analytics and operations dashboards, with feedback updates pushed back to edge.</li>
</ol>

<p>In repository terms, that includes topic patterns such as:</p>

<ul>
  <li><code class="language-plaintext highlighter-rouge">tt/edge/{site}/{camera_id}/detections</code></li>
  <li><code class="language-plaintext highlighter-rouge">tt/cloud/{site}/{device_id}/verify</code></li>
  <li><code class="language-plaintext highlighter-rouge">tt/cloud/{site}/{device_id}/verify-result</code></li>
</ul>

<pre><code class="language-mermaid">flowchart LR
  RTSPA["AIO RTSP Adapter"] --&gt;|"tt/edge/{site}/{camera_id}/frames"| Edge["Edge Inference Service"]
  Edge --&gt;|"tt/edge/{site}/{camera_id}/detections"| Flows["AIO Data Flows"]
  Edge --&gt;|"tt/edge/{site}/{camera_id}/traffic"| Flows
  Edge --&gt;|"Enriched msg + sampled frame ref"| Flows
  Flows --&gt;|"Delta events (new/lost detections)"| Fabric["Fabric RTI"]
  Flows --&gt;|"Verify request (sampled frame)"| FEP["Foundry Endpoint"]
</code></pre>

<p>Operationally, Arc gives me a consistent management surface for local Kubernetes resources and policy. I am also treating <a href="https://learn.microsoft.com/en-us/azure/azure-arc/kubernetes/conceptual-gitops-flux2">GitOps with Flux on Arc-enabled Kubernetes</a> as the default deployment and configuration strategy for repeatability.</p>

<p>One reason this fits the basement buildout well is that Azure IoT Operations is designed as a unified edge data plane with an industrial MQTT broker and supports routing/normalization before cloud fan-out. That maps directly to how I want to keep high-volume inference local while still enabling cloud-side verification, model lifecycle workflows, and cross-site analytics.</p>

<p>For the Fabric path, I am modeling Data Flows publishing directly to Fabric Eventstream through the documented Fabric endpoint configuration (no required Event Hub bridge in this path).</p>

<pre><code class="language-mermaid">sequenceDiagram
  autonumber
  participant Cam as Camera
  participant Win as Windows RTSP Host
  participant RTSPA as AIO RTSP Adapter
  participant MQTT as AIO MQTT Broker
  participant Edge as Edge Inference Service
  participant Flow as AIO Data Flows
  participant FReg as Foundry Registry
  participant FTrain as Foundry Distill/Train
  participant FEP as Foundry Endpoint
  participant Fabric as Fabric Eventstream
  participant Log as Log Analytics
  participant Ops as Ops Dashboards

  Cam-&gt;&gt;Win: RTSP stream
  Win-&gt;&gt;RTSPA: RTSP relay
  RTSPA-&gt;&gt;MQTT: Publish frame topic
  MQTT-&gt;&gt;Edge: Consume frame topic
  Edge-&gt;&gt;MQTT: Publish detections topic
  Edge-&gt;&gt;MQTT: Publish traffic topic
  Edge-&gt;&gt;MQTT: Publish enriched message + sampled frame ref
  MQTT-&gt;&gt;Flow: Route edge topics

  alt Cloud connected
    Flow-&gt;&gt;FEP: Verify request (sampled frame + context)
    alt Verify success
      FEP--&gt;&gt;Flow: Verify response
      Flow-&gt;&gt;Fabric: Push extracted delta events (new/lost detections)
      Flow-&gt;&gt;Fabric: Push verified analytics events
      Flow-&gt;&gt;Log: Push ops metrics
      Flow-&gt;&gt;Ops: Update cloud dashboards
    else Verify timeout/error
      Flow-&gt;&gt;Flow: Retry with backoff
      Flow-&gt;&gt;Log: Emit verify_failure metric
      Flow-&gt;&gt;Ops: Raise verify alert
    end
  else Cloud unavailable (offline window)
    Flow-&gt;&gt;Flow: Buffer and compact delta events
    Flow-&gt;&gt;Log: Emit offline_mode metric
    Flow-&gt;&gt;Ops: Raise cloud_disconnect alert
  end

  FReg-&gt;&gt;FTrain: Model lineage + artifacts
  FTrain-&gt;&gt;FEP: Deploy candidate verify model
  FEP--&gt;&gt;Edge: Model and threshold feedback rollout
</code></pre>

<pre><code class="language-mermaid">flowchart LR
  A["RTSP = ingest transport"] --&gt; B["MQTT = edge bus"]
  B --&gt; C["Kafka endpoint = Fabric ingress"]
  D["Delta event = object newly detected or no longer detected"] --&gt; E["Enriched msg = detection + frame reference + context"]
</code></pre>

<h2 id="aws-path-greengrass-iot-core-sitewise-systems-manager-and-bedrock">AWS Path: Greengrass, IoT Core, SiteWise, Systems Manager, and Bedrock</h2>

<p>On AWS, the equivalent pattern uses:</p>

<ul>
  <li><a href="https://docs.aws.amazon.com/greengrass/v2/developerguide/what-is-iot-greengrass.html">AWS IoT Greengrass</a> for edge runtime orchestration.</li>
  <li><a href="https://docs.aws.amazon.com/iot/latest/developerguide/what-is-aws-iot.html">AWS IoT Core</a> for secure bi-directional cloud messaging and device state.</li>
  <li><a href="https://docs.aws.amazon.com/iot-sitewise/latest/userguide/what-is-sitewise.html">AWS IoT SiteWise</a> for industrial telemetry modeling, transforms, and monitoring.</li>
  <li><a href="https://docs.aws.amazon.com/systems-manager/latest/userguide/what-is-systems-manager.html">AWS Systems Manager</a> for hybrid fleet operations, patching, and command execution.</li>
  <li><a href="https://docs.aws.amazon.com/bedrock/latest/userguide/what-is-bedrock.html">Amazon Bedrock</a> as part of the cloud-side model specialization and distillation path.</li>
</ul>

<p>The AWS side in the demo repository is organized to mirror Azure demo shape where possible, including shared vertical scenarios and analytics assets. The intent is to keep edge behavior portable while changing only cloud control-plane integrations.</p>

<p>At a high level:</p>

<ol>
  <li>Local inference continues at the edge.</li>
  <li>Edge messaging bridges into AWS IoT Core patterns.</li>
  <li>Industrial telemetry and KPI modeling feed SiteWise analytics.</li>
  <li>Operations and lifecycle tasks route through Systems Manager.</li>
  <li>Distilled cloud-side model workflows can feed edge deployment artifacts.</li>
</ol>

<p>This gives us realistic AWS parity for customer conversations where cloud preference is fixed but the edge architecture should stay consistent.</p>

<pre><code class="language-mermaid">sequenceDiagram
  participant Cam as Camera
  participant Edge as Tenstorrent Edge Workload
  participant GG as AWS IoT Greengrass
  participant Core as AWS IoT Core
  participant SW as AWS IoT SiteWise
  participant SSM as AWS Systems Manager
  participant BR as Amazon Bedrock

  Cam-&gt;&gt;Edge: Local Frames
  Edge-&gt;&gt;GG: Inference Output
  GG-&gt;&gt;Core: Telemetry Publish
  Core-&gt;&gt;SW: Rules to Asset Models
  SSM--&gt;&gt;Edge: Patch and Command Ops
  BR--&gt;&gt;Edge: Distilled Model Artifacts
</code></pre>

<h2 id="cross-provider-pattern">Cross-Provider Pattern</h2>

<p>The architecture pattern stays the same even when control planes differ:</p>

<table>
  <thead>
    <tr>
      <th>Layer</th>
      <th>Azure</th>
      <th>AWS</th>
    </tr>
  </thead>
  <tbody>
    <tr>
      <td>Edge inference runtime</td>
      <td>Tenstorrent edge service on local K8s</td>
      <td>Tenstorrent workloads under Greengrass-managed edge runtime</td>
    </tr>
    <tr>
      <td>Edge messaging</td>
      <td>IoT Operations MQTT broker</td>
      <td>IoT Core and Greengrass local messaging patterns</td>
    </tr>
    <tr>
      <td>Fleet and policy</td>
      <td>Arc-enabled infrastructure and GitOps</td>
      <td>Systems Manager + IoT fleet operations</td>
    </tr>
    <tr>
      <td>Industrial analytics</td>
      <td>Event flow to cloud analytics services</td>
      <td>SiteWise asset model and telemetry analytics</td>
    </tr>
    <tr>
      <td>Model lifecycle</td>
      <td>Cloud verification + model workflows</td>
      <td>Bedrock-assisted distillation workflows</td>
    </tr>
  </tbody>
</table>

<p>This is the core reason for the buildout: one local edge core, multiple cloud orchestration options, and a purely local fallback.</p>

<pre><code class="language-mermaid">flowchart TB
  subgraph Core["Shared Edge Core"]
    Ingest["RTSP ingest + frame contracts"]
    TT["TT inference"]
    NV["NVIDIA inference"]
    Publish["Event publish + thresholding"]
    Health["Health metrics"]
    Package["Packaging"]
    Ingest --&gt; TT
    Ingest --&gt; NV
    TT --&gt; Publish
    NV --&gt; Publish
    Publish --&gt; Health
    Health --&gt; Package
  end

  subgraph AZ["Azure Integration"]
    AIO["IoT Operations"]
    Arc["Arc"]
    Fabric["Fabric RTI"]
    Foundry["Foundry"]
  end

  subgraph AW["AWS Integration"]
    GG["Greengrass"]
    CoreIoT["IoT Core"]
    SW["SiteWise"]
    SSM["Systems Manager"]
    BR["Bedrock"]
  end

  subgraph LOC["Local Integration"]
    LMQTT["Local MQTT"]
    LVerify["Local verify"]
    LAnalytics["Local analytics"]
    LOps["Local ops"]
  end

  Publish --&gt; AIO
  Publish --&gt; CoreIoT
  Publish --&gt; LMQTT

  AIO --&gt; Fabric
  AIO --&gt; Foundry
  Arc -. "policy/deploy" .-&gt; AIO

  CoreIoT --&gt; GG
  CoreIoT --&gt; SW
  SSM -. "fleet control" .-&gt; GG
  BR --&gt; GG

  LMQTT --&gt; LVerify
  LMQTT --&gt; LAnalytics
  LAnalytics --&gt; LOps

  Foundry -- "model + threshold updates" --&gt; Package
  BR -- "model updates" --&gt; Package
  LVerify -- "local policy updates" --&gt; Package
</code></pre>

<pre><code class="language-mermaid">flowchart LR
  Build["Build"] --&gt; Pack["Package"]
  Pack --&gt; Deploy["Deploy"]
  Deploy --&gt; Observe["Observe"]
  Observe --&gt; Tune["Tune"]
  Tune --&gt; Rollout["Rollout"]
  Rollout --&gt; Deploy
  Observe --&gt; Reach{"Cloud reachable?"}
  Reach -- "yes" --&gt; Hybrid["Hybrid mode"]
  Reach -- "no" --&gt; LocalOnly["Local-only mode"]
  LocalOnly --&gt; Buffer["Buffer + local analytics"]
  Buffer --&gt; Recover["Backfill on reconnect"]
  Recover --&gt; Hybrid
</code></pre>

<h2 id="first-milestone">First Milestone</h2>

<p>The first milestone for this personal buildout is to get Azure IoT Operations fully wired to local Tenstorrent inference in a closed loop:</p>

<ol>
  <li>Ingest local RTSP streams into the edge inference service.</li>
  <li>Run local inference on the Tenstorrent host.</li>
  <li>Publish structured detections into IoT Operations topics.</li>
  <li>Forward selected events or sampled frames for cloud verification.</li>
  <li>Return verification and analytics outcomes to operational dashboards.</li>
  <li>Push updated thresholds and model-management decisions back to the edge.</li>
</ol>

<p>This gives a concrete demonstration of edge inference plus cloud feedback rather than edge-only or cloud-only narratives.</p>

<pre><code class="language-mermaid">flowchart TD
  A["RTSP Ingest"] --&gt; B["Tenstorrent Inference"]
  B --&gt; C["Publish to IoT Ops Topics"]
  C --&gt; D["Cloud Verification and Analytics"]
  D --&gt; E["Feedback to Edge Policies and Thresholds"]
</code></pre>

<h2 id="next-steps">Next Steps</h2>

<ol>
  <li>Complete Blackhole onboarding and benchmark against current Wormhole and NVIDIA paths.</li>
  <li>Harden deployment automation across Azure and AWS for faster scenario switching.</li>
  <li>Expand vertical demo packs so the same local hardware can represent more business contexts.</li>
  <li>Add stronger runbook-level operational checks for edge health, topic flow integrity, and model rollout safety.</li>
</ol>

<h2 id="references">References</h2>

<ul>
  <li><a href="https://learn.microsoft.com/en-us/azure/iot-operations/overview-iot-operations">Azure IoT Operations overview</a></li>
  <li><a href="https://learn.microsoft.com/en-us/azure/iot-operations/connect-to-cloud/howto-configure-fabric-endpoint">Configure Azure IoT Operations Fabric endpoint</a></li>
  <li><a href="https://learn.microsoft.com/en-us/azure/azure-arc/overview">Azure Arc overview</a></li>
  <li><a href="https://learn.microsoft.com/en-us/azure/azure-arc/kubernetes/overview">Azure Arc-enabled Kubernetes overview</a></li>
  <li><a href="https://learn.microsoft.com/en-us/azure/azure-arc/kubernetes/conceptual-gitops-flux2">GitOps with Flux v2 on Azure Arc-enabled Kubernetes</a></li>
  <li><a href="https://docs.aws.amazon.com/greengrass/v2/developerguide/what-is-iot-greengrass.html">AWS IoT Greengrass overview</a></li>
  <li><a href="https://docs.aws.amazon.com/iot/latest/developerguide/what-is-aws-iot.html">AWS IoT Core overview</a></li>
  <li><a href="https://docs.aws.amazon.com/iot-sitewise/latest/userguide/what-is-sitewise.html">AWS IoT SiteWise overview</a></li>
  <li><a href="https://docs.aws.amazon.com/systems-manager/latest/userguide/what-is-systems-manager.html">AWS Systems Manager overview</a></li>
  <li><a href="https://docs.aws.amazon.com/bedrock/latest/userguide/what-is-bedrock.html">Amazon Bedrock overview</a></li>
  <li><a href="https://docs.tenstorrent.com/">Tenstorrent documentation home</a></li>
  <li><a href="https://docs.tenstorrent.com/forge/index.html">Tenstorrent TT-Forge documentation</a></li>
  <li><a href="https://tenstorrent.com/hardware/wormhole">Tenstorrent Wormhole hardware</a></li>
  <li><a href="https://tenstorrent.com/hardware/blackhole">Tenstorrent Blackhole hardware</a></li>
</ul>]]></content><author><name>Jared Rhodes</name></author><category term="home-lab" /><category term="home-lab" /><category term="homelab" /><category term="tenstorrent" /><category term="azure" /><category term="azure-iot-operations" /><category term="aws" /><category term="edge" /><category term="iot" /><category term="cloud-architecture" /><category term="machine-learning" /><category term="nvidia" /><summary type="html"><![CDATA[Building out a basement studio and mixed Tenstorrent/NVIDIA lab for reusable Azure and AWS edge demo scenarios.]]></summary></entry><entry><title type="html">Home Lab - Utilizing the Cloud - Dynamic VPN</title><link href="https://jaredrhodes.com/blog/home-lab-utilizing-the-cloud-dynamic-vpn/" rel="alternate" type="text/html" title="Home Lab - Utilizing the Cloud - Dynamic VPN" /><published>2021-11-29T07:04:00+00:00</published><updated>2021-11-29T07:04:00+00:00</updated><id>https://jaredrhodes.com/blog/home-lab-utilizing-the-cloud-dynamic-vpn</id><content type="html" xml:base="https://jaredrhodes.com/blog/home-lab-utilizing-the-cloud-dynamic-vpn/"><![CDATA[<h2 id="overview">Overview</h2>

<p>In a previous post, we discussed how to save money on a home lab. One section was cloud utilization. Let’s expand on that section and have a more in-depth conversation about how to create dynamic resources in Azure. This article will focus on creating a VPN dynamically.</p>

<p>Azure networking is not the most noticeable part of an enterprise bill. In the homelab scenario, it can be a running cost <a href="https://azure.microsoft.com/en-us/pricing/details/vpn-gateway/">that adds up when not needed</a>. Remember the entire purpose of a homelab is to run most, if not all, items… well in your home, at least. To alleviate this running cost, the components needed in an Azure Site-to-Site VPN can instead be created dynamically to utilize whenever it is required.</p>

<p>Due to the time involved in creating a VPN Gateway in Azure, this won’t be something that can be created and destroyed the same way a virtual machine or container could be. For the VPN Gateway, there should be at least one hour to guarantee that the VPN Gateway and other components can be created in time to meet demand load.</p>

<p>Let’s imagine a scenario where ad-hoc processing power is needed for an upcoming marketing campaign where traffic is expected to exceed our current capacity. In this scenario, our servers will be replicated in Azure Virtual Machines and allow for increased traffic. (This is a basic setup; in later posts, we’ll discuss more advanced scenarios.) To accomplish this, we need to set up a Site-to-Site VPN in Azure from our homelab.</p>

<p><img src="/assets/media/2021/10/1367f-hybrid-network-architectures.png" alt="" /></p>

<p>
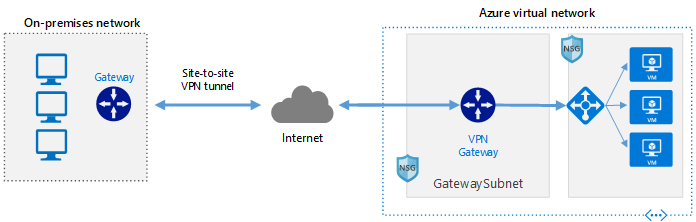
Diagram showing an on-premises network on the left which consists of three computer screens and a gateway. A double sided arrow connecting the on-premises to a cloud labeled internet with “Site-to-site VPN tunnel” above the double sided arrow. Another double sided arrow connects the internet cloud to its right through a dotted rectangle labeled “Azure Virtual Network”. The arrow connects to an item labeled VPN gateway. That gateway has a single arrow leaving it to the right pointing to a load balancer which is pointing to three identical virtual machines.</p>

<p>The steps to accomplish this are:</p>

<ol>
  <li>Supported Routers</li>
  <li>Creating a Site-to-Site Connection</li>
  <li>Replicating Virtual Machines / Containers</li>
  <li>Tear Down</li>
</ol>

<h2 id="supported-routers-official-docs">Supported Routers (<a href="https://docs.microsoft.com/en-us/azure/vpn-gateway/vpn-gateway-about-vpn-devices">official docs</a>)</h2>

<p>Microsoft keeps an updated set of documentation for supported VPN routers. A VPN device is required to configure a Site-to-Site (S2S) cross-premises VPN connection using a VPN gateway. Site-to-Site connections can be used to create a hybrid solution, or whenever you want secure connections between your on-premises networks and your virtual networks.</p>

<p>Important ??” If you are experiencing connectivity issues between your on-premises VPN devices and VPN gateways, refer to <a href="https://docs.microsoft.com/en-us/azure/vpn-gateway/vpn-gateway-about-vpn-devices#known">Known device compatibility issues</a>.</p>

<h3 id="items-to-note-when-viewing-the-tables"><a href="https://docs.microsoft.com/en-us/azure/vpn-gateway/vpn-gateway-about-vpn-devices#items-to-note-when-viewing-the-tables"></a>Items to note when viewing the tables:</h3>

<ul>
  <li>There has been a terminology change for Azure VPN gateways. Only the names have changed. There is no functionality change.
    <ul>
      <li>Static Routing = PolicyBased</li>
      <li>Dynamic Routing = RouteBased</li>
    </ul>
  </li>
  <li>Specifications for HighPerformance VPN gateway and RouteBased VPN gateway are the same, unless otherwise noted. For example, the validated VPN devices that are compatible with RouteBased VPN gateways are also compatible with the HighPerformance VPN gateway.</li>
</ul>

<h3 id="validated-vpn-devices-and-device-configuration-guides"><a href="https://docs.microsoft.com/en-us/azure/vpn-gateway/vpn-gateway-about-vpn-devices#devicetable"></a>Validated VPN devices and device configuration guides</h3>

<p>In partnership with device vendors, we have validated a set of standard VPN devices. All of the devices in the device families in the following list should work with VPN gateways. See <a href="https://docs.microsoft.com/en-us/azure/vpn-gateway/vpn-gateway-about-vpn-gateway-settings#vpntype">About VPN Gateway Settings</a> to understand the VPN type use (PolicyBased or RouteBased) for the VPN Gateway solution you want to configure.</p>

<p>To help configure your VPN device, refer to the links that correspond to the appropriate device family. The links to configuration instructions are provided on a best-effort basis. For VPN device support, contact your device manufacturer.</p>

<table>
  <thead>
    <tr>
      <th><strong>Vendor</strong></th>
      <th><strong>Device family</strong></th>
      <th><strong>Minimum OS version</strong></th>
      <th><strong>PolicyBased configuration instructions</strong></th>
      <th><strong>RouteBased configuration instructions</strong></th>
    </tr>
  </thead>
  <tbody>
    <tr>
      <td>A10 Networks, Inc.</td>
      <td>Thunder CFW</td>
      <td>ACOS 4.1.1</td>
      <td>Not compatible</td>
      <td><a href="/assets/media/A10-DG-16161-EN.pdf">Configuration guide</a></td>
    </tr>
    <tr>
      <td>Allied Telesis</td>
      <td>AR Series VPN Routers</td>
      <td>AR-Series 5.4.7+</td>
      <td><a href="https://www.alliedtelesis.com/documents/how-to/configure/site-to-site-vpn-between-azure-and-ar-series-router">Configuration guide</a></td>
      <td><a href="https://www.alliedtelesis.com/documents/how-to/configure/site-to-site-vpn-between-azure-and-ar-series-router">Configuration guide</a></td>
    </tr>
    <tr>
      <td>Arista</td>
      <td>CloudEOS Router</td>
      <td>vEOS 4.24.0FX</td>
      <td>(not tested)</td>
      <td><a href="https://www.arista.com/en/cg-veos-router/veos-router-cloudeos-ipsec-connectivity-to-azure-virtual-network-gateway">Configuration guide</a></td>
    </tr>
    <tr>
      <td>Barracuda Networks, Inc.</td>
      <td>Barracuda CloudGen Firewall</td>
      <td>PolicyBased: 5.4.3   RouteBased: 6.2.0</td>
      <td><a href="https://campus.barracuda.com/product/cloudgenfirewall/doc/79462887/how-to-configure-an-ikev1-ipsec-site-to-site-vpn-to-the-static-microsoft-azure-vpn-gateway/">Configuration guide</a></td>
      <td><a href="https://campus.barracuda.com/product/cloudgenfirewall/doc/79462889/how-to-configure-bgp-over-ikev2-ipsec-site-to-site-vpn-to-an-azure-vpn-gateway/">Configuration guide</a></td>
    </tr>
    <tr>
      <td>Check Point</td>
      <td>Security Gateway</td>
      <td>R80.10</td>
      <td><a href="https://supportcenter.checkpoint.com/supportcenter/portal?eventSubmit_doGoviewsolutiondetails=&amp;solutionid=sk101275">Configuration guide</a></td>
      <td><a href="https://supportcenter.checkpoint.com/supportcenter/portal?eventSubmit_doGoviewsolutiondetails=&amp;solutionid=sk101275">Configuration guide</a></td>
    </tr>
    <tr>
      <td>Cisco</td>
      <td>ASA</td>
      <td>8.3   8.4+ (IKEv2*)</td>
      <td>Supported</td>
      <td><a href="https://www.cisco.com/c/en/us/support/docs/security/adaptive-security-appliance-asa-software/214109-configure-asa-ipsec-vti-connection-to-az.html">Configuration guide*</a></td>
    </tr>
    <tr>
      <td>Cisco</td>
      <td>ASR</td>
      <td>PolicyBased: IOS 15.1   RouteBased: IOS 15.2</td>
      <td>Supported</td>
      <td>Supported</td>
    </tr>
    <tr>
      <td>Cisco</td>
      <td>CSR</td>
      <td>RouteBased: IOS-XE 16.10</td>
      <td>(not tested)</td>
      <td><a href="https://docs.microsoft.com/en-us/azure/vpn-gateway/vpn-gateway-download-vpndevicescript">Configuration script</a></td>
    </tr>
    <tr>
      <td>Cisco</td>
      <td>ISR</td>
      <td>PolicyBased: IOS 15.0   RouteBased*: IOS 15.1</td>
      <td>Supported</td>
      <td>Supported</td>
    </tr>
    <tr>
      <td>Cisco</td>
      <td>Meraki (MX)</td>
      <td>MX v15.12</td>
      <td>Not compatible</td>
      <td><a href="https://documentation.meraki.com/MX/Site-to-site_VPN/Configuring_Site_to_Site_VPN_tunnels_to_Azure_VPN_Gateway">Configuration guide</a></td>
    </tr>
    <tr>
      <td>Cisco</td>
      <td>vEdge (Viptela OS)</td>
      <td>18.4.0 (Active/Passive Mode)      19.2 (Active/Active Mode)</td>
      <td>Not compatible</td>
      <td><a href="https://community.cisco.com/t5/networking-documents/how-to-configure-ipsec-vpn-connection-between-cisco-vedge-and/ta-p/3841454">Manual configuration (Active/Passive)</a>      <a href="https://www.cisco.com/c/en/us/td/docs/routers/sdwan/configuration/Network-Optimization-and-High-Availability/Network-Optimization-High-Availability-book/b_Network-Optimization-and-HA_chapter_00.html">Cloud Onramp configuration (Active/Active)</a></td>
    </tr>
    <tr>
      <td>Citrix</td>
      <td>NetScaler MPX, SDX, VPX</td>
      <td>10.1 and above</td>
      <td><a href="https://docs.citrix.com/en-us/netscaler/11-1/system/cloudbridge-connector-introduction/cloudbridge-connector-azure.html">Configuration guide</a></td>
      <td>Not compatible</td>
    </tr>
    <tr>
      <td>F5</td>
      <td>BIG-IP series</td>
      <td>12.0</td>
      <td><a href="https://devcentral.f5.com/articles/connecting-to-windows-azure-with-the-big-ip">Configuration guide</a></td>
      <td><a href="https://devcentral.f5.com/articles/big-ip-to-azure-dynamic-ipsec-tunneling">Configuration guide</a></td>
    </tr>
    <tr>
      <td>Fortinet</td>
      <td>FortiGate</td>
      <td>FortiOS 5.6</td>
      <td>(not tested)</td>
      <td><a href="https://docs.fortinet.com/document/fortigate/5.6.0/cookbook/255100/ipsec-vpn-to-azure">Configuration guide</a></td>
    </tr>
    <tr>
      <td>Hillstone Networks</td>
      <td>Next-Gen Firewalls (NGFW)</td>
      <td>5.5R7</td>
      <td>(not tested)</td>
      <td><a href="/assets/media/How-to-setup-Site-to-Site-VPN-between-Microsoft-Azure-and-an-on-premise-Hillstone-Networks-Security-Gateway.pdf">Configuration guide</a></td>
    </tr>
    <tr>
      <td>Internet Initiative Japan (IIJ)</td>
      <td>SEIL Series</td>
      <td>SEIL/X 4.60   SEIL/B1 4.60   SEIL/x86 3.20</td>
      <td><a href="https://www.iij.ad.jp/biz/seil/ConfigAzureSEILVPN.pdf">Configuration guide</a></td>
      <td>Not compatible</td>
    </tr>
    <tr>
      <td>Juniper</td>
      <td>SRX</td>
      <td>PolicyBased: JunOS 10.2   Routebased: JunOS 11.4</td>
      <td>Supported</td>
      <td><a href="https://docs.microsoft.com/en-us/azure/vpn-gateway/vpn-gateway-download-vpndevicescript">Configuration script</a></td>
    </tr>
    <tr>
      <td>Juniper</td>
      <td>J-Series</td>
      <td>PolicyBased: JunOS 10.4r9   RouteBased: JunOS 11.4</td>
      <td>Supported</td>
      <td><a href="https://docs.microsoft.com/en-us/azure/vpn-gateway/vpn-gateway-download-vpndevicescript">Configuration script</a></td>
    </tr>
    <tr>
      <td>Juniper</td>
      <td>ISG</td>
      <td>ScreenOS 6.3</td>
      <td>Supported</td>
      <td><a href="https://docs.microsoft.com/en-us/azure/vpn-gateway/vpn-gateway-download-vpndevicescript">Configuration script</a></td>
    </tr>
    <tr>
      <td>Juniper</td>
      <td>SSG</td>
      <td>ScreenOS 6.2</td>
      <td>Supported</td>
      <td><a href="https://docs.microsoft.com/en-us/azure/vpn-gateway/vpn-gateway-download-vpndevicescript">Configuration script</a></td>
    </tr>
    <tr>
      <td>Juniper</td>
      <td>MX</td>
      <td>JunOS 12.x</td>
      <td>Supported</td>
      <td><a href="https://docs.microsoft.com/en-us/azure/vpn-gateway/vpn-gateway-download-vpndevicescript">Configuration script</a></td>
    </tr>
    <tr>
      <td>Microsoft</td>
      <td>Routing and Remote Access Service</td>
      <td>Windows Server 2012</td>
      <td>Not compatible</td>
      <td>Supported</td>
    </tr>
    <tr>
      <td>Open Systems AG</td>
      <td>Mission Control Security Gateway</td>
      <td>N/A</td>
      <td><a href="https://open-systems.com/">Configuration guide</a></td>
      <td>Not compatible</td>
    </tr>
    <tr>
      <td>Palo Alto Networks</td>
      <td>All devices running PAN-OS</td>
      <td>PAN-OS   PolicyBased: 6.1.5 or later   RouteBased: 7.1.4</td>
      <td>Supported</td>
      <td><a href="https://knowledgebase.paloaltonetworks.com/KCSArticleDetail?id=kA10g000000Cm6WCAS">Configuration guide</a></td>
    </tr>
    <tr>
      <td>Sentrium (Developer)</td>
      <td>VyOS</td>
      <td>VyOS 1.2.2</td>
      <td>(not tested)</td>
      <td><a href="https://docs.vyos.io/en/latest/configexamples/azure-vpn-bgp.html">Configuration guide</a></td>
    </tr>
    <tr>
      <td>ShareTech</td>
      <td>Next Generation UTM (NU series)</td>
      <td>9.0.1.3</td>
      <td>Not compatible</td>
      <td><a href="http://www.sharetech.com.tw/images/file/Solution/NU_UTM/S2S_VPN_with_Azure_Route_Based_en.pdf">Configuration guide</a></td>
    </tr>
    <tr>
      <td>SonicWall</td>
      <td>TZ Series, NSA Series   SuperMassive Series   E-Class NSA Series</td>
      <td>SonicOS 5.8.x   SonicOS 5.9.x   SonicOS 6.x</td>
      <td>Not compatible</td>
      <td><a href="https://www.sonicwall.com/support/knowledge-base/170505320011694">Configuration guide</a></td>
    </tr>
    <tr>
      <td>Sophos</td>
      <td>XG Next Gen Firewall</td>
      <td>XG v17</td>
      <td>(not tested)</td>
      <td><a href="https://community.sophos.com/kb/127546">Configuration guide</a>      <a href="https://community.sophos.com/kb/en-us/133154">Configuration guide ??” Multiple SAs</a></td>
    </tr>
    <tr>
      <td>Synology</td>
      <td>MR2200ac   RT2600ac   RT1900ac</td>
      <td>SRM1.1.5/VpnPlusServer-1.2.0</td>
      <td>(not tested)</td>
      <td><a href="https://www.synology.com/en-global/knowledgebase/SRM/tutorial/VPN/How_to_set_up_Site_to_Site_VPN_between_Synology_Router_and_MS_Azure">Configuration guide</a></td>
    </tr>
    <tr>
      <td>Ubiquiti</td>
      <td>EdgeRouter</td>
      <td>EdgeOS v1.10</td>
      <td>(not tested)</td>
      <td><a href="https://help.ubnt.com/hc/en-us/articles/115012374708">BGP over IKEv2/IPsec</a>      <a href="https://help.ubnt.com/hc/en-us/articles/115012305347">VTI over IKEv2/IPsec</a></td>
    </tr>
    <tr>
      <td>Ultra</td>
      <td>3E-636L3</td>
      <td>5.2.0.T3 Build-13</td>
      <td>(not tested)</td>
      <td>Configuration guide</td>
    </tr>
    <tr>
      <td>WatchGuard</td>
      <td>All</td>
      <td>Fireware XTM   PolicyBased: v11.11.x   RouteBased: v11.12.x</td>
      <td><a href="http://watchguardsupport.force.com/publicKB?type=KBArticle&amp;SFDCID=kA2F00000000LI7KAM&amp;lang=en_US">Configuration guide</a></td>
      <td><a href="http://watchguardsupport.force.com/publicKB?type=KBArticle&amp;SFDCID=kA22A000000XZogSAG&amp;lang=en_US">Configuration guide</a></td>
    </tr>
    <tr>
      <td>Zyxel</td>
      <td>ZyWALL USG series   ZyWALL ATP series   ZyWALL VPN series</td>
      <td>ZLD v4.32+</td>
      <td>(not tested)</td>
      <td><a href="https://businessforum.zyxel.com/discussion/2648/">VTI over IKEv2/IPsec</a>      <a href="https://businessforum.zyxel.com/discussion/2650/">BGP over IKEv2/IPsec</a></td>
    </tr>
  </tbody>
</table>

<p>(*) Cisco ASA versions 8.4+ add IKEv2 support, can connect to Azure VPN gateway using custom IPsec/IKE policy with “UsePolicyBasedTrafficSelectors” option. Refer to this <a href="https://docs.microsoft.com/en-us/azure/vpn-gateway/vpn-gateway-connect-multiple-policybased-rm-ps">how-to article</a>.</p>

<p>(**) ISR 7200 Series routers only support PolicyBased VPNs.</p>

<h3 id="download-vpn-device-configuration-scripts-from-azure"><a href="https://docs.microsoft.com/en-us/azure/vpn-gateway/vpn-gateway-about-vpn-devices#configscripts"></a>Download VPN device configuration scripts from Azure</h3>

<p>For certain devices, you can download configuration scripts directly from Azure. For more information and download instructions, see <a href="https://docs.microsoft.com/en-us/azure/vpn-gateway/vpn-gateway-download-vpndevicescript">Download VPN device configuration scripts</a>.</p>

<h4 id="devices-with-available-configuration-scripts"><a href="https://docs.microsoft.com/en-us/azure/vpn-gateway/vpn-gateway-about-vpn-devices#devices-with-available-configuration-scripts"></a>Devices with available configuration scripts</h4>

<table>
  <thead>
    <tr>
      <th><strong>Vendor</strong></th>
      <th><strong>Device family</strong></th>
      <th><strong>Firmware version</strong></th>
    </tr>
  </thead>
  <tbody>
    <tr>
      <td>Cisco</td>
      <td>ISR</td>
      <td>IOS 15.1 (Preview)</td>
    </tr>
    <tr>
      <td>Cisco</td>
      <td>ASA</td>
      <td>ASA ( * ) RouteBased (IKEv2- No BGP) for ASA below 9.8</td>
    </tr>
    <tr>
      <td>Cisco</td>
      <td>ASA</td>
      <td>ASA RouteBased (IKEv2 ??” No BGP) for ASA 9.8+</td>
    </tr>
    <tr>
      <td>Juniper</td>
      <td>SRX_GA</td>
      <td>12.x</td>
    </tr>
    <tr>
      <td>Juniper</td>
      <td>SSG_GA</td>
      <td>ScreenOS 6.2.x</td>
    </tr>
    <tr>
      <td>Juniper</td>
      <td>JSeries_GA</td>
      <td>JunOS 12.x</td>
    </tr>
    <tr>
      <td>Juniper</td>
      <td>SRX</td>
      <td>JunOS 12.x RouteBased BGP</td>
    </tr>
    <tr>
      <td>Ubiquiti</td>
      <td>EdgeRouter</td>
      <td>EdgeOS v1.10x RouteBased VTI</td>
    </tr>
    <tr>
      <td>Ubiquiti</td>
      <td>EdgeRouter</td>
      <td>EdgeOS v1.10x RouteBased BGP</td>
    </tr>
  </tbody>
</table>

<p>( * ) Required: NarrowAzureTrafficSelectors (enable UsePolicyBasedTrafficSelectors option) and CustomAzurePolicies (IKE/IPsec)</p>

<h3 id="non-validated-vpn-devices"><a href="https://docs.microsoft.com/en-us/azure/vpn-gateway/vpn-gateway-about-vpn-devices#additionaldevices"></a>Non-validated VPN devices</h3>

<p>If you don’t see your device listed in the Validated VPN devices table, your device still may work with a Site-to-Site connection. Contact your device manufacturer for additional support and configuration instructions.</p>

<h3 id="editing-device-configuration-samples"><a href="https://docs.microsoft.com/en-us/azure/vpn-gateway/vpn-gateway-about-vpn-devices#editing"></a>Editing device configuration samples</h3>

<p>After you download the provided VPN device configuration sample, you’ll need to replace some of the values to reflect the settings for your environment.</p>

<h4 id="to-edit-a-sample"><a href="https://docs.microsoft.com/en-us/azure/vpn-gateway/vpn-gateway-about-vpn-devices#to-edit-a-sample"></a>To edit a sample:</h4>

<ol>
  <li>Open the sample using Notepad.</li>
  <li>Search and replace all &lt;<em>text</em>&gt; strings with the values that pertain to your environment. Be sure to include &lt; and &gt;. When a name is specified, the name you select should be unique. If a command does not work, consult your device manufacturer documentation.</li>
</ol>

<table>
  <thead>
    <tr>
      <th><strong>Sample text</strong></th>
      <th><strong>Change to</strong></th>
    </tr>
  </thead>
  <tbody>
    <tr>
      <td>&lt;RP_OnPremisesNetwork&gt;</td>
      <td>Your chosen name for this object. Example: myOnPremisesNetwork</td>
    </tr>
    <tr>
      <td>&lt;RP_AzureNetwork&gt;</td>
      <td>Your chosen name for this object. Example: myAzureNetwork</td>
    </tr>
    <tr>
      <td>&lt;RP_AccessList&gt;</td>
      <td>Your chosen name for this object. Example: myAzureAccessList</td>
    </tr>
    <tr>
      <td>&lt;RP_IPSecTransformSet&gt;</td>
      <td>Your chosen name for this object. Example: myIPSecTransformSet</td>
    </tr>
    <tr>
      <td>&lt;RP_IPSecCryptoMap&gt;</td>
      <td>Your chosen name for this object. Example: myIPSecCryptoMap</td>
    </tr>
    <tr>
      <td>&lt;SP_AzureNetworkIpRange&gt;</td>
      <td>Specify range. Example: 192.168.0.0</td>
    </tr>
    <tr>
      <td>&lt;SP_AzureNetworkSubnetMask&gt;</td>
      <td>Specify subnet mask. Example: 255.255.0.0</td>
    </tr>
    <tr>
      <td>&lt;SP_OnPremisesNetworkIpRange&gt;</td>
      <td>Specify on-premises range. Example: 10.2.1.0</td>
    </tr>
    <tr>
      <td>&lt;SP_OnPremisesNetworkSubnetMask&gt;</td>
      <td>Specify on-premises subnet mask. Example: 255.255.255.0</td>
    </tr>
    <tr>
      <td>&lt;SP_AzureGatewayIpAddress&gt;</td>
      <td>This information specific to your virtual network and is located in the Management Portal as <strong>Gateway IP address</strong>.</td>
    </tr>
    <tr>
      <td>&lt;SP_PresharedKey&gt;</td>
      <td>This information is specific to your virtual network and is located in the Management Portal as Manage Key.</td>
    </tr>
  </tbody>
</table>

<h3 id="default-ipsecike-parameters"><a href="https://docs.microsoft.com/en-us/azure/vpn-gateway/vpn-gateway-about-vpn-devices#ipsec"></a>Default IPsec/IKE parameters</h3>

<p>The tables below contain the combinations of algorithms and parameters Azure VPN gateways use in default configuration (<strong>Default policies</strong>). For route-based VPN gateways created using the Azure Resource Management deployment model, you can specify a custom policy on each individual connection. Please refer to <a href="https://docs.microsoft.com/en-us/azure/vpn-gateway/vpn-gateway-ipsecikepolicy-rm-powershell">Configure IPsec/IKE policy</a> for detailed instructions.</p>

<p>Additionally, you must clamp TCP <strong>MSS</strong> at <strong>1350</strong>. Or if your VPN devices do not support MSS clamping, you can alternatively set the <strong>MTU</strong> on the tunnel interface to <strong>1400</strong> bytes instead.</p>

<p>In the following tables:</p>

<ul>
  <li>SA = Security Association</li>
  <li>IKE Phase 1 is also called “Main Mode”</li>
  <li>IKE Phase 2 is also called “Quick Mode”</li>
</ul>

<h4 id="ike-phase-1-main-mode-parameters"><a href="https://docs.microsoft.com/en-us/azure/vpn-gateway/vpn-gateway-about-vpn-devices#ike-phase-1-main-mode-parameters"></a>IKE Phase 1 (Main Mode) parameters</h4>

<table>
  <thead>
    <tr>
      <th><strong>Property</strong></th>
      <th><strong>PolicyBased</strong></th>
      <th><strong>RouteBased</strong></th>
    </tr>
  </thead>
  <tbody>
    <tr>
      <td>IKE Version</td>
      <td>IKEv1</td>
      <td>IKEv1 and IKEv2</td>
    </tr>
    <tr>
      <td>Diffie-Hellman Group</td>
      <td>Group 2 (1024 bit)</td>
      <td>Group 2 (1024 bit)</td>
    </tr>
    <tr>
      <td>Authentication Method</td>
      <td>Pre-Shared Key</td>
      <td>Pre-Shared Key</td>
    </tr>
    <tr>
      <td>Encryption &amp; Hashing Algorithms</td>
      <td>1. AES256, SHA256   2. AES256, SHA1   3. AES128, SHA1   4. 3DES, SHA1</td>
      <td>1. AES256, SHA1   2. AES256, SHA256   3. AES128, SHA1   4. AES128, SHA256   5. 3DES, SHA1   6. 3DES, SHA256</td>
    </tr>
    <tr>
      <td>SA Lifetime</td>
      <td>28,800 seconds</td>
      <td>28,800 seconds</td>
    </tr>
  </tbody>
</table>

<h4 id="ike-phase-2-quick-mode-parameters"><a href="https://docs.microsoft.com/en-us/azure/vpn-gateway/vpn-gateway-about-vpn-devices#ike-phase-2-quick-mode-parameters"></a>IKE Phase 2 (Quick Mode) parameters</h4>

<table>
  <thead>
    <tr>
      <th><strong>Property</strong></th>
      <th><strong>PolicyBased</strong></th>
      <th><strong>RouteBased</strong></th>
    </tr>
  </thead>
  <tbody>
    <tr>
      <td>IKE Version</td>
      <td>IKEv1</td>
      <td>IKEv1 and IKEv2</td>
    </tr>
    <tr>
      <td>Encryption &amp; Hashing Algorithms</td>
      <td>1. AES256, SHA256   2. AES256, SHA1   3. AES128, SHA1   4. 3DES, SHA1</td>
      <td><a href="https://docs.microsoft.com/en-us/azure/vpn-gateway/vpn-gateway-about-vpn-devices#RouteBasedOffers">RouteBased QM SA Offers</a></td>
    </tr>
    <tr>
      <td>SA Lifetime (Time)</td>
      <td>3,600 seconds</td>
      <td>27,000 seconds</td>
    </tr>
    <tr>
      <td>SA Lifetime (Bytes)</td>
      <td>102,400,000 KB</td>
      <td>102,400,000 KB</td>
    </tr>
    <tr>
      <td>Perfect Forward Secrecy (PFS)</td>
      <td>No</td>
      <td><a href="https://docs.microsoft.com/en-us/azure/vpn-gateway/vpn-gateway-about-vpn-devices#RouteBasedOffers">RouteBased QM SA Offers</a></td>
    </tr>
    <tr>
      <td>Dead Peer Detection (DPD)</td>
      <td>Not supported</td>
      <td>Supported</td>
    </tr>
  </tbody>
</table>

<h4 id="routebased-vpn-ipsec-security-association-ike-quick-mode-sa-offers"><a href="https://docs.microsoft.com/en-us/azure/vpn-gateway/vpn-gateway-about-vpn-devices#routebased-vpn-ipsec-security-association-ike-quick-mode-sa-offers"></a><a></a>RouteBased VPN IPsec Security Association (IKE Quick Mode SA) Offers</h4>

<p>The following table lists IPsec SA (IKE Quick Mode) Offers. Offers are listed the order of preference that the offer is presented or accepted.</p>

<h5 id="azure-gateway-as-initiator"><a href="https://docs.microsoft.com/en-us/azure/vpn-gateway/vpn-gateway-about-vpn-devices#azure-gateway-as-initiator"></a>Azure Gateway as initiator</h5>

<table>
  <thead>
    <tr>
      <th>??”</th>
      <th><strong>Encryption</strong></th>
      <th><strong>Authentication</strong></th>
      <th><strong>PFS Group</strong></th>
    </tr>
  </thead>
  <tbody>
    <tr>
      <td>1</td>
      <td>GCM AES256</td>
      <td>GCM (AES256)</td>
      <td>None</td>
    </tr>
    <tr>
      <td>2</td>
      <td>AES256</td>
      <td>SHA1</td>
      <td>None</td>
    </tr>
    <tr>
      <td>3</td>
      <td>3DES</td>
      <td>SHA1</td>
      <td>None</td>
    </tr>
    <tr>
      <td>4</td>
      <td>AES256</td>
      <td>SHA256</td>
      <td>None</td>
    </tr>
    <tr>
      <td>5</td>
      <td>AES128</td>
      <td>SHA1</td>
      <td>None</td>
    </tr>
    <tr>
      <td>6</td>
      <td>3DES</td>
      <td>SHA256</td>
      <td>None</td>
    </tr>
  </tbody>
</table>

<h5 id="azure-gateway-as-responder"><a href="https://docs.microsoft.com/en-us/azure/vpn-gateway/vpn-gateway-about-vpn-devices#azure-gateway-as-responder"></a>Azure Gateway as responder</h5>

<table>
  <thead>
    <tr>
      <th>??”</th>
      <th><strong>Encryption</strong></th>
      <th><strong>Authentication</strong></th>
      <th><strong>PFS Group</strong></th>
    </tr>
  </thead>
  <tbody>
    <tr>
      <td>1</td>
      <td>GCM AES256</td>
      <td>GCM (AES256)</td>
      <td>None</td>
    </tr>
    <tr>
      <td>2</td>
      <td>AES256</td>
      <td>SHA1</td>
      <td>None</td>
    </tr>
    <tr>
      <td>3</td>
      <td>3DES</td>
      <td>SHA1</td>
      <td>None</td>
    </tr>
    <tr>
      <td>4</td>
      <td>AES256</td>
      <td>SHA256</td>
      <td>None</td>
    </tr>
    <tr>
      <td>5</td>
      <td>AES128</td>
      <td>SHA1</td>
      <td>None</td>
    </tr>
    <tr>
      <td>6</td>
      <td>3DES</td>
      <td>SHA256</td>
      <td>None</td>
    </tr>
    <tr>
      <td>7</td>
      <td>DES</td>
      <td>SHA1</td>
      <td>None</td>
    </tr>
    <tr>
      <td>8</td>
      <td>AES256</td>
      <td>SHA1</td>
      <td>1</td>
    </tr>
    <tr>
      <td>9</td>
      <td>AES256</td>
      <td>SHA1</td>
      <td>2</td>
    </tr>
    <tr>
      <td>10</td>
      <td>AES256</td>
      <td>SHA1</td>
      <td>14</td>
    </tr>
    <tr>
      <td>11</td>
      <td>AES128</td>
      <td>SHA1</td>
      <td>1</td>
    </tr>
    <tr>
      <td>12</td>
      <td>AES128</td>
      <td>SHA1</td>
      <td>2</td>
    </tr>
    <tr>
      <td>13</td>
      <td>AES128</td>
      <td>SHA1</td>
      <td>14</td>
    </tr>
    <tr>
      <td>14</td>
      <td>3DES</td>
      <td>SHA1</td>
      <td>1</td>
    </tr>
    <tr>
      <td>15</td>
      <td>3DES</td>
      <td>SHA1</td>
      <td>2</td>
    </tr>
    <tr>
      <td>16</td>
      <td>3DES</td>
      <td>SHA256</td>
      <td>2</td>
    </tr>
    <tr>
      <td>17</td>
      <td>AES256</td>
      <td>SHA256</td>
      <td>1</td>
    </tr>
    <tr>
      <td>18</td>
      <td>AES256</td>
      <td>SHA256</td>
      <td>2</td>
    </tr>
    <tr>
      <td>19</td>
      <td>AES256</td>
      <td>SHA256</td>
      <td>14</td>
    </tr>
    <tr>
      <td>20</td>
      <td>AES256</td>
      <td>SHA1</td>
      <td>24</td>
    </tr>
    <tr>
      <td>21</td>
      <td>AES256</td>
      <td>SHA256</td>
      <td>24</td>
    </tr>
    <tr>
      <td>22</td>
      <td>AES128</td>
      <td>SHA256</td>
      <td>None</td>
    </tr>
    <tr>
      <td>23</td>
      <td>AES128</td>
      <td>SHA256</td>
      <td>1</td>
    </tr>
    <tr>
      <td>24</td>
      <td>AES128</td>
      <td>SHA256</td>
      <td>2</td>
    </tr>
    <tr>
      <td>25</td>
      <td>AES128</td>
      <td>SHA256</td>
      <td>14</td>
    </tr>
    <tr>
      <td>26</td>
      <td>3DES</td>
      <td>SHA1</td>
      <td>14</td>
    </tr>
  </tbody>
</table>

<ul>
  <li>You can specify IPsec ESP NULL encryption with RouteBased and HighPerformance VPN gateways. Null based encryption does not provide protection to data in transit, and should only be used when maximum throughput and minimum latency is required. Clients may choose to use this in VNet-to-VNet communication scenarios, or when encryption is being applied elsewhere in the solution.</li>
  <li>For cross-premises connectivity through the Internet, use the default Azure VPN gateway settings with encryption and hashing algorithms listed in the tables above to ensure security of your critical communication.</li>
</ul>

<h2 id="creating-a-vpn-gateway-official-docs">Creating a VPN Gateway (<a href="https://docs.microsoft.com/en-us/azure/vpn-gateway/vpn-gateway-howto-site-to-site-resource-manager-cli">official docs</a>)</h2>

<p><img src="https://docs.microsoft.com/en-us/azure/vpn-gateway/media/vpn-gateway-howto-site-to-site-resource-manager-cli/site-to-site-diagram.png" alt="Site-to-Site VPN Gateway cross-premises connection diagram" /></p>

<p>A Site-to-Site VPN gateway connection is used to connect your on-premises network to an Azure virtual network over an IPsec/IKE (IKEv1 or IKEv2) VPN tunnel. This type of connection requires a VPN device located on-premises that has an externally facing public IP address assigned to it. For more information about VPN gateways, see <a href="https://docs.microsoft.com/en-us/azure/vpn-gateway/vpn-gateway-about-vpngateways">About VPN gateway</a>.</p>

<h3 id="before-you-begin"><a href="https://docs.microsoft.com/en-us/azure/vpn-gateway/vpn-gateway-howto-site-to-site-resource-manager-cli#before-you-begin"></a>Before you begin</h3>

<p>Verify that you have met the following criteria before beginning configuration:</p>

<ul>
  <li>Make sure you have a compatible VPN device and someone who is able to configure it. For more information about compatible VPN devices and device configuration, see <a href="https://docs.microsoft.com/en-us/azure/vpn-gateway/vpn-gateway-about-vpn-devices">About VPN Devices</a>.</li>
  <li>Verify that you have an externally facing public IPv4 address for your VPN device.</li>
  <li>
    <p>If you are unfamiliar with the IP address ranges located in your on-premises network configuration, you need to coordinate with someone who can provide those details for you. When you create this configuration, you must specify the IP address range prefixes that Azure will route to your on-premises location. None of the subnets of your on-premises network can over lap with the virtual network subnets that you want to connect to.</p>
  </li>
  <li>Use the Bash environment in <a href="https://docs.microsoft.com/en-us/azure/cloud-shell/quickstart">Azure Cloud Shell</a>.<a href="https://shell.azure.com/"></a></li>
  <li>If you prefer, <a href="https://docs.microsoft.com/en-us/cli/azure/install-azure-cli">install</a> the Azure CLI to run CLI reference commands.
    <ul>
      <li>If you’re using a local installation, sign in to the Azure CLI by using the <a href="https://docs.microsoft.com/en-us/cli/azure/reference-index#az_login">az login</a> command. To finish the authentication process, follow the steps displayed in your terminal. For additional sign-in options, see <a href="https://docs.microsoft.com/en-us/cli/azure/authenticate-azure-cli">Sign in with the Azure CLI</a>.</li>
      <li>When you’re prompted, install Azure CLI extensions on first use. For more information about extensions, see <a href="https://docs.microsoft.com/en-us/cli/azure/azure-cli-extensions-overview">Use extensions with the Azure CLI</a>.</li>
      <li>Run <a href="https://docs.microsoft.com/en-us/cli/azure/reference-index?#az_version">az version</a> to find the version and dependent libraries that are installed. To upgrade to the latest version, run <a href="https://docs.microsoft.com/en-us/cli/azure/reference-index?#az_upgrade">az upgrade</a>.</li>
    </ul>
  </li>
  <li>This article requires version 2.0 or later of the Azure CLI. If using Azure Cloud Shell, the latest version is already installed.</li>
</ul>

<h4 id="example-values"><a href="https://docs.microsoft.com/en-us/azure/vpn-gateway/vpn-gateway-howto-site-to-site-resource-manager-cli#example"></a>Example values</h4>

<p>You can use the following values to create a test environment, or refer to these values to better understand the examples in this article:Copy</p>

<div class="language-plaintext highlighter-rouge"><div class="highlight"><pre class="highlight"><code>#Example values

VnetName                = TestVNet1?
ResourceGroup           = TestRG1?
Location                = eastus?
AddressSpace            = 10.11.0.0/16?
SubnetName              = Subnet1?
Subnet                  = 10.11.0.0/24?
GatewaySubnet           = 10.11.255.0/27?
LocalNetworkGatewayName = Site2?
LNG Public IP           = &lt;VPN device IP address&gt;
LocalAddrPrefix1        = 10.0.0.0/24
LocalAddrPrefix2        = 20.0.0.0/24  ?
GatewayName             = VNet1GW?
PublicIP                = VNet1GWIP?
VPNType                 = RouteBased?
GatewayType             = Vpn?
ConnectionName          = VNet1toSite2
</code></pre></div></div>

<h3 id="1-connect-to-your-subscription"><a href="https://docs.microsoft.com/en-us/azure/vpn-gateway/vpn-gateway-howto-site-to-site-resource-manager-cli#Login"></a>1. Connect to your subscription</h3>

<p>If you choose to run CLI locally, connect to your subscription. If you are using Azure Cloud Shell in the browser, you don’t need to connect to your subscription. You will connect automatically in Azure Cloud Shell. However, you may want to verify that you are using the correct subscription after you connect.</p>

<p>Sign in to your Azure subscription with the <a href="https://docs.microsoft.com/en-us/cli/azure/">az login</a> command and follow the on-screen directions. For more information about signing in, see <a href="https://docs.microsoft.com/en-us/cli/azure/get-started-with-azure-cli">Get Started with Azure CLI</a>.</p>

<div class="language-plaintext highlighter-rouge"><div class="highlight"><pre class="highlight"><code>az login
</code></pre></div></div>

<p>If you have more than one Azure subscription, list the subscriptions for the account.</p>

<div class="language-plaintext highlighter-rouge"><div class="highlight"><pre class="highlight"><code>az account list --all
</code></pre></div></div>

<p>Specify the subscription that you want to use.</p>

<div class="language-plaintext highlighter-rouge"><div class="highlight"><pre class="highlight"><code>az account set --subscription &lt;replace_with_your_subscription_id&gt;

</code></pre></div></div>

<h3 id="2-create-a-resource-group"><a href="https://docs.microsoft.com/en-us/azure/vpn-gateway/vpn-gateway-howto-site-to-site-resource-manager-cli#rg"></a>2. Create a resource group</h3>

<p>The following example creates a resource group named ‘TestRG1’ in the ‘eastus’ location. If you already have a resource group in the region that you want to create your VNet, you can use that one instead.</p>

<div class="language-plaintext highlighter-rouge"><div class="highlight"><pre class="highlight"><code>az group create --name TestRG1 --location eastus
</code></pre></div></div>

<h3 id="3-create-a-virtual-network"><a href="https://docs.microsoft.com/en-us/azure/vpn-gateway/vpn-gateway-howto-site-to-site-resource-manager-cli#VNet"></a>3. Create a virtual network</h3>

<p>If you don’t already have a virtual network, create one using the <a href="https://docs.microsoft.com/en-us/cli/azure/network/vnet">az network vnet create</a> command. When creating a virtual network, make sure that the address spaces you specify don’t overlap any of the address spaces that you have on your on-premises network.</p>

<p>Note ??” In order for this VNet to connect to an on-premises location, you need to coordinate with your on-premises network administrator to carve out an IP address range that you can use specifically for this virtual network. If a duplicate address range exists on both sides of the VPN connection, traffic does not route the way you may expect it to. Additionally, if you want to connect this VNet to another VNet, the address space cannot overlap with other VNet. Take care to plan your network configuration accordingly.</p>

<p>The following example creates a virtual network named ‘TestVNet1’ and a subnet, ‘Subnet1’.</p>

<div class="language-plaintext highlighter-rouge"><div class="highlight"><pre class="highlight"><code>az network vnet create --name TestVNet1 --resource-group TestRG1 --address-prefix 10.11.0.0/16 --location eastus --subnet-name Subnet1 --subnet-prefix 10.11.0.0/24
</code></pre></div></div>

<h3 id="4-create-the-gateway-subnet"><a href="https://docs.microsoft.com/en-us/azure/vpn-gateway/vpn-gateway-howto-site-to-site-resource-manager-cli#4-create-the-gateway-subnet"></a>4. <a></a>Create the gateway subnet</h3>

<p>The virtual network gateway uses specific subnet called the gateway subnet. The gateway subnet is part of the virtual network IP address range that you specify when configuring your virtual network. It contains the IP addresses that the virtual network gateway resources and services use. The subnet must be named ‘GatewaySubnet’ in order for Azure to deploy the gateway resources. You can’t specify a different subnet to deploy the gateway resources to. If you don’t have a subnet named ‘GatewaySubnet’, when you create your VPN gateway, it will fail.</p>

<p>When you create the gateway subnet, you specify the number of IP addresses that the subnet contains. The number of IP addresses needed depends on the VPN gateway configuration that you want to create. Some configurations require more IP addresses than others. We recommend that you create a gateway subnet that uses a /27 or /28.</p>

<p>If you see an error that specifies that the address space overlaps with a subnet, or that the subnet is not contained within the address space for your virtual network, check your VNet address range. You may not have enough IP addresses available in the address range you created for your virtual network. For example, if your default subnet encompasses the entire address range, there are no IP addresses left to create additional subnets. You can either adjust your subnets within the existing address space to free up IP addresses, or specify an additional address range and create the gateway subnet there.</p>

<p>Use the <a href="https://docs.microsoft.com/en-us/cli/azure/network/vnet/subnet">az network vnet subnet create</a> command to create the gateway subnet.</p>

<div class="language-plaintext highlighter-rouge"><div class="highlight"><pre class="highlight"><code>az network vnet subnet create --address-prefix 10.11.255.0/27 --name GatewaySubnet --resource-group TestRG1 --vnet-name TestVNet1
</code></pre></div></div>

<p>Important ??” When working with gateway subnets, avoid associating a network security group (NSG) to the gateway subnet. Associating a network security group to this subnet may cause your virtual network gateway (VPN and Express Route gateways) to stop functioning as expected. For more information about network security groups, see <a href="https://docs.microsoft.com/en-us/azure/virtual-network/network-security-groups-overview">What is a network security group?</a>.</p>

<h3 id="5-create-the-local-network-gateway"><a href="https://docs.microsoft.com/en-us/azure/vpn-gateway/vpn-gateway-howto-site-to-site-resource-manager-cli#localnet"></a>5. Create the local network gateway</h3>

<p>The local network gateway typically refers to your on-premises location. You give the site a name by which Azure can refer to it, then specify the IP address of the on-premises VPN device to which you will create a connection. You also specify the IP address prefixes that will be routed through the VPN gateway to the VPN device. The address prefixes you specify are the prefixes located on your on-premises network. If your on-premises network changes, you can easily update the prefixes.</p>

<p>Use the following values:</p>

<ul>
  <li>The <em>??”gateway-ip-address</em> is the IP address of your on-premises VPN device.</li>
  <li>The <em>??”local-address-prefixes</em> are your on-premises address spaces.</li>
</ul>

<p>Use the <a href="https://docs.microsoft.com/en-us/cli/azure/network/local-gateway">az network local-gateway create</a> command to add a local network gateway with multiple address prefixes:</p>

<div class="language-plaintext highlighter-rouge"><div class="highlight"><pre class="highlight"><code>az network local-gateway create --gateway-ip-address 23.99.221.164 --name Site2 --resource-group TestRG1 --local-address-prefixes 10.0.0.0/24 20.0.0.0/24
</code></pre></div></div>

<h3 id="6-request-a-public-ip-address"><a href="https://docs.microsoft.com/en-us/azure/vpn-gateway/vpn-gateway-howto-site-to-site-resource-manager-cli#PublicIP"></a>6. Request a Public IP address</h3>

<p>A VPN gateway must have a Public IP address. You first request the IP address resource, and then refer to it when creating your virtual network gateway. The IP address is dynamically assigned to the resource when the VPN gateway is created. VPN Gateway currently only supports <em>Dynamic</em> Public IP address allocation. You cannot request a Static Public IP address assignment. However, this does not mean that the IP address changes after it has been assigned to your VPN gateway. The only time the Public IP address changes is when the gateway is deleted and re-created. It doesn’t change across resizing, resetting, or other internal maintenance/upgrades of your VPN gateway.</p>

<p>Use the <a href="https://docs.microsoft.com/en-us/cli/azure/network/public-ip">az network public-ip create</a> command to request a Dynamic Public IP address.</p>

<div class="language-plaintext highlighter-rouge"><div class="highlight"><pre class="highlight"><code>az network public-ip create --name VNet1GWIP --resource-group TestRG1 --allocation-method Dynamic
</code></pre></div></div>

<h3 id="7-create-the-vpn-gateway"><a href="https://docs.microsoft.com/en-us/azure/vpn-gateway/vpn-gateway-howto-site-to-site-resource-manager-cli#CreateGateway"></a>7. Create the VPN gateway</h3>

<p>Create the virtual network VPN gateway. Creating a gateway can often take 45 minutes or more, depending on the selected gateway SKU.</p>

<p>Use the following values:</p>

<ul>
  <li>The <em>??”gateway-type</em> for a Site-to-Site configuration is <em>Vpn</em>. The gateway type is always specific to the configuration that you are implementing. For more information, see <a href="https://docs.microsoft.com/en-us/azure/vpn-gateway/vpn-gateway-about-vpn-gateway-settings#gwtype">Gateway types</a>.</li>
  <li>The <em>??”vpn-type</em> can be <em>RouteBased</em> (referred to as a Dynamic Gateway in some documentation), or <em>PolicyBased</em> (referred to as a Static Gateway in some documentation). The setting is specific to requirements of the device that you are connecting to. For more information about VPN gateway types, see <a href="https://docs.microsoft.com/en-us/azure/vpn-gateway/vpn-gateway-about-vpn-gateway-settings#vpntype">About VPN Gateway configuration settings</a>.</li>
  <li>Select the Gateway SKU that you want to use. There are configuration limitations for certain SKUs. For more information, see <a href="https://docs.microsoft.com/en-us/azure/vpn-gateway/vpn-gateway-about-vpn-gateway-settings#gwsku">Gateway SKUs</a>.</li>
</ul>

<p>Create the VPN gateway using the <a href="https://docs.microsoft.com/en-us/cli/azure/network/vnet-gateway">az network vnet-gateway create</a> command. If you run this command using the ‘??”no-wait’ parameter, you don’t see any feedback or output. This parameter allows the gateway to create in the background. It takes 45 minutes or more to create a gateway.</p>

<div class="language-plaintext highlighter-rouge"><div class="highlight"><pre class="highlight"><code>az network vnet-gateway create --name VNet1GW --public-ip-address VNet1GWIP --resource-group TestRG1 --vnet TestVNet1 --gateway-type Vpn --vpn-type RouteBased --sku VpnGw1 --no-wait?
</code></pre></div></div>

<h3 id="8-configure-your-vpn-device"><a href="https://docs.microsoft.com/en-us/azure/vpn-gateway/vpn-gateway-howto-site-to-site-resource-manager-cli#VPNDevice"></a>8. Configure your VPN device</h3>

<p>Site-to-Site connections to an on-premises network require a VPN device. In this step, you configure your VPN device. When configuring your VPN device, you need the following:</p>

<ul>
  <li>A shared key. This is the same shared key that you specify when creating your Site-to-Site VPN connection. In our examples, we use a basic shared key. We recommend that you generate a more complex key to use.</li>
  <li>The Public IP address of your virtual network gateway. You can view the public IP address by using the Azure portal, PowerShell, or CLI. To find the public IP address of your virtual network gateway, use the <a href="https://docs.microsoft.com/en-us/cli/azure/network/public-ip">az network public-ip list</a> command. For easy reading, the output is formatted to display the list of public IPs in table format.</li>
</ul>

<div class="language-plaintext highlighter-rouge"><div class="highlight"><pre class="highlight"><code>az network public-ip list --resource-group TestRG1 --output table
</code></pre></div></div>

<p><strong>To download VPN device configuration scripts:</strong></p>

<p>Depending on the VPN device that you have, you may be able to download a VPN device configuration script. For more information, see <a href="https://docs.microsoft.com/en-us/azure/vpn-gateway/vpn-gateway-download-vpndevicescript">Download VPN device configuration scripts</a>.</p>

<p><strong>See the following links for additional configuration information:</strong></p>

<ul>
  <li>For information about compatible VPN devices, see <a href="https://docs.microsoft.com/en-us/azure/vpn-gateway/vpn-gateway-about-vpn-devices">VPN Devices</a>.</li>
  <li>Before configuring your VPN device, check for any <a href="https://docs.microsoft.com/en-us/azure/vpn-gateway/vpn-gateway-about-vpn-devices#known">Known device compatibility issues</a> for the VPN device that you want to use.</li>
  <li>For links to device configuration settings, see <a href="https://docs.microsoft.com/en-us/azure/vpn-gateway/vpn-gateway-about-vpn-devices#devicetable">Validated VPN Devices</a>. The device configuration links are provided on a best-effort basis. It’s always best to check with your device manufacturer for the latest configuration information. The list shows the versions we have tested. If your OS is not on that list, it is still possible that the version is compatible. Check with your device manufacturer to verify that OS version for your VPN device is compatible.</li>
  <li>For an overview of VPN device configuration, see <a href="https://docs.microsoft.com/en-us/azure/vpn-gateway/vpn-gateway-3rdparty-device-config-overview">VPN device configuration overview</a>.</li>
  <li>For information about editing device configuration samples, see <a href="https://docs.microsoft.com/en-us/azure/vpn-gateway/vpn-gateway-about-vpn-devices#editing">Editing samples</a>.</li>
  <li>For cryptographic requirements, see <a href="https://docs.microsoft.com/en-us/azure/vpn-gateway/vpn-gateway-about-compliance-crypto">About cryptographic requirements and Azure VPN gateways</a>.</li>
  <li>For information about IPsec/IKE parameters, see <a href="https://docs.microsoft.com/en-us/azure/vpn-gateway/vpn-gateway-about-vpn-devices#ipsec">About VPN devices and IPsec/IKE parameters for Site-to-Site VPN gateway connections</a>. This link shows information about IKE version, Diffie-Hellman Group, Authentication method, encryption and hashing algorithms, SA lifetime, PFS, and DPD, in addition to other parameter information that you need to complete your configuration.</li>
  <li>For IPsec/IKE policy configuration steps, see <a href="https://docs.microsoft.com/en-us/azure/vpn-gateway/vpn-gateway-ipsecikepolicy-rm-powershell">Configure IPsec/IKE policy for S2S VPN or VNet-to-VNet connections</a>.</li>
  <li>To connect multiple policy-based VPN devices, see <a href="https://docs.microsoft.com/en-us/azure/vpn-gateway/vpn-gateway-connect-multiple-policybased-rm-ps">Connect Azure VPN gateways to multiple on-premises policy-based VPN devices using PowerShell</a>.</li>
</ul>

<h3 id="9-create-the-vpn-connection"><a href="https://docs.microsoft.com/en-us/azure/vpn-gateway/vpn-gateway-howto-site-to-site-resource-manager-cli#CreateConnection"></a>9. Create the VPN connection</h3>

<p>Create the Site-to-Site VPN connection between your virtual network gateway and your on-premises VPN device. Pay particular attention to the shared key value, which must match the configured shared key value for your VPN device.</p>

<p>Create the connection using the <a href="https://docs.microsoft.com/en-us/cli/azure/network/vpn-connection">az network vpn-connection create</a> command.</p>

<div class="language-plaintext highlighter-rouge"><div class="highlight"><pre class="highlight"><code>az network vpn-connection create --name VNet1toSite2 --resource-group TestRG1 --vnet-gateway1 VNet1GW -l eastus --shared-key abc123 --local-gateway2 Site2
</code></pre></div></div>

<p>After a short while, the connection will be established.</p>

<h3 id="10-verify-the-vpn-connection"><a href="https://docs.microsoft.com/en-us/azure/vpn-gateway/vpn-gateway-howto-site-to-site-resource-manager-cli#toverify"></a>10. Verify the VPN connection</h3>

<p>You can verify that your connection succeeded by using the <a href="https://docs.microsoft.com/en-us/cli/azure/network/vpn-connection">az network vpn-connection show</a> command. In the example, ‘??”name’ refers to the name of the connection that you want to test. When the connection is in the process of being established, its connection status shows ‘Connecting’. Once the connection is established, the status changes to ‘Connected’.</p>

<div class="language-plaintext highlighter-rouge"><div class="highlight"><pre class="highlight"><code>az network vpn-connection show --name VNet1toSite2 --resource-group TestRG1
</code></pre></div></div>

<p>If you want to use another method to verify your connection, see <a href="https://docs.microsoft.com/en-us/azure/vpn-gateway/vpn-gateway-verify-connection-resource-manager">Verify a VPN Gateway connection</a>.</p>

<h3 id="to-connect-to-a-virtual-machine"><a href="https://docs.microsoft.com/en-us/azure/vpn-gateway/vpn-gateway-howto-site-to-site-resource-manager-cli#connectVM"></a>To connect to a virtual machine</h3>

<p>You can connect to a VM that is deployed to your VNet by creating a Remote Desktop Connection to your VM. The best way to initially verify that you can connect to your VM is to connect by using its private IP address, rather than computer name. That way, you are testing to see if you can connect, not whether name resolution is configured properly.</p>

<ol>
  <li>Locate the private IP address. You can find the private IP address of a VM by either looking at the properties for the VM in the Azure portal, or by using PowerShell.
    <ul>
      <li>Azure portal ??” Locate your virtual machine in the Azure portal. View the properties for the VM. The private IP address is listed.</li>
      <li>PowerShell ??” Use the example to view a list of VMs and private IP addresses from your resource groups. You don’t need to modify this example before using it.Azure PowerShellCopyTry It<code class="language-plaintext highlighter-rouge">$VMs = Get-AzVM $Nics = Get-AzNetworkInterface | Where VirtualMachine -ne $null foreach($Nic in $Nics) { $VM = $VMs | Where-Object -Property Id -eq $Nic.VirtualMachine.Id $Prv = $Nic.IpConfigurations | Select-Object -ExpandProperty PrivateIpAddress $Alloc = $Nic.IpConfigurations | Select-Object -ExpandProperty PrivateIpAllocationMethod Write-Output "$($VM.Name): $Prv,$Alloc" }</code></li>
    </ul>
  </li>
  <li>Verify that you are connected to your VNet using the Point-to-Site VPN connection.</li>
  <li>Open <strong>Remote Desktop Connection</strong> by typing “RDP” or “Remote Desktop Connection” in the search box on the taskbar, then select Remote Desktop Connection. You can also open Remote Desktop Connection using the ‘mstsc’ command in PowerShell.</li>
  <li>In Remote Desktop Connection, enter the private IP address of the VM. You can click “Show Options” to adjust additional settings, then connect.</li>
</ol>

<p><strong>Troubleshoot a connection</strong></p>

<p>If you are having trouble connecting to a virtual machine over your VPN connection, check the following:</p>

<ul>
  <li>Verify that your VPN connection is successful.</li>
  <li>Verify that you are connecting to the private IP address for the VM.</li>
  <li>If you can connect to the VM using the private IP address, but not the computer name, verify that you have configured DNS properly. For more information about how name resolution works for VMs, see <a href="https://docs.microsoft.com/en-us/azure/virtual-network/virtual-networks-name-resolution-for-vms-and-role-instances">Name Resolution for VMs</a>.</li>
  <li>For more information about RDP connections, see <a href="https://docs.microsoft.com/en-us/troubleshoot/azure/virtual-machines/troubleshoot-rdp-connection">Troubleshoot Remote Desktop connections to a VM</a>.</li>
</ul>

<h3 id="common-tasks"><a href="https://docs.microsoft.com/en-us/azure/vpn-gateway/vpn-gateway-howto-site-to-site-resource-manager-cli#tasks"></a>Common tasks</h3>

<p>This section contains common commands that are helpful when working with site-to-site configurations. For the full list of CLI networking commands, see <a href="https://docs.microsoft.com/en-us/cli/azure/network">Azure CLI ??” Networking</a>.</p>

<h4 id="to-view-local-network-gateways"><a href="https://docs.microsoft.com/en-us/azure/vpn-gateway/vpn-gateway-howto-site-to-site-resource-manager-cli#to-view-local-network-gateways"></a>To view local network gateways</h4>

<p>To view a list of the local network gateways, use the <a href="https://docs.microsoft.com/en-us/cli/azure/network/local-gateway">az network local-gateway list</a> command.</p>

<div class="language-plaintext highlighter-rouge"><div class="highlight"><pre class="highlight"><code>az network local-gateway list --resource-group TestRG1
</code></pre></div></div>

<h4 id="to-modify-local-network-gateway-ip-address-prefixes--no-gateway-connection"><a href="https://docs.microsoft.com/en-us/azure/vpn-gateway/vpn-gateway-howto-site-to-site-resource-manager-cli#noconnection"></a>To modify local network gateway IP address prefixes ??” no gateway connection</h4>

<p>If you don’t have a gateway connection and you want to add or remove IP address prefixes, you use the same command that you use to create the local network gateway, <a href="https://docs.microsoft.com/en-us/cli/azure/network/local-gateway">az network local-gateway create</a>. You can also use this command to update the gateway IP address for the VPN device. To overwrite the current settings, use the existing name of your local network gateway. If you use a different name, you create a new local network gateway, instead of overwriting the existing one.</p>

<p>Each time you make a change, the entire list of prefixes must be specified, not just the prefixes that you want to change. Specify only the prefixes that you want to keep. In this case, 10.0.0.0/24 and 20.0.0.0/24</p>

<div class="language-plaintext highlighter-rouge"><div class="highlight"><pre class="highlight"><code>az network local-gateway create --gateway-ip-address 23.99.221.164 --name Site2 -g TestRG1 --local-address-prefixes 10.0.0.0/24 20.0.0.0/24
</code></pre></div></div>

<h4 id="to-modify-local-network-gateway-ip-address-prefixes--existing-gateway-connection"><a href="https://docs.microsoft.com/en-us/azure/vpn-gateway/vpn-gateway-howto-site-to-site-resource-manager-cli#withconnection"></a>To modify local network gateway IP address prefixes ??” existing gateway connection</h4>

<p>If you have a gateway connection and want to add or remove IP address prefixes, you can update the prefixes using <a href="https://docs.microsoft.com/en-us/cli/azure/network/local-gateway">az network local-gateway update</a>. This results in some downtime for your VPN connection. When modifying the IP address prefixes, you don’t need to delete the VPN gateway.</p>

<p>Each time you make a change, the entire list of prefixes must be specified, not just the prefixes that you want to change. In this example, 10.0.0.0/24 and 20.0.0.0/24 are already present. We add the prefixes 30.0.0.0/24 and 40.0.0.0/24 and specify all 4 of the prefixes when updating.</p>

<div class="language-plaintext highlighter-rouge"><div class="highlight"><pre class="highlight"><code>az network local-gateway update --local-address-prefixes 10.0.0.0/24 20.0.0.0/24 30.0.0.0/24 40.0.0.0/24 --name VNet1toSite2 -g TestRG1
</code></pre></div></div>

<h4 id="to-modify-the-local-network-gateway-gatewayipaddress"><a href="https://docs.microsoft.com/en-us/azure/vpn-gateway/vpn-gateway-howto-site-to-site-resource-manager-cli#to-modify-the-local-network-gateway-gatewayipaddress"></a>To modify the local network gateway ‘gatewayIpAddress’</h4>

<p>If the VPN device that you want to connect to has changed its public IP address, you need to modify the local network gateway to reflect that change. The gateway IP address can be changed without removing an existing VPN gateway connection (if you have one). To modify the gateway IP address, replace the values ‘Site2’ and ‘TestRG1’ with your own using the <a href="https://docs.microsoft.com/en-us/cli/azure/network/local-gateway">az network local-gateway update</a> command.</p>

<div class="language-plaintext highlighter-rouge"><div class="highlight"><pre class="highlight"><code>az network local-gateway update --gateway-ip-address 23.99.222.170 --name Site2 --resource-group TestRG1
</code></pre></div></div>

<p>Verify that the IP address is correct in the output:Copy</p>

<div class="language-plaintext highlighter-rouge"><div class="highlight"><pre class="highlight"><code>"gatewayIpAddress": "23.99.222.170",
</code></pre></div></div>

<h4 id="to-verify-the-shared-key-values"><a href="https://docs.microsoft.com/en-us/azure/vpn-gateway/vpn-gateway-howto-site-to-site-resource-manager-cli#to-verify-the-shared-key-values"></a>To verify the shared key values</h4>

<p>Verify that the shared key value is the same value that you used for your VPN device configuration. If it is not, either run the connection again using the value from the device, or update the device with the value from the return. The values must match. To view the shared key, use the <a href="https://docs.microsoft.com/en-us/cli/azure/network/vpn-connection">az network vpn-connection-list</a>.</p>

<div class="language-plaintext highlighter-rouge"><div class="highlight"><pre class="highlight"><code>az network vpn-connection shared-key show --connection-name VNet1toSite2 --resource-group TestRG1
</code></pre></div></div>

<h4 id="to-view-the-vpn-gateway-public-ip-address"><a href="https://docs.microsoft.com/en-us/azure/vpn-gateway/vpn-gateway-howto-site-to-site-resource-manager-cli#to-view-the-vpn-gateway-public-ip-address"></a>To view the VPN gateway Public IP address</h4>

<p>To find the public IP address of your virtual network gateway, use the <a href="https://docs.microsoft.com/en-us/cli/azure/network/public-ip">az network public-ip list</a> command. For easy reading, the output for this example is formatted to display the list of public IPs in table format.</p>

<div class="language-plaintext highlighter-rouge"><div class="highlight"><pre class="highlight"><code>az network public-ip list --resource-group TestRG1 --output table
</code></pre></div></div>

<p>With the gateway and router setup complete, the next step is replicating the virtual machines</p>

<h2 id="replicating-virtual-machines--containers">Replicating Virtual Machines / Containers</h2>

<p>Due to the number of different ways to migrate Virtual Machines into Azure from the private cloud, we will not cover migration in depth this time. Whether you use Windows, Linux, KVM, VMWare, Unix, Hyper-V, Docker, K8s, Proxmox, or anything else, <a href="https://docs.microsoft.com/en-us/azure/migrate/create-manage-projects">Microsoft has a number of guides for migration</a>. Leave questions on this article, if there is information you can’t find.</p>

<p>There are a few items to keep in mind when migrating Virtual Machines / Containers from a homelab to Azure. A major one is that the migration is likely not permanent and likely not one way. Azure has a number of tools and technologies for migrating infrastructure into Azure; it does not, however, have many tools for migrating instances out of Azure (and rightly so). This means that your migration strategy will need to be able to synchronize back to the homelab. Prepare for a bi-directional migration process, if migration is required for entire machines.</p>

<h3 id="bi-directional-migrations">Bi-Directional Migrations</h3>

<h4 id="virtual-machines">Virtual Machines</h4>

<p>Bi-directional migration options will differ depending on the hosting technology you use for your homelab. The most basic case, Virtual Machines (KVM, VMWare, Hyper-V, Xen, etc.), has two options based on deployment type:</p>

<ul>
  <li>Immutable ??” <a href="https://docs.microsoft.com/en-us/azure/architecture/solution-ideas/articles/immutable-infrastructure-cicd-using-jenkins-and-terraform-on-azure-virtual-architecture-overview">Due to the stateless nature of immutable instances</a>, the synchronization mechanism would target the underlying state storage mechanism if there is one. In the case of a blob or file store, the data can be easily copied between Azure and homelab using any number of tools.</li>
  <li>Mutable ??” Mutable instances will most likely need to have the (virtual) machine disks copied between each host. Use appropriate disk conversion technology so that the disk type is appropriate the host (Azure VHD vs KVM qcow2, etc).</li>
</ul>

<p>It should be noted that migrations of certain products, like SQL Server, have more advanced migration and synchronization methods. These products are outside the scope of this discussion. For an example, a PostgreSQL cluster has the option to <a href="https://docs.microsoft.com/en-us/azure/postgresql/howto-read-replicas-portal">migrate via replication</a>.</p>

<h4 id="containers">Containers</h4>

<h4 id="data-sync">Data Sync</h4>

<p>Azure has a number of different options to sync blobs between the home lab and Azure:</p>

<ul>
  <li><a href="https://docs.microsoft.com/en-us/azure/storage/common/storage-use-azcopy-v10?toc=/azure/storage/blobs/toc.json">AzCopy</a></li>
  <li><a href="https://docs.microsoft.com/en-us/azure/data-factory/connector-azure-blob-storage?toc=/azure/storage/blobs/toc.json">Azure Data Factory</a></li>
  <li><a href="https://docs.microsoft.com/en-us/azure/storage/blobs/network-file-system-protocol-support-how-to">Mount storage by using NFS</a></li>
  <li><a href="https://docs.microsoft.com/en-us/azure/storage/blobs/storage-how-to-mount-container-linux">Mount storage from Linux using blobfuse</a></li>
  <li><a href="https://docs.microsoft.com/en-us/azure/storage/common/storage-use-data-movement-library?toc=/azure/storage/blobs/toc.json">Transfer data with the Data Movement library</a></li>
</ul>

<h3 id="front-doors">Front Doors</h3>

<h4 id="direct-entry">Direct Entry</h4>

<p>Another item to consider is what will be the front door into your homelab. The usage of front door here is describing how the applications are accessed over the internet. If the homelab will still use its internet as the front door for application access, then will the available bandwidth be enough for the migration increase? If Azure is to be the front door, then how do you simultaneously handle having two front doors as the DNS update propagates?</p>

<p><img src="/assets/media/2021/10/e4aca-hybrid-network-architectures-front-door.png" alt="" /></p>

<p>
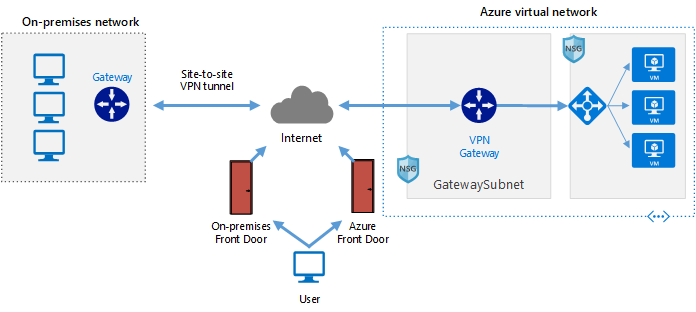
Diagram showing an on-premises network on the left, which consists of three computer screens and a gateway. A double-sided arrow connecting the on-premises to a cloud labeled internet with “Site-to-site VPN tunnel” above the double-sided arrow. Another double-sided arrow connects the internet cloud to its right, through a dotted rectangle labeled “Azure Virtual Network”. The arrow connects to an item labeled VPN gateway. That gateway has a single-arrow leaving it to the right pointing to a load balancer which is pointing to three identical virtual machines. At the bottom, there is a computer monitor labeled user. Between the computer monitor labeled user and the cloud labeled internet is two doors. The left door is labeled on-premises front door. The right door is labeled Azure Front Door. There is a blue arrow for each door pointing from the computer labeled user. There is a blue arrow from each door pointing to the cloud labeled internet.</p>

<p>If you wish to use both as a front door, make sure you have an ingress option available that can properly route between the different subnets and servers. In the case of a basic web server, use something like Nginx or HA Proxy for ingress and basic routing, so that it can be mirrored between homelab and Azure.</p>

<p>Once our event is complete, it’s time to synchronize our systems and tear down our gateway.</p>

<h2 id="tear-down-official-docs">Tear Down (<a href="https://docs.microsoft.com/en-us/azure/architecture/solution-ideas/articles/backup-archive-on-premises-applications">official docs</a>)</h2>

<p>There are a couple of different approaches you can take when you want to delete a virtual network gateway for a VPN gateway configuration.</p>

<ul>
  <li>If you want to delete everything and start over, as in the case of a test environment, you can delete the resource group. When you delete a resource group, it deletes all the resources within the group. This is method is only recommended if you don’t want to keep any of the resources in the resource group. You can’t selectively delete only a few resources using this approach.</li>
  <li>If you want to keep some of the resources in your resource group, deleting a virtual network gateway becomes slightly more complicated. Before you can delete the virtual network gateway, you must first delete any resources that are dependent on the gateway. The steps you follow depend on the type of connections that you created and the dependent resources for each connection.</li>
</ul>

<h3 id="before-beginning"><a href="https://docs.microsoft.com/en-us/azure/vpn-gateway/vpn-gateway-delete-vnet-gateway-powershell#before-beginning"></a>Before beginning</h3>

<h4 id="1-download-the-latest-azure-resource-manager-powershell-cmdlets"><a href="https://docs.microsoft.com/en-us/azure/vpn-gateway/vpn-gateway-delete-vnet-gateway-powershell#1-download-the-latest-azure-resource-manager-powershell-cmdlets"></a>1. Download the latest Azure Resource Manager PowerShell cmdlets.</h4>

<p>Download and install the latest version of the Azure Resource Manager PowerShell cmdlets. For more information about downloading and installing PowerShell cmdlets, see <a href="https://docs.microsoft.com/en-us/powershell/azure/">How to install and configure Azure PowerShell</a>.</p>

<h4 id="2-connect-to-your-azure-account"><a href="https://docs.microsoft.com/en-us/azure/vpn-gateway/vpn-gateway-delete-vnet-gateway-powershell#2-connect-to-your-azure-account"></a>2. Connect to your Azure account.</h4>

<p>Open your PowerShell console and connect to your account. Use the following example to help you connect:</p>

<div class="language-plaintext highlighter-rouge"><div class="highlight"><pre class="highlight"><code>Connect-AzAccount
</code></pre></div></div>

<p>Check the subscriptions for the account.</p>

<div class="language-plaintext highlighter-rouge"><div class="highlight"><pre class="highlight"><code>Get-AzSubscription
</code></pre></div></div>

<p>If you have more than one subscription, specify the subscription that you want to use.</p>

<div class="language-plaintext highlighter-rouge"><div class="highlight"><pre class="highlight"><code>Select-AzSubscription -SubscriptionName "Replace_with_your_subscription_name"
</code></pre></div></div>

<h2 id="delete-a-site-to-site-vpn-gateway"><a href="https://docs.microsoft.com/en-us/azure/vpn-gateway/vpn-gateway-delete-vnet-gateway-powershell#S2S"></a>Delete a Site-to-Site VPN gateway</h2>

<p>To delete a virtual network gateway for a S2S configuration, you must first delete each resource that pertains to the virtual network gateway. Resources must be deleted in a certain order due to dependencies. When working with the examples below, some of the values must be specified, while other values are an output result. We use the following specific values in the examples for demonstration purposes:</p>

<p>VNet name: VNet1
Resource Group name: RG1
Virtual network gateway name: GW1</p>

<p>The following steps apply to the <a href="https://docs.microsoft.com/en-us/azure/azure-resource-manager/management/deployment-models">Resource Manager deployment model</a>.</p>

<h3 id="1-get-the-virtual-network-gateway-that-you-want-to-delete"><a href="https://docs.microsoft.com/en-us/azure/vpn-gateway/vpn-gateway-delete-vnet-gateway-powershell#1-get-the-virtual-network-gateway-that-you-want-to-delete"></a>1. Get the virtual network gateway that you want to delete.</h3>

<div class="language-plaintext highlighter-rouge"><div class="highlight"><pre class="highlight"><code>$GW=get-Azvirtualnetworkgateway -Name "GW1" -ResourceGroupName "RG1"
</code></pre></div></div>

<h3 id="2-check-to-see-if-the-virtual-network-gateway-has-any-connections"><a href="https://docs.microsoft.com/en-us/azure/vpn-gateway/vpn-gateway-delete-vnet-gateway-powershell#2-check-to-see-if-the-virtual-network-gateway-has-any-connections"></a>2. Check to see if the virtual network gateway has any connections.</h3>

<div class="language-plaintext highlighter-rouge"><div class="highlight"><pre class="highlight"><code>get-Azvirtualnetworkgatewayconnection -ResourceGroupName "RG1" | where-object {$_.VirtualNetworkGateway1.Id -eq $GW.Id}
$Conns=get-Azvirtualnetworkgatewayconnection -ResourceGroupName "RG1" | where-object {$_.VirtualNetworkGateway1.Id -eq $GW.Id}
</code></pre></div></div>

<h3 id="3-delete-all-connections"><a href="https://docs.microsoft.com/en-us/azure/vpn-gateway/vpn-gateway-delete-vnet-gateway-powershell#3-delete-all-connections"></a>3. Delete all connections.</h3>

<p>You may be prompted to confirm the deletion of each of the connections.</p>

<div class="language-plaintext highlighter-rouge"><div class="highlight"><pre class="highlight"><code>$Conns | ForEach-Object {Remove-AzVirtualNetworkGatewayConnection -Name $_.name -ResourceGroupName $_.ResourceGroupName}
</code></pre></div></div>

<h3 id="4-delete-the-virtual-network-gateway"><a href="https://docs.microsoft.com/en-us/azure/vpn-gateway/vpn-gateway-delete-vnet-gateway-powershell#4-delete-the-virtual-network-gateway"></a>4. Delete the virtual network gateway.</h3>

<p>You may be prompted to confirm the deletion of the gateway. If you have a P2S configuration to this VNet in addition to your S2S configuration, deleting the virtual network gateway will automatically disconnect all P2S clients without warning.</p>

<div class="language-plaintext highlighter-rouge"><div class="highlight"><pre class="highlight"><code>Remove-AzVirtualNetworkGateway -Name "GW1" -ResourceGroupName "RG1"
</code></pre></div></div>

<p>At this point, your virtual network gateway has been deleted. You can use the next steps to delete any resources that are no longer being used.</p>

<h3 id="5-delete-the-local-network-gateways"><a href="https://docs.microsoft.com/en-us/azure/vpn-gateway/vpn-gateway-delete-vnet-gateway-powershell#5-delete-the-local-network-gateways"></a>5 Delete the local network gateways.</h3>

<p>Get the list of the corresponding local network gateways.</p>

<div class="language-plaintext highlighter-rouge"><div class="highlight"><pre class="highlight"><code>$LNG=Get-AzLocalNetworkGateway -ResourceGroupName "RG1" | where-object {$_.Id -In $Conns.LocalNetworkGateway2.Id}
</code></pre></div></div>

<p>Delete the local network gateways. You may be prompted to confirm the deletion of each of the local network gateway.</p>

<div class="language-plaintext highlighter-rouge"><div class="highlight"><pre class="highlight"><code>$LNG | ForEach-Object {Remove-AzLocalNetworkGateway -Name $_.Name -ResourceGroupName $_.ResourceGroupName}
</code></pre></div></div>

<h3 id="6-delete-the-public-ip-address-resources"><a href="https://docs.microsoft.com/en-us/azure/vpn-gateway/vpn-gateway-delete-vnet-gateway-powershell#6-delete-the-public-ip-address-resources"></a>6. Delete the Public IP address resources.</h3>

<p>Get the IP configurations of the virtual network gateway.</p>

<div class="language-plaintext highlighter-rouge"><div class="highlight"><pre class="highlight"><code>$GWIpConfigs = $Gateway.IpConfigurations
</code></pre></div></div>

<p>Get the list of Public IP address resources used for this virtual network gateway. If the virtual network gateway was active-active, you will see two Public IP addresses.</p>

<div class="language-plaintext highlighter-rouge"><div class="highlight"><pre class="highlight"><code>$PubIP=Get-AzPublicIpAddress | where-object {$_.Id -In $GWIpConfigs.PublicIpAddress.Id}
</code></pre></div></div>

<p>Delete the Public IP resources.</p>

<div class="language-plaintext highlighter-rouge"><div class="highlight"><pre class="highlight"><code>$PubIP | foreach-object {remove-AzpublicIpAddress -Name $_.Name -ResourceGroupName "RG1"}
</code></pre></div></div>

<h3 id="7-delete-the-gateway-subnet-and-set-the-configuration"><a href="https://docs.microsoft.com/en-us/azure/vpn-gateway/vpn-gateway-delete-vnet-gateway-powershell#7-delete-the-gateway-subnet-and-set-the-configuration"></a>7. Delete the gateway subnet and set the configuration.</h3>

<div class="language-plaintext highlighter-rouge"><div class="highlight"><pre class="highlight"><code>$GWSub = Get-AzVirtualNetwork -ResourceGroupName "RG1" -Name "VNet1" | Remove-AzVirtualNetworkSubnetConfig -Name "GatewaySubnet"
Set-AzVirtualNetwork -VirtualNetwork $GWSub
</code></pre></div></div>

<h2 id="delete-a-vpn-gateway-by-deleting-the-resource-group"><a href="https://docs.microsoft.com/en-us/azure/vpn-gateway/vpn-gateway-delete-vnet-gateway-powershell#delete"></a>Delete a VPN gateway by deleting the resource group</h2>

<p>If you are not concerned about keeping any of your resources in the resource group and you just want to start over, you can delete an entire resource group. This is a quick way to remove everything. The following steps apply only to the <a href="https://docs.microsoft.com/en-us/azure/azure-resource-manager/management/deployment-models">Resource Manager deployment model</a>.</p>

<h3 id="1-get-a-list-of-all-the-resource-groups-in-your-subscription"><a href="https://docs.microsoft.com/en-us/azure/vpn-gateway/vpn-gateway-delete-vnet-gateway-powershell#1-get-a-list-of-all-the-resource-groups-in-your-subscription"></a>1. Get a list of all the resource groups in your subscription.</h3>

<div class="language-plaintext highlighter-rouge"><div class="highlight"><pre class="highlight"><code>Get-AzResourceGroup
</code></pre></div></div>

<h3 id="2-locate-the-resource-group-that-you-want-to-delete"><a href="https://docs.microsoft.com/en-us/azure/vpn-gateway/vpn-gateway-delete-vnet-gateway-powershell#2-locate-the-resource-group-that-you-want-to-delete"></a>2. Locate the resource group that you want to delete.</h3>

<p>Locate the resource group that you want to delete and view the list of resources in that resource group. In the example, the name of the resource group is RG1. Modify the example to retrieve a list of all the resources.</p>

<div class="language-plaintext highlighter-rouge"><div class="highlight"><pre class="highlight"><code>Find-AzResource -ResourceGroupNameContains RG1
</code></pre></div></div>

<h3 id="3-verify-the-resources-in-the-list"><a href="https://docs.microsoft.com/en-us/azure/vpn-gateway/vpn-gateway-delete-vnet-gateway-powershell#3-verify-the-resources-in-the-list"></a>3. Verify the resources in the list.</h3>

<p>When the list is returned, review it to verify that you want to delete all the resources in the resource group, as well as the resource group itself. If you want to keep some of the resources in the resource group, use the steps in the earlier sections of this article to delete your gateway.</p>

<h3 id="4-delete-the-resource-group-and-resources"><a href="https://docs.microsoft.com/en-us/azure/vpn-gateway/vpn-gateway-delete-vnet-gateway-powershell#4-delete-the-resource-group-and-resources"></a>4. Delete the resource group and resources.</h3>

<p>To delete the resource group and all the resource contained in the resource group, modify the example and run.</p>

<div class="language-plaintext highlighter-rouge"><div class="highlight"><pre class="highlight"><code>Remove-AzResourceGroup -Name RG1
</code></pre></div></div>

<h3 id="5-check-the-status"><a href="https://docs.microsoft.com/en-us/azure/vpn-gateway/vpn-gateway-delete-vnet-gateway-powershell#5-check-the-status"></a>5. Check the status.</h3>

<p>It takes some time for Azure to delete all the resources. You can check the status of your resource group by using this cmdlet.</p>

<div class="language-plaintext highlighter-rouge"><div class="highlight"><pre class="highlight"><code>Get-AzResourceGroup -ResourceGroupName RG1
</code></pre></div></div>

<p>The result that is returned shows ‘Succeeded’.</p>

<div class="language-plaintext highlighter-rouge"><div class="highlight"><pre class="highlight"><code>ResourceGroupName : RG1
Location          : eastus
ProvisioningState : Succeeded
</code></pre></div></div>]]></content><author><name>Jared Rhodes</name></author><category term="cloud-architecture" /><category term="homelab" /><category term="microsoft-azure" /><category term="azure" /><category term="edge" /><category term="home-lab" /><category term="cloud-architecture" /><category term="postgresql" /><category term="proxmox" /><summary type="html"><![CDATA[J]]></summary><media:thumbnail xmlns:media="http://search.yahoo.com/mrss/" url="https://jaredrhodes.com/assets/media/2021/08/adf42-adobestock_265247767.jpeg" /><media:content medium="image" url="https://jaredrhodes.com/assets/media/2021/08/adf42-adobestock_265247767.jpeg" xmlns:media="http://search.yahoo.com/mrss/" /></entry><entry><title type="html">Can’t access TrueNAS/FreeNAS over VPN</title><link href="https://jaredrhodes.com/blog/cant-access-truenas-freenas-over-vpn/" rel="alternate" type="text/html" title="Can’t access TrueNAS/FreeNAS over VPN" /><published>2021-11-01T07:09:00+00:00</published><updated>2021-11-01T07:09:00+00:00</updated><id>https://jaredrhodes.com/blog/cant-access-truenas-freenas-over-vpn</id><content type="html" xml:base="https://jaredrhodes.com/blog/cant-access-truenas-freenas-over-vpn/"><![CDATA[<p>There was an issue accessing a TrueNAS device over the VPN. The VPN was assigning an Ip Address outside the network available to the TrueNAS host. In my case:</p>

<ol>
  <li>VPN assigned IP address is in range 172.16.0.0/24</li>
  <li>Network for TrueNAS is in range 10.0.0.0/16</li>
</ol>

<p>Since the VPN address is outside the range of the CIDR block for the TrueNAS ip address subnet, TrueNAS can’t respond to the incoming request. To fix this, add a Static Route for TrueNAS. To add a Static Route, expand the Network tab in the left hand menu and select Static Routes in the menu.</p>

<p><img src="/assets/media/2021/10/ad800-screen-shot-2021-10-30-at-10.24.17-pm.png?w=428&amp;h=1024" alt="" /></p>

<p>The left main menu in TrueNAS core with the Network tab expanded and the Static Routes tab within Network selected</p>

<p>From the Static Routes screen, click Add in the top right of the new screen. After that the following form will appear:</p>

<p><img src="https://www.truenas.com/docs/images/CORE/12.0/NetworkStaticRoutesAdd.png" alt="" /></p>

<table>
  <thead>
    <tr>
      <th>Setting</th>
      <th>Value</th>
      <th>Description</th>
    </tr>
  </thead>
  <tbody>
    <tr>
      <td>Destination</td>
      <td>integer</td>
      <td>Use the format <em>A.B.C.D/E</em> where <em>E</em> is the CIDR mask.    In the example above it would be 172.16.0.0/24</td>
    </tr>
    <tr>
      <td>Gateway</td>
      <td>integer</td>
      <td>Enter the IP address of the gateway.   In the example above it would be 10.0.0.150 (150 is my gateway)</td>
    </tr>
    <tr>
      <td>Description</td>
      <td>string</td>
      <td>Notes or identifiers describing the route.</td>
    </tr>
  </tbody>
</table>

<p>The form fields for adding a static route in TrueNAS</p>

<p>After the fields are populated correctly, click “Submit” and the VPN connections should now be able to reach the TrueNAS core device.</p>]]></content><author><name>Jared Rhodes</name></author><category term="home-lab" /><category term="networking" /><category term="vpn" /><category term="home-lab" /><category term="truenas" /><category term="ai" /><category term="homelab" /><category term="infrastructure" /><category term="self-hosted" /><summary type="html"><![CDATA[J]]></summary><media:thumbnail xmlns:media="http://search.yahoo.com/mrss/" url="https://jaredrhodes.com/assets/media/2021/10/a9bc2-logo-truenas-core_119b-compressor.png" /><media:content medium="image" url="https://jaredrhodes.com/assets/media/2021/10/a9bc2-logo-truenas-core_119b-compressor.png" xmlns:media="http://search.yahoo.com/mrss/" /></entry><entry><title type="html">Home Lab - Keeping Costs Down</title><link href="https://jaredrhodes.com/blog/home-lab-keeping-costs-down/" rel="alternate" type="text/html" title="Home Lab - Keeping Costs Down" /><published>2021-10-11T07:04:00+00:00</published><updated>2021-10-11T07:04:00+00:00</updated><id>https://jaredrhodes.com/blog/home-lab-keeping-costs-down</id><content type="html" xml:base="https://jaredrhodes.com/blog/home-lab-keeping-costs-down/"><![CDATA[<h2 id="understand-the-use-case">Understand the Use Case</h2>

<p>If you’re considering building a lab, chances are you’ve got a good idea of what you want to do with it. If not, then let me give you one piece of advice: <strong>THINK CAREFULLY BEFOREHAND ABOUT WHAT YOU WANT TO ACHIEVE</strong>. <a href="https://www.supermicro.com/en/products/system/GPU/4U/SYS-420GP-TNR">10 GPU “super computers”</a> can be great fun but are woefully unnecessary if you want a web development server. Likewise, a petabyte of redundant storage truly lives up to its name if you’re planning to use it to host a Doom multiplayer server. I know it sounds obvious, but it’s just too easy to get distracted by a great eBay deal and end up with a 900w paper weight.</p>

<p>I can already hear you shouting, <strong>“EBAY HO, BUY ALL THE THINGS”</strong>, but lets just slow down there for one second, soldier. This is a really, really good way to spend a whole lot of money on a stack of stuff that is worth more to a scrapyard than your homelab. There’s a <strong>ton</strong> of enterprise gear out there ready for the taking, but do your due diligence or you won’t get the good stuff. Instead, you’ll end up with a server with only one ethernet management port and no network card. It’s a bad scene when that happens, so let’s try to preclude it.</p>

<h3 id="common-use-cases">Common Use Cases</h3>

<p><img src="/assets/media/2021/08/d0650-adobestock_432153240.jpeg?w=1024&amp;h=683" alt="" /></p>

<p>Open tower PC computers. Depicts computer repair, maintenance, service or upgrade</p>

<p>Most home lab users get started for very specific use cases. The starter use cases are usually:</p>

<ul>
  <li>Game Servers</li>
  <li>Media Servers</li>
  <li>Storage and Archiving</li>
  <li>Web Hosting</li>
  <li>Certification Study</li>
  <li>Remote Access</li>
  <li>Development Servers</li>
  <li>Home Automation</li>
  <li>Crypto Currency and other Electric Waste</li>
</ul>

<p>It is important to understand that your homelab project is not the first of its kind. There are an innumerable number of self hosted game servers, media servers, and self hosted web sites. Before breaking out the credit card, use (at-least) a google search to find a similar project which describes their setup to understand how the underlying hardware is being used. Understanding hardware is key to understanding what you will need instead of what you want or think you may need.</p>

<p>For example, a home media server doesn’t need a 24 port 10 G switch. It also doesn’t need an AMD Ryzen Threadripper 3990X 64Core 128Thread 2.9GHz 7nm sTRX4 CPU Processor. Both of those items will add expense and power usage, without providing a better media server. What is most important is overall disk space and making sure the disks are redundant (note disk speed is not of the utmost importance). With this in mind, you can search for a single server setup that can handle an appropriate amount of disk space for your needs.</p>

<h3 id="larger-use-cases">Larger Use Cases</h3>

<p><img src="/assets/media/2021/08/b0d94-adobestock_267084326.jpeg?w=1024&amp;h=576" alt="" /></p>

<p>In the Modern Data Center: IT Engineer Installs New HDD Hard Drive and Other Hardware into Server Rack Equipment. IT Specialist Doing Maintenance, Running Diagnostics and Updating Hardware.</p>

<p>Larger use cases (or enterprise use cases) will combine multiple use cases from above along with new use cases, monitoring, multiple environments, additional access &amp; control mechanisms, and more. An example of a larger use case can be an edge computing solution for home automation combined with a home security system. Another use case could be a web crawler, archiver, and data processor to create a custom search engine. A personal use case of my home lab is snapshotting/archiving documentation of older products and software so that if said documentation were no longer hosted by a third party, I’d still have access to it.</p>

<p>When diving into larger/enterprise use cases you often run into a different level of concerns. This particular blog post wont dive into such details; just understand there are additional costs that comes with enterprise setups. Backup power, layers of redundancy, DR &amp; backup strategies, mitigating for natural and manmade disasters, and more. Each of these will increase cost and slowly transform a home lab into a datacenter.</p>

<h2 id="find-a-deal">Find a Deal</h2>

<h3 id="buy-nothing">Buy nothing</h3>

<p><img src="/assets/media/2021/08/78eff-adobestock_122624463.jpeg?w=1024&amp;h=683" alt="" /></p>

<p>Keep in mind that this post is meant for someone who’s already started labbing, but wants to up their gear to do more and doesn’t know where to begin.</p>

<p>The vast majority of us all started with an old PC or leftover parts from a previous upgrade or, maybe, from that box your parents didn’t need anymore after that they got a new present. Maybe you volunteer to take it and clean it for them and begin to use what they left behind. Personally, this is exactly how I got my original NAS.</p>

<p>I’d be very surprised if you’re not already sitting on a pile of old parts in some way, shape, or form. If you weren’t the kind to collect parts, you probably wouldn’t be labbing. Even if not, if all you have is one PC, use it. These days we have VirtualBox, which does a fine job of running just about everything you might want to try out. It might be a bit slow, but you can get started while you wait for your tax return/birthday money/lottery winnings to get here.</p>

<p>The key point is that nothing about learning the basics of homelab setup requires enterprise hardware, except, of course, for learning how enterprise hardware itself is laid out. That has its merits, but most of it can still be learned from building your own PC. Coding, Linux, FreeBSD, Win 2012 R2, containers, hypervisors, networking, storage; all of it can be done with a fairly recent laptop or desktop.</p>

<h3 id="understanding-hardware">Understanding Hardware</h3>

<p><img src="/assets/media/2021/08/3ab43-adobestock_388098428.jpeg?w=1024&amp;h=683" alt="" /></p>

<p>Male computer technician repairing broken silver rack mount server while opening its parts and analyzing and understanding problem</p>

<p>Let’s discuss the different types of hardware options you’ll encounter; hopefully, this will save you from traveling an expensive learning curve. You don’t want to end up with a server that is so old it doesn’t support virtualization. Older servers can be power hungry and scream every time you turn them on. These tips will hopefully help you understand the difference between a $150 paperweight and a $200 deal.</p>

<p>This is such an important issue to me, because I have witnessed those uninitiated in homelab quickly lose their enthusiasm when they end up getting Pentium 4-era Xeons that are practically worthless. I point this out not to pound those who have just started with homelab builds into the ground, but to point out that if you don’t research, ask around, and make sure of what you’re getting, you could end up getting worthless hardware without even knowing it. And, trust me, it’s not always easy to see when you might be headed down this path. I speak from experience.</p>

<h3 id="ask-questions">Ask Questions</h3>

<p><img src="/assets/media/2021/08/22096-adobestock_330190933.jpeg?w=1024&amp;h=683" alt="" /></p>

<p>Young woman asking questions to the speaker during the briefing.</p>

<p>There are a number of guides on the internet to help with buying of used/refurbished/old servers. Using your search engine of choice will lead you on many adventures. It cannot be stressed enough that you should understand your use case before you purchase a machine. Here are a list of questions to ask yourself:</p>

<ul>
  <li>What kind of connections does the motherboard provide for hard drives?
    <ul>
      <li>Does the server have a raid card?
        <ul>
          <li>If the raid card fails, how hard will it be to replace?</li>
          <li>If a drive fails, how hard will it be to recreate the raid cluster?</li>
          <li>What is the maximum memory supported by the raid card?</li>
        </ul>
      </li>
      <li>Is this server primarily reading or writing data?
        <ul>
          <li>Is the primary reading or writing a central focus of this server?</li>
          <li>What level of redundancy is needed for this data?</li>
          <li>Can this server use a NAS instead of local hard drives for the non-OS (or all) data?</li>
        </ul>
      </li>
      <li>Will this server need to “trust” the hard drives attached to it? (A server may not be able to read the temperature of a hard drive and consider it to be overheating. The fans will then go full blast driving up the energy consumption and noise generation of the machine. This is a problem in servers like Dells, where there is an expectation of a Dell Certified hard drive)</li>
    </ul>
  </li>
  <li>What are the network throughput needs of this project?
    <ul>
      <li>Is the network card fast enough for this project’s needs? Is the switch/router it is connected to fast enough for this project’s needs?</li>
      <li>Does the card provide enough ports for the considered management setup?</li>
      <li>Does it provide redundancy at the card or port level?</li>
      <li>If the network card fails, how hard will it be to replace?</li>
    </ul>
  </li>
  <li>What are the memory needs for the project and what are the memory options provided by the motherboard?
    <ul>
      <li>Not a question, but a note - use ECC RAM. Servers are not personal use computers and with multiple workloads running on them, ECC RAM can prevent a systemic crash that destroys all the workloads on the server.</li>
      <li>Another note, don’t use DDR2 memory. Its a power hog and getting harder and harder to replace.</li>
      <li>Does the motherboard except UDIMM, RDIMM, or LDIMM and in what configurations?</li>
      <li>What RAM is currently available from other projects to reuse?</li>
      <li>Are any processes or workloads memory intensive or is RAM general use?</li>
    </ul>
  </li>
  <li>What level of compute power is needed?
    <ul>
      <li>Does the motherboard for this project support the expected CPU?</li>
      <li>Does the CPU support the RAM for this server?</li>
      <li>Does the CPU support virtual machine passthrough (Intel VT-d or AMD-Vi)?</li>
      <li>Are vendors readily stocking this CPU?</li>
    </ul>
  </li>
</ul>

<h3 id="places-to-purchase">Places to purchase</h3>

<p><img src="/assets/media/2021/08/e7b0d-adobestock_227842635.jpeg?w=1024&amp;h=683" alt="" /></p>

<p>Shopping basket with computer device and accessories, 3D rendering isolated on white background</p>

<p>The primary place to find “deals” on retired server equipment would be eBay. eBay serves as a single point where recyclers, repurchasers, and refurbishers can sell IT equipment. In fact, most shops will have multiple “stores” that they use so that they can have a single location with different store fronts. Some shops will have a brand name that is its own web store. eBay is the place that I personally go to first when I am bored and want to look at stuff I will never buy.</p>

<p>There are a number of different categories to check that are not eBay: (It should be noted that this section is from an American perspective. If you searching elsewhere this guide may not be perfectly applicable to buying in your region)</p>

<h4 id="local-electronic-recyclers">Local Electronic Recyclers</h4>

<p>Electronic recyclers are sometimes tasked to clean out old data centers. This leaves the recycler with enterprise servers and networking equipment that will need to be sold. Some items are best to pick up in person. Renting moving equipment and moving server racks to a house or office space from an electronic recycler can save thousands on such a purchase (from personal experience). Personally, I have built/purchased both my mobile testing platform and my server racks from a local electronics recycler. It’s as simple as setting up an appointment with the recycler and taking a tour of their warehouse. There may be more than just the equipment for the project being planned in there for purchase.</p>

<p>The major benefit of visiting an electronic recycler is that they may be willing to make a deal NOW. You are there, you have money, and they do not need to ship out the product. This can reduce their costs and in turn pass that savings on to you. However, make sure that you can move and transport the items that you bought. Server racks can weigh upwards of 400lbs and not fit in a standard rental box truck standing up. Make sure you can transport whatever you buy and that it will fit, not only in the room you purchase it for, but through the doorways to the room in question.</p>

<h4 id="government-surplus">Government Surplus</h4>

<p>A surplus store in the Commonwealth of Nations sells items that are used, or purchased but unused, and no longer needed. A surplus store may also sell items that are past their use by date. Additionally, there are government auctions for similar property where some amazing deals can be found. Note, these amazing deals are sought after by many personal and professional hobbyist, so don’t expect too much of an amazing deal.</p>

<h4 id="online-sales">Online Sales</h4>

<p>All that can be said for online sales in this article has been stated. Anything not said should be known from your own online shopping experience. For the sake of being somewhat useful, here is a list sourced from the reddit homelab wiki buying guide:</p>

<ul>
  <li><a href="http://ebay.com/">http://ebay.com</a> - the best place to get used servers
    <ul>
      <li><a href="https://www.labgopher.com/">https://www.labgopher.com/</a> - Ebay server search tool</li>
      <li><a href="https://geargrabber.io/">https://geargrabber.io/</a> - Ebay search tool for servers and networking gear</li>
    </ul>
  </li>
  <li><a href="https://www.homelabtech.com/">https://www.homelabtech.com</a> - Refurbished Servers, Storage, Networking, and Parts</li>
  <li><a href="https://www.orangecomputers.com/">https://www.orangecomputers.com</a> - Refurbished Servers, Storage, Networking, and Parts</li>
  <li><a href="https://www.metservers.com/">https://www.metservers.com/</a> - Refurbished Servers, Desktop, Networking, and Parts</li>
  <li><a href="http://www.pennelcomonline.com/">http://www.pennelcomonline.com/</a> - Racks, rack accessories, or modular parts (rack strips, corners, cross-members for custom racks etc)</li>
  <li><a href="https://www.ispsupplies.com/">https://www.ispsupplies.com</a> - WaveGuard WG-UB-RM1 Rackmount kit for Ubiquiti EdgeRouter Lite and similar models.</li>
  <li><a href="https://www.startech.com/">https://www.startech.com/</a> - Racks, rack accessories, and hard-to-find or otherwise niche tools.</li>
  <li><a href="http://www.navepoint.com/">http://www.navepoint.com/</a> - Racks, rack accessories, and general office equipment</li>
</ul>

<h2 id="using-the-cloud">Using the Cloud</h2>

<p><img src="/assets/media/2021/08/adf42-adobestock_265247767.jpeg?w=1024&amp;h=655" alt="" /></p>

<p>Private cloud left connected to Public cloud right with Hybrid cloud placed between</p>

<p>The cloud can be utilized to keep costs down. You read that last sentence correctly, it can be used to keep costs down. From a business perspective, it can be utilized to shift capital expenses to operational expenses. For a home lab, it can be used so that $10,000 in equipment cost can instead be spread out month to month over the course of years. As a <a href="https://mvp.microsoft.com/en-us/PublicProfile/5002468?fullName=Jared%20Rhodes">Microsoft MVP for Azure</a>, I have a good sense of when to use the public cloud vs when to invest in the private cloud. Hopefully, this section can provide a quick guide to when and where your project can benefit from either.</p>

<p>A thought that should be shared is that the entire integration with the public cloud can be dynamic, if you so choose. From the VPN components to the different offerings being consumed (unless there is a need for persistent state), the items can all be created on demand. This is said with the understanding that certain items require physical components and long term contracts. If your project requires those parameters, then the project may fall outside the definition of “home lab” being used here. Also, some items, like a VPN Gateway in Azure, may take a half hour to an hour to provision on demand. For a home lab, some pre-planning may be required due to those time constraints (as compared to an enterprise environment, where all those items will be persistent).</p>

<p>For a home lab, the primary purpose is to own and house the equipment running your projects. That being the primary purpose, does not mean there are no other benefits to using the public cloud in a hybrid scenario. The following are a few scenarios where using the public cloud could help reduce costs:</p>

<h3 id="scaling-out">Scaling Out</h3>

<p>From the above listed options for projects, some could benefit from being able to scale out due to demand. Web servers, game servers, development servers, and more may have inconsistent demand. If your project involves a forever online game server and suddenly one thousand of your closest friends plan to play together one night, then there may be a need to scale out beyond the capacity of your home lab.</p>

<p>Assuming the project is set up for this scenario, hosting it in the public cloud may be as simple as changing a public DNS entry and uploading your virtualization configuration of the server to a public cloud provider. An example would be Minecraft server running inside of a container. It can be quickly uploaded to something like <a href="https://azure.microsoft.com/en-us/services/container-instances/#documentation">Azure Container Instances</a> for the evening and cost a fistful of dollars. Compared to the thousands in hardware costs that would be needed for that one evening, the public cloud can provide the required infrastructure for a fraction of the cost.</p>

<p>Another example could be a public web server for a one day conference. For ~360 days out of the year, the site will receive one or two hits a day. When the week of the conference arrives, it may suddenly get hundreds or thousands of hits per day. Instead of running the site in the cloud the entire year or spending capital enough to host it in your lab for the week of the conference, use the cloud the week of and the rest of the year use the home lab (private cloud).</p>

<h3 id="disaster-recovery">Disaster Recovery</h3>

<p>Some of the key tenants to a proper disaster recovery protocol is secondary location, offsite storage, or any other type of physical separation of the recovery environment. This acts as a hedge to a physical disaster in the private cloud region. This multi-locality is a primary tenant of any cloud hosting but in the home lab scenario is mostly not feasible. A public cloud offering can be a cheap disaster recovery option for the home lab. Having encrypted backups of configuration and servers paired with separately located media backups of sensitive data can be combined to form a DR strategy for the home lab.</p>

<p>Not everything will be cheaply hosted in a public cloud for DR purposes. If the project is a media server or data lab, then the storage fees on any media not hosted within the lab may prove to be too costly. The DR scenario that the cloud can help with, on a home lab budget, is one where the underlying data is small enough to make running costs too high.</p>

<h3 id="core-infrastructure">Core Infrastructure</h3>

<p>The recovery strategy used in my personal lab starts with core infrastructure. First, the physical hosts are configured for virtualization and then a mix of VMs and containers are deployed to start:</p>

<ul>
  <li>Certificate Authority (with root certs being loaded from backup physical media)</li>
  <li>apt-mirror &amp; docker-registry</li>
  <li>DNS</li>
  <li>LDAP</li>
  <li>Data Systems</li>
  <li>Web Servers</li>
</ul>

<p>By using cloud offerings for some core infrastructure, both costs and restart time are minimized. For each of the following, an option could be:</p>

<ul>
  <li>CA - Let’s Encrypt</li>
  <li>apt-mirror &amp; docker-registry - use public free apt repos and docker hub</li>
  <li>DNS - use the name servers provided by the registrar</li>
  <li>LDAP - use Azure Active Directory where it can replace LDAP (don’t write me an essay about how AAD is not LDAP! I know its not but for something like an internal website or gitlab it can make a suitable replacement.)</li>
</ul>

<h3 id="paassaas">PAAS/SAAS</h3>

<p>Some services in the public cloud can easily out scale a home lab configured version for a lower cost point (even over the long run). Also, some offerings in the public cloud can make the completion of specific portions of the home lab project much faster. If you are building a machine learning setup, utilizing the dynamic compute capabilities of something like <a href="https://azure.microsoft.com/en-us/services/machine-learning/">Azure Machine Learning</a> to host notebooks or add compute power for the models will have a drastically lower price point than configuring the same in a home lab setup.</p>

<p>Another example could be adding a text messaging feature for two factor authentication. Adding in a <a href="https://www.twilio.com/messaging">twilio </a>messaging account will be much lower than trying to add an entire phone. Similarly, using Office 365 or Zoho mail could be cheaper than any self hosted alternative. Moreover, the free tiers offered by Github are so fully featured now that self hosting is purely for the hobby and not for any feature benefit.</p>]]></content><author><name>Jared Rhodes</name></author><category term="cloud-architecture" /><category term="homelab" /><category term="home-lab" /><category term="cloud-architecture" /><category term="machine-learning" /><category term="ai" /><category term="vpn" /><category term="azure" /><category term="docker" /><summary type="html"><![CDATA[J]]></summary><media:thumbnail xmlns:media="http://search.yahoo.com/mrss/" url="https://jaredrhodes.com/assets/media/2021/08/63375-adobestock_152867553.jpeg" /><media:content medium="image" url="https://jaredrhodes.com/assets/media/2021/08/63375-adobestock_152867553.jpeg" xmlns:media="http://search.yahoo.com/mrss/" /></entry><entry><title type="html">Home Lab - a lie I tell myself</title><link href="https://jaredrhodes.com/blog/home-lab-a-lie-i-tell-myself/" rel="alternate" type="text/html" title="Home Lab - a lie I tell myself" /><published>2021-08-09T06:30:00+00:00</published><updated>2021-08-09T06:30:00+00:00</updated><id>https://jaredrhodes.com/blog/home-lab-a-lie-i-tell-myself</id><content type="html" xml:base="https://jaredrhodes.com/blog/home-lab-a-lie-i-tell-myself/"><![CDATA[<p>Since March of 2020 I’ve been working on building out a homelab. Something about being inside a little more drove me to want to work with the computers at home. Normally that free time would be spent at community events or with presentations. Something had to fill the void and a homelab was it.</p>

<p>At first, the goal was simple; learn about different server technologies and edge computing by building a “data center” in a closet. The “data center” part of it is where most at home sysadmins fall into a bottomless pit of self-hosted technologies and I am no different. First it is a home media server, then a dashboard, then a database, then a data system, then a clustered set of systems, then there is suddenly a need for documentation for a lab you built yourself as it becomes too much to handle at once.</p>

<p>This will, hopefully, be the first of many posts about home labs that is written from personal and professional experience. Throughout the series there should be a showcase of how to use home labs for:</p>

<ul>
  <li>Home Media</li>
  <li>Automation</li>
  <li>Edge Computing</li>
  <li>Archiving</li>
  <li>Game Servers</li>
  <li>Development Servers</li>
  <li>Access and Control</li>
  <li>Dynamic Public Cloud Integration</li>
  <li>Redundancy and Disaster Recovery</li>
  <li>and… more</li>
</ul>

<p>The first and foremost discussion to have is price control. Enterprise server contracts can start at seven figures. If this is what you are looking for, then this is not the blog you seek. What this blog will focus on is how to keep a relatively low budget. Lets see how far we can make the homelab budget go!</p>

<p>At this point, you may be wondering why the title is “Home Lab - a lie I tell myself”. When this journey started, this was a 1-2 tower server adventure. Over time this has exploded, both in scope and in price. At this point, the name “homelab” no longer describes the system I’ve built. Not just in size but also due to the fact that it is no longer at my home. Hopefully, this series can serve as both enablement and deterrent to an ever expanding homelab.</p>

<p>Some helpful resources I used when I got started:</p>

<ul>
  <li><a href="https://www.reddit.com/r/homelab/">https://www.reddit.com/r/homelab/</a></li>
  <li><a href="https://www.reddit.com/r/homelabsales">https://www.reddit.com/r/homelabsales</a></li>
  <li><a href="https://github.com/awesome-foss/awesome-sysadmin#awesome-sysadmin">https://github.com/awesome-foss/awesome-sysadmin</a></li>
  <li><a href="https://www.ebay.com/">https://www.ebay.com/</a></li>
  <li><a href="https://wiki.debian.org/">https://wiki.debian.org/</a></li>
  <li><a href="https://www.truenas.com/docs/">https://www.truenas.com/docs/</a></li>
  <li><a href="https://docs.ansible.com/">https://docs.ansible.com/</a></li>
</ul>]]></content><author><name>Jared Rhodes</name></author><category term="home-lab" /><category term="debian" /><category term="homelab" /><category term="kvm" /><category term="linux" /><category term="containers" /><category term="docker" /><category term="home-lab" /><category term="infrastructure" /><summary type="html"><![CDATA[J]]></summary><media:thumbnail xmlns:media="http://search.yahoo.com/mrss/" url="https://jaredrhodes.com/assets/media/2021/08/844a7-1kimwgjulrzzonpjgfh1sta.png" /><media:content medium="image" url="https://jaredrhodes.com/assets/media/2021/08/844a7-1kimwgjulrzzonpjgfh1sta.png" xmlns:media="http://search.yahoo.com/mrss/" /></entry><entry><title type="html">Error: mkisofs not found in $PATH</title><link href="https://jaredrhodes.com/blog/error-mkisofs-not-found-in-path/" rel="alternate" type="text/html" title="Error: mkisofs not found in $PATH" /><published>2021-08-08T08:56:31+00:00</published><updated>2021-08-08T08:56:31+00:00</updated><id>https://jaredrhodes.com/blog/error-mkisofs-not-found-in-path</id><content type="html" xml:base="https://jaredrhodes.com/blog/error-mkisofs-not-found-in-path/"><![CDATA[<p>Using the<a href="https://registry.terraform.io/providers/dmacvicar/libvirt/latest"> KVM terraform provider</a>, I ran into the following error - Error: mkisofs not found in $PATH. After hours of trying to install it on a Debian based server, the realization that the executable was missing from the <strong>CLIENT</strong> and not the <strong>SERVER</strong> dawned on me.</p>

<p>If this error is currently blocking progress, be sure to INSTALL MKISOFS ON THE CLIENT and don’t worry about the server!</p>]]></content><author><name>Jared Rhodes</name></author><category term="home-lab" /><category term="infrastructure" /><category term="kvm" /><category term="terraform" /><category term="home-lab" /><category term="homelab" /><category term="self-hosted" /><summary type="html"><![CDATA[J]]></summary></entry><entry><title type="html">TrueNAS Azure Sync for Proxmox</title><link href="https://jaredrhodes.com/blog/truenas-azure-sync-for-proxmox/" rel="alternate" type="text/html" title="TrueNAS Azure Sync for Proxmox" /><published>2021-06-21T18:21:00+00:00</published><updated>2021-06-21T18:21:00+00:00</updated><id>https://jaredrhodes.com/blog/truenas-azure-sync-for-proxmox</id><content type="html" xml:base="https://jaredrhodes.com/blog/truenas-azure-sync-for-proxmox/"><![CDATA[<p>Previously, we discuss TrueNAS NFS for Proxmox. Now that Proxmox is using TrueNAS for storage, a Cloud Sync Task can be used to copy the TrueNAS NFS to Azure Blob Storage as a backup. The following steps are required:</p>

<ul>
  <li>Create Azure Blob Storage Account</li>
  <li>Create TrueNAS Cloud Credentials</li>
  <li>Create Cloud Sync Tasks</li>
</ul>

<h3 id="create-azure-blob-storage-account">Create Azure Blob Storage Account</h3>

<h4 id="create-a-storage-account">Create a storage account</h4>

<p>Every storage account must belong to an Azure resource group. A resource group is a logical container for grouping your Azure services. When you create a storage account, you have the option to either create a new resource group, or use an existing resource group. This article shows how to create a new resource group.</p>

<p>A <strong>general-purpose v2</strong> storage account provides access to all of the Azure Storage services: blobs, files, queues, tables, and disks. The steps outlined here create a general-purpose v2 storage account, but the steps to create any type of storage account are similar. For more information about types of storage accounts and other storage account settings, see <a href="https://docs.microsoft.com/en-us/azure/storage/common/storage-account-overview">Azure storage account overview</a>.</p>

<h4 id="portal">Portal</h4>

<p>To create a general-purpose v2 storage account in the Azure portal, follow these steps:</p>

<ol>
  <li>On the Azure portal menu, select <strong>All services</strong>. In the list of resources, type <strong>Storage Accounts</strong>. As you begin typing, the list filters based on your input. Select <strong>Storage Accounts</strong>.</li>
  <li>On the <strong>Storage Accounts</strong> window that appears, choose <strong>Add</strong>.</li>
  <li>On the <strong>Basics</strong> tab, select the subscription in which to create the storage account.</li>
  <li>Under the <strong>Resource group</strong> field, select your desired resource group, or create a new resource group. For more information on Azure resource groups, see <a href="https://docs.microsoft.com/en-us/azure/azure-resource-manager/management/overview">Azure Resource Manager overview</a>.</li>
  <li>Next, enter a name for your storage account. The name you choose must be unique across Azure. The name also must be between 3 and 24 characters in length, and may include only numbers and lowercase letters.</li>
  <li>Select a location for your storage account, or use the default location.</li>
  <li>Select a performance tier. The default tier is <em>Standard</em>.</li>
  <li>Set the <strong>Account kind</strong> field to <em>Storage V2 (general-purpose v2)</em>.</li>
  <li>Specify how the storage account will be replicated. The default replication option is <em>Read-access geo-redundant storage (RA-GRS)</em>. For more information about available replication options, see <a href="https://docs.microsoft.com/en-us/azure/storage/common/storage-redundancy">Azure Storage redundancy</a>.</li>
  <li>Additional options are available on the <strong>Networking</strong>, <strong>Data protection</strong>, <strong>Advanced</strong>, and <strong>Tags</strong> tabs. To use Azure Data Lake Storage, choose the <strong>Advanced</strong> tab, and then set <strong>Hierarchical namespace</strong> to <strong>Enabled</strong>. For more information, see <a href="https://docs.microsoft.com/en-us/azure/storage/blobs/data-lake-storage-introduction">Azure Data Lake Storage Gen2 Introduction</a></li>
  <li>Select <strong>Review + Create</strong> to review your storage account settings and create the account.</li>
  <li>Select <strong>Create</strong>.</li>
</ol>

<p>The following image shows the settings on the <strong>Basics</strong> tab for a new storage account:</p>

<p><img src="https://docs.microsoft.com/en-us/azure/includes/media/storage-create-account-portal-include/account-create-portal.png" alt="Screenshot showing how to create a storage account in the Azure portal" /></p>

<h4 id="create-a-container">Create a container</h4>

<p>To create a container in the Azure portal, follow these steps:</p>

<ol>
  <li>Navigate to your new storage account in the Azure portal.</li>
  <li>In the left menu for the storage account, scroll to the <strong>Blob service</strong> section, then select <strong>Containers</strong>.</li>
  <li>Select the <strong>+ Container</strong> button.</li>
  <li>Type a name for your new container. The container name must be lowercase, must start with a letter or number, and can include only letters, numbers, and the dash (-) character. For more information about container and blob names, see <a href="https://docs.microsoft.com/en-us/rest/api/storageservices/naming-and-referencing-containers--blobs--and-metadata">Naming and referencing containers, blobs, and metadata</a>.</li>
  <li>Set the level of public access to the container. The default level is <strong>Private (no anonymous access)</strong>.</li>
  <li>Select <strong>OK</strong> to create the container.<img src="https://docs.microsoft.com/en-us/azure/storage/blobs/media/storage-quickstart-blobs-portal/create-container.png" alt="Screenshot showing how to create a container in the Azure portal" /></li>
</ol>

<h3 id="create-truenas-cloud-credentials">Create TrueNAS Cloud Credentials</h3>

<p>To begin integrating TrueNAS with a Cloud Storage provider, register the account credentials on the system. After saving any credentials, a <a href="https://www.truenas.com/docs/core/tasks/cloudsynctasks/">Cloud Sync Task</a> allows sending or receiving data from that Cloud Storage Provider.</p>

<h4 id="saving-a-cloud-storage-credential">Saving a Cloud Storage Credential<a href="https://www.truenas.com/docs/core/system/cloudcredentials/#saving-a-cloud-storage-credential"></a></h4>

<p>Transferring data from TrueNAS to the Cloud requires saving Cloud Storage Provider credentials on the system.</p>

<p>It is recommended to have another browser tab open and logged in to the Cloud Storage Provider account you intend to link with TrueNAS. Some providers require additional information that is generated on the storage provider account page. For example, saving an Amazon S3 credential on TrueNAS could require logging in to the S3 account and generating an access key pair on the <em>Security Credentials &gt; Access Keys</em> page.</p>

<p>To save cloud storage provider credentials, go to <strong>System &gt; Cloud Credentials</strong> and click <em>Add</em>.</p>

<p><img src="/assets/media/2021/04/48a7e-image.png" alt="" /></p>

<p>Using the Azure Portal we can retrieve our access keys.</p>

<p><img src="/assets/media/2021/04/6f02d-image-1.png" alt="" /></p>

<h3 id="create-cloud-sync-tasks">Create Cloud Sync Tasks</h3>

<p>TrueNAS can send, receive, or synchronize data with a Cloud Storage provider. Cloud Sync tasks allow for single time transfers or recurring transfers on a schedule, and are an effective method to back up data to a remote location.</p>

<p>Go to <strong>Tasks &gt; Cloud Sync Tasks</strong> and click <em>Add</em>.</p>

<p><img src="https://www.truenas.com/docs/images/CORE/12.0/TasksCloudSyncAdd.png" alt="TasksCloudSyncAdd" title="Creating a Cloud Sync Task" /></p>

<p>Give the task a memorable <em>Description</em> and select an existing cloud <em>Credential</em>. TrueNAS connects to the chosen Cloud Storage Provider and shows the available storage locations. Decide if data is transferring to (<em>PUSH</em>) or from (<em>PULL</em>) the Cloud Storage location (<strong>Remote</strong>). Choose a <em>Transfer Mode</em>:</p>

<p>Next, <strong>Control</strong> when the task runs by defining a <em>Schedule</em>. When a specific <em>Schedule</em> is required, choose <em>Custom</em> and use the <strong>Advanced Scheduler</strong>.Advanced Scheduler<em>expand</em></p>

<p>Unsetting <em>Enable</em> makes the configuration available without allowing the <em>Schedule</em> to run the task. To manually activate a saved task, go to <strong>Tasks &gt; Cloud Sync Tasks</strong>, click to expand a task, and click <em>RUN NOW</em>.</p>

<p>The remaining options allow tuning the task to your specific requirements.Specific Options<em>expand</em></p>

<p><strong>Transfer</strong></p>

<table>
  <thead>
    <tr>
      <th>Name</th>
      <th>Description</th>
    </tr>
  </thead>
  <tbody>
    <tr>
      <td>Description</td>
      <td>Enter a description of the Cloud Sync Task.</td>
    </tr>
    <tr>
      <td>Direction</td>
      <td>PUSH sends data to cloud storage. PULL receives data from cloud storage. Changing the direction resets the Transfer Mode to COPY.</td>
    </tr>
    <tr>
      <td>Transfer Mode</td>
      <td>SYNC: Files on the destination are changed to match those on the source. If a file does not exist on the source, it is also deleted from the destination. COPY: Files from the source are copied to the destination. If files with the same names are present on the destination, they are overwritten. MOVE: After files are copied from the source to the destination, they are deleted from the source. Files with the same names on the destination are overwritten.</td>
    </tr>
    <tr>
      <td>Directory/Files</td>
      <td>Select the directories or files to be sent to the cloud for Push syncs, or the destination to be written for Pull syncs. Be cautious about the destination of Pull jobs to avoid overwriting existing files.</td>
    </tr>
  </tbody>
</table>

<p><strong>Remote</strong></p>

<table>
  <thead>
    <tr>
      <th>Name</th>
      <th>Description</th>
    </tr>
  </thead>
  <tbody>
    <tr>
      <td>Credential</td>
      <td>Select the cloud storage provider credentials from the list of available Cloud Credentials.</td>
    </tr>
  </tbody>
</table>

<p><strong>Control</strong></p>

<table>
  <thead>
    <tr>
      <th>Name</th>
      <th>Description</th>
    </tr>
  </thead>
  <tbody>
    <tr>
      <td>Schedule</td>
      <td>Select a schedule preset or choose Custom to open the advanced scheduler.</td>
    </tr>
    <tr>
      <td>Enabled</td>
      <td>Enable this Cloud Sync Task. Unset to disable this Cloud Sync Task without deleting it.</td>
    </tr>
  </tbody>
</table>

<p><strong>Advanced Options</strong></p>

<table>
  <thead>
    <tr>
      <th>Name</th>
      <th>Description</th>
    </tr>
  </thead>
  <tbody>
    <tr>
      <td>Follow Symlinks</td>
      <td>Follow symlinks and copy the items to which they link.</td>
    </tr>
    <tr>
      <td>Pre-Script</td>
      <td>Script to execute before running sync.</td>
    </tr>
    <tr>
      <td>Post-Script</td>
      <td>Script to execute after running sync.</td>
    </tr>
    <tr>
      <td>Exclude</td>
      <td>List of files and directories to exclude from sync. Separate entries by pressing Enter. See <a href="https://rclone.org/filtering/">rclone filtering</a> for more details about the <code class="language-plaintext highlighter-rouge">--exclude</code> option.</td>
    </tr>
  </tbody>
</table>

<p><strong>Advanced Remote Options</strong></p>

<table>
  <thead>
    <tr>
      <th>Name</th>
      <th>Description</th>
    </tr>
  </thead>
  <tbody>
    <tr>
      <td>Remote Encryption</td>
      <td><em>PUSH</em>: Encrypt files before transfer and store the encrypted files on the remote system. Files are encrypted using the Encryption Password and Encryption Salt values. <em>PULL</em>: Decrypt files that are being stored on the remote system before the transfer. Transferring the encrypted files requires entering the same Encryption Password and Encryption Salt that was used to encrypt the files. Additional details about the encryption algorithm and key derivation are available in the <a href="https://rclone.org/crypt/#file-formats">rclone crypt File formats documentation</a>.</td>
    </tr>
    <tr>
      <td>Transfers</td>
      <td>Number of simultaneous file transfers. Enter a number based on the available bandwidth and destination system performance. See <a href="https://rclone.org/docs/#transfers-n">rclone -transfers</a>.</td>
    </tr>
    <tr>
      <td>Bandwidth limit</td>
      <td>A single bandwidth limit or bandwidth limit schedule in rclone format. Separate entries by pressing Enter. Example: <code class="language-plaintext highlighter-rouge">08:00,512 12:00,10MB 13:00,512 18:00,30MB 23:00,off</code>. Units can be specified with the beginning letter: b, k (default), M, or G. See <a href="https://rclone.org/docs/#bwlimit-bandwidth-spec">rclone -bwlimit</a>.</td>
    </tr>
  </tbody>
</table>

<h3 id="scripting-and-environment-variables">Scripting and Environment Variables</h3>

<p>Advanced users can write scripts that run immediately <em>before</em> or <em>after</em> the Cloud Sync task. The <strong>Post-script</strong> field is only run when the Cloud Sync task successfully completes. You can pass a variety of task environment variables into the <strong>Pre-</strong> and <strong>Post-</strong> script fields:</p>

<ul>
  <li>CLOUD_SYNC_ID</li>
  <li>CLOUD_SYNC_DESCRIPTION</li>
  <li>CLOUD_SYNC_DIRECTION</li>
  <li>CLOUD_SYNC_TRANSFER_MODE</li>
  <li>CLOUD_SYNC_ENCRYPTION</li>
  <li>CLOUD_SYNC_FILENAME_ENCRYPTION</li>
  <li>CLOUD_SYNC_ENCRYPTION_PASSWORD</li>
  <li>CLOUD_SYNC_ENCRYPTION_SALT</li>
  <li>CLOUD_SYNC_SNAPSHOT</li>
</ul>

<p>There also are provider-specific variables like CLOUD_SYNC_CLIENT_ID or CLOUD_SYNC_TOKEN or CLOUD_SYNC_CHUNK_SIZE</p>

<p>Remote storage settings:</p>

<ul>
  <li>CLOUD_SYNC_BUCKET</li>
  <li>CLOUD_SYNC_FOLDER</li>
</ul>

<p>Local storage settings:</p>

<ul>
  <li>CLOUD_SYNC_PATH</li>
</ul>

<h3 id="testing-settings">Testing Settings<a href="https://www.truenas.com/docs/core/tasks/cloudsynctasks/#testing-settings"></a></h3>

<p>Test the settings before saving by clicking <em>DRY RUN</em>. TrueNAS connects to the Cloud Storage Provider and simulates a file transfer. No data is actually sent or received. A dialog shows the test status and allows downloading the task logs.</p>

<p><img src="https://www.truenas.com/docs/images/CORE/12.0/TasksCloudsyncAddGoogledriveDryrun.png" alt="TasksCloudsyncAddGoogledriveDryrun" title="Example: Google Drive Test" /></p>

<h2 id="cloud-sync-behavior">Cloud Sync Behavior<a href="https://www.truenas.com/docs/core/tasks/cloudsynctasks/#cloud-sync-behavior"></a></h2>

<p>Saved tasks are activated according to their schedule or by clicking <strong>RUN NOW</strong>. An in-progress cloud sync must finish before another can begin. Stopping an in-progress task cancels the file transfer and requires starting the file transfer over.</p>

<p>To view logs about a running or the most recent run of a task, click the task status.</p>

<h2 id="cloud-sync-restore">Cloud Sync Restore<a href="https://www.truenas.com/docs/core/tasks/cloudsynctasks/#cloud-sync-restore"></a></h2>

<p>To quickly create a new Cloud Sync that uses the same options but reverses the data transfer, expand () an existing Cloud Sync and click <em>RESTORE</em>.</p>

<p><img src="https://www.truenas.com/docs/images/CORE/12.0/TasksCloudSyncRestore.png" alt="TasksCloudSyncRestore" title="Cloud Sync Restore" /></p>

<p>Enter a new <em>Description</em> for this reversed task and define the path to a storage location for the transferred data.</p>

<p>The restored cloud sync is saved as another entry in <strong>Tasks &gt; Cloud Sync Tasks</strong>.</p>]]></content><author><name>Jared Rhodes</name></author><category term="cloud-architecture" /><category term="azure" /><category term="azure-blob-storage" /><category term="proxmox" /><category term="truenas" /><category term="home-lab" /><category term="ai" /><category term="homelab" /><category term="infrastructure" /><summary type="html"><![CDATA[J]]></summary><media:thumbnail xmlns:media="http://search.yahoo.com/mrss/" url="https://jaredrhodes.com/assets/media/2021/04/a209f-573-5731000_proxmox-proxmox-logo-hd-png-download.png" /><media:content medium="image" url="https://jaredrhodes.com/assets/media/2021/04/a209f-573-5731000_proxmox-proxmox-logo-hd-png-download.png" xmlns:media="http://search.yahoo.com/mrss/" /></entry><entry><title type="html">TrueNAS NFS for Proxmox</title><link href="https://jaredrhodes.com/blog/truenas-nfs-for-proxmox/" rel="alternate" type="text/html" title="TrueNAS NFS for Proxmox" /><published>2021-06-07T08:40:00+00:00</published><updated>2021-06-07T08:40:00+00:00</updated><id>https://jaredrhodes.com/blog/truenas-nfs-for-proxmox</id><content type="html" xml:base="https://jaredrhodes.com/blog/truenas-nfs-for-proxmox/"><![CDATA[<p>While setting the server closet at the office, the first thing setup was a TrueNAS Core server. If you are looking for a guide on installing TrueNAS core, a good one can be found <a href="https://www.ixsystems.com/blog/how-to-install-truenas-core/">here</a>. With it already in place, it can be used to create an NFS share.</p>

<p>One of the major benefits of NFS is being able to easily migrate a container from one environment to another. By using the NFS, the container or VM is pulled over the network which allows any host to host ad hoc. Migrating VMs or containers takes seconds.</p>

<h2 id="truenas-nfs-support">TrueNAS NFS support</h2>

<p>Creating a Network File System (NFS) share on TrueNAS gives the benefit of making lots of data easily available for anyone with share access. Depending how the share is configured, users accessing the share can be restricted to read or write privileges.To create a new share, make sure a dataset is available with all the data for sharing.</p>

<h3 id="creating-an-nfs-share">Creating an NFS Share<a href="https://www.truenas.com/docs/core/sharing/nfs/nfsshare/#creating-an-nfs-share"></a></h3>

<p>Go to <strong>Sharing &gt; Unix Shares (NFS)</strong> and click <em>ADD</em>.</p>

<p><img src="https://www.truenas.com/docs/images/CORE/12.0/SharingNFSAdd.png" alt="Services NFS Add" title="Services NFS Add" /></p>

<p>Use the file browser to select the dataset to be shared. An optional <em>Description</em> can be entered to help identify the share. Clicking <em>SUBMIT</em> creates the share. At the time of creation, you can select <em>ENABLE SERVICE</em> for the service to start and to automatically start after any reboots. If you wish to create the share but not immediately enable it, select <em>CANCEL</em>.</p>

<p><img src="https://www.truenas.com/docs/images/CORE/12.0/SharingNFSAddServiceEnable.png" alt="Services NFS Add Service Enable" title="Services NFS Add Service Enable" /></p>

<p><img src="https://www.truenas.com/docs/images/CORE/12.0/SharingNFSAddServiceEnableSuccess.png" alt="Services NFS Service Enable Success" title="Services NFS Add Service Enable Success" /></p>

<h4 id="nfs-share-settings">NFS Share Settings<a href="https://www.truenas.com/docs/core/sharing/nfs/nfsshare/#nfs-share-settings"></a></h4>

<table>
  <thead>
    <tr>
      <th>Setting</th>
      <th>Value</th>
      <th>Description</th>
      <th> </th>
    </tr>
  </thead>
  <tbody>
    <tr>
      <td>Path</td>
      <td>file browser</td>
      <td>Type or browse to the full path to the pool or dataset to share. Click <strong>ADD</strong> to configure multiple paths.</td>
      <td> </td>
    </tr>
    <tr>
      <td>Description</td>
      <td>string</td>
      <td>Enter any notes or reminders about the share.</td>
      <td> </td>
    </tr>
    <tr>
      <td>All dirs</td>
      <td>checkbox</td>
      <td>Set to allow the client to mount any subdirectory within the <strong>Path</strong>. Leaving disabled only allows clients to mount the <strong>Path</strong> endpoint.</td>
      <td> </td>
    </tr>
    <tr>
      <td>Quiet</td>
      <td>checkbox</td>
      <td>Enabling inhibits some syslog diagnostics to avoid error messages. See <a href="https://www.freebsd.org/cgi/man.cgi?query=exports">exports(5)</a> for examples. Disabling allows all syslog diagnostics, which can lead to additional cosmetic error messages.</td>
      <td> </td>
    </tr>
    <tr>
      <td>Enabled</td>
      <td>checkbox</td>
      <td>Enable this NFS share. Unset to disable this NFS share without deleting the configuration.</td>
      <td> </td>
    </tr>
  </tbody>
</table>

<p>To edit an existing NFS share, go to <strong>Sharing &gt; Unix Shares (NFS)</strong> and click <em>more_vert</em> <strong>&gt; Edit</strong>. The options available are identical to the share creation options.</p>

<h3 id="configure-the-nfs-service">Configure the NFS Service<a href="https://www.truenas.com/docs/core/sharing/nfs/nfsshare/#configure-the-nfs-service"></a></h3>

<p>To begin sharing the data, go to <strong>Services</strong> and click the <em>NFS</em> toggle. If you want NFS sharing to activate immediately after TrueNAS boots, set <em>Start Automatically</em>.</p>

<p>NFS service settings can be configured by clicking (Configure).</p>

<p><img src="https://www.truenas.com/docs/images/CORE/12.0/ServicesNFSOptions.png" alt="Services NFS Options" title="Services NFS Options" /></p>

<table>
  <thead>
    <tr>
      <th>Setting</th>
      <th>Value</th>
      <th>Description</th>
    </tr>
  </thead>
  <tbody>
    <tr>
      <td>Number of servers</td>
      <td>integer</td>
      <td>Specify how many servers to create. Increase if NFS client responses are slow. Keep this less than or equal to the number of CPUs reported by <code class="language-plaintext highlighter-rouge">sysctl -n kern.smp.cpus</code> to limit CPU context switching.</td>
    </tr>
    <tr>
      <td>Bind IP Addresses</td>
      <td>drop down</td>
      <td>Select IP addresses to listen to for NFS requests. Leave empty for NFS to listen to all available addresses.</td>
    </tr>
    <tr>
      <td>Enable NFSv4</td>
      <td>checkbox</td>
      <td>Set to switch from NFSv3 to NFSv4.</td>
    </tr>
    <tr>
      <td>NFSv3 ownership model for NFSv4</td>
      <td>checkbox</td>
      <td>Set when NFSv4 ACL support is needed without requiring the client and the server to sync users and groups.</td>
    </tr>
    <tr>
      <td>Require Kerberos for NFSv4</td>
      <td>checkbox</td>
      <td>Set to force NFS shares to fail if the Kerberos ticket is unavailable.</td>
    </tr>
    <tr>
      <td>Serve UDP NFS clients</td>
      <td>checkbox</td>
      <td>Set if NFS clients need to use the User Datagram Protocol (UDP).</td>
    </tr>
    <tr>
      <td>Allow non-root mount</td>
      <td>checkbox</td>
      <td>Set only if required by the NFS client. Set to allow serving non-root mount requests.</td>
    </tr>
    <tr>
      <td>Support &gt;16 groups</td>
      <td>checkbox</td>
      <td>Set when a user is a member of more than 16 groups. This assumes group membership is configured correctly on the NFS server.</td>
    </tr>
    <tr>
      <td>Log mountd(8) requests</td>
      <td>checkbox</td>
      <td>Set to log <a href="https://www.freebsd.org/cgi/man.cgi?query=mountd">mountd</a> syslog requests.</td>
    </tr>
    <tr>
      <td>Log rpc.statd(8) and rpc.lockd(8)</td>
      <td>checkbox</td>
      <td>Set to log <a href="https://www.freebsd.org/cgi/man.cgi?query=rpc.statd">rpc.statd</a> and <a href="https://www.freebsd.org/cgi/man.cgi?query=rpc.lockd">rpc.lockd</a> syslog requests.</td>
    </tr>
    <tr>
      <td>mountd(8) bind port</td>
      <td>integer</td>
      <td>Enter a number to bind <a href="https://www.freebsd.org/cgi/man.cgi?query=mountd">mountd</a> only to that port.</td>
    </tr>
    <tr>
      <td>rpc.statd(8) bind port</td>
      <td>integer</td>
      <td>Enter a number to bind <a href="https://www.freebsd.org/cgi/man.cgi?query=rpc.statd">rpc.statd</a> only to that port.</td>
    </tr>
    <tr>
      <td>rpc.lockd(8) bind port</td>
      <td>integer</td>
      <td>Enter a number to bind <a href="https://www.freebsd.org/cgi/man.cgi?query=rpc.lockd">rpc.lockd</a> only to that port.</td>
    </tr>
  </tbody>
</table>

<p>Unless a specific setting is needed, it is recommended to use the default settings for the NFS service. When TrueNAS is already connected to <a href="https://www.truenas.com/docs/core/directoryservices/activedirectory/">Active Directory</a>, setting <em>NFSv4</em> and <em>Require Kerberos for NFSv4</em> also requires a <a href="https://www.truenas.com/docs/core/directoryservices/kerberos/#kerberos-keytabs">Kerberos Keytab</a>.</p>

<h2 id="proxmox-nfs-storage-pool">Proxmox NFS storage pool</h2>

<p>The NFS backend is based on the directory backend, so it shares most properties. The directory layout and the file naming conventions are the same. The main advantage is that you can directly configure the NFS server properties, so the backend can mount the share automatically. There is no need to modify /etc/fstab. The backend can also test if the server is online, and provides a method to query the server for exported shares.</p>

<table>
  <tbody>
    <tr>
      <td>![How to add NFS Storage on Proxmox VE</td>
      <td>LinuxHelp Tutorials](https://assets.linuxhelp.com/scr/4e41f4401a23836d8c1122490c315bfc.png)</td>
    </tr>
  </tbody>
</table>

<p>The backend supports all common storage properties, except the shared flag, which is always set. Additionally, the following properties are used to configure the NFS server:</p>

<p><strong>server</strong> - Server IP or DNS name. To avoid DNS lookup delays, it is usually preferable to use an IP address instead of a DNS name - unless you have a very reliable DNS server, or list the server in the local /etc/hosts file.</p>

<p><strong>export</strong> - NFS export path (as listed by pvesm nfsscan). You can also set NFS mount options:</p>

<p><strong>path</strong> - The local mount point (defaults to /mnt/pve/&lt;STORAGE_ID&gt;/).</p>

<p><strong>options</strong> - NFS mount options (see man nfs).</p>

<p><img src="https://www.howtoforge.com/images/how-to-configure-nfs-storage-in-proxmox-ve/big/3.png" alt="How to setup an NFS Server and configure NFS Storage in Proxmox VE" /></p>]]></content><author><name>Jared Rhodes</name></author><category term="home-lab" /><category term="containers" /><category term="lxc" /><category term="proxmox" /><category term="truenas" /><category term="home-lab" /><category term="ai" /><category term="homelab" /><category term="infrastructure" /><summary type="html"><![CDATA[J]]></summary><media:thumbnail xmlns:media="http://search.yahoo.com/mrss/" url="https://jaredrhodes.com/assets/media/2021/04/a209f-573-5731000_proxmox-proxmox-logo-hd-png-download.png" /><media:content medium="image" url="https://jaredrhodes.com/assets/media/2021/04/a209f-573-5731000_proxmox-proxmox-logo-hd-png-download.png" xmlns:media="http://search.yahoo.com/mrss/" /></entry><entry><title type="html">PostgreSQL Historical Log by Table</title><link href="https://jaredrhodes.com/blog/postgresql-historical-log-by-table/" rel="alternate" type="text/html" title="PostgreSQL Historical Log by Table" /><published>2020-06-22T19:47:43+00:00</published><updated>2020-06-22T19:47:43+00:00</updated><id>https://jaredrhodes.com/blog/postgresql-historical-log-by-table</id><content type="html" xml:base="https://jaredrhodes.com/blog/postgresql-historical-log-by-table/"><![CDATA[<p>In my current project, there is a need for tracking data changes in the PostgreSQL tables. The end goal is, if a row changes, we copy the previous row before the change transaction completes and write it to a logging table. We will accomplish this with in the following steps:</p>

<ul>
  <li>Creating a table LIKE our table that needs logging</li>
  <li>Create a function for our table</li>
  <li>Apply that function as a trigger</li>
</ul>

<h2 id="table-like">Table Like</h2>

<p>First we need an example table to get started with. For a simple example, lets use a basic address table.</p>

<p>https://gist.github.com/QiMata/ad12fbbf5736fb582249694ac9627757</p>

<p>This basic table has enough constraints to make a decent example. We need to create a copy of this table, one where the columns are the same name and type, but without all of the constraints. Luckily for us, PostgreSQL provides a feature for just a situation. For this, we want to use the like_option for the CREATE TABLE statement. According the latest documentation (<a href="https://www.postgresql.org/docs/12/index.html">PostgreSQL 12</a>) at the time of writing this post:</p>

<p>The <code class="language-plaintext highlighter-rouge">LIKE</code> clause specifies a table from which the new table automatically copies all column names, their data types, and their not-null constraints.</p>

<p>Unlike <code class="language-plaintext highlighter-rouge">INHERITS</code>, the new table and original table are completely decoupled after creation is complete. Changes to the original table will not be applied to the new table, and it is not possible to include data of the new table in scans of the original table.</p>

<p>Also unlike <code class="language-plaintext highlighter-rouge">INHERITS</code>, columns and constraints copied by <code class="language-plaintext highlighter-rouge">LIKE</code> are not merged with similarly named columns and constraints. If the same name is specified explicitly or in another <code class="language-plaintext highlighter-rouge">LIKE</code> clause, an error is signaled.</p>

<p>The optional <em><code class="language-plaintext highlighter-rouge">like_option</code></em> clauses specify which additional properties of the original table to copy. Specifying <code class="language-plaintext highlighter-rouge">INCLUDING</code> copies the property, specifying <code class="language-plaintext highlighter-rouge">EXCLUDING</code> omits the property. <code class="language-plaintext highlighter-rouge">EXCLUDING</code> is the default. If multiple specifications are made for the same kind of object, the last one is used.</p>

<p>We will want to exclude all constraints so that when our trigger fires, it can write any data to the columns without worrying if those columns are valid. The resulting table definition looks like the following:</p>

<p>https://gist.github.com/QiMata/32546c1d481fa8f3c04f5976614e1e9d</p>

<h2 id="logging-function">Logging Function</h2>

<p>Next, there needs to be a trigger that logs the data. To create a new trigger in PostgreSQL, you follow these steps:</p>

<ul>
  <li>
    <ul>
      <li>First, create a trigger function using <code class="language-plaintext highlighter-rouge">&lt;a href="https://www.postgresqltutorial.com/postgresql-create-function/"&gt;CREATE FUNCTION&lt;/a&gt;</code> statement.
        <ul>
          <li>Second, bind the trigger function to a table by using <code class="language-plaintext highlighter-rouge">CREATE TRIGGER</code> statement.</li>
        </ul>
      </li>
    </ul>
  </li>
</ul>

<p>A trigger function is similar to an ordinary function. However, a trigger function does not take any argument and has a return value with the type of <code class="language-plaintext highlighter-rouge">trigger</code>. Inside this trigger function, insert the old data into the logging table. This makes the trigger function as follows:</p>

<p>https://gist.github.com/QiMata/45d698713e5f703af246e8eef7c16f1a</p>

<p>TG_OP is Data type text; a string of INSERT, UPDATE, DELETE, or TRUNCATE telling for which operation the trigger was fired.</p>

<h2 id="implementing-the-trigger">Implementing the Trigger</h2>

<p>As we said earlier, Second, bind the trigger function to a table by using <code class="language-plaintext highlighter-rouge">CREATE TRIGGER</code> statement. This part is fairly easy.</p>

<p>https://gist.github.com/QiMata/7f7ea3929029bd815821bdcddf444182</p>

<p>Now, whenever you insert, update, or delete a record in the address table, the operation is logged in the logging address table.</p>]]></content><author><name>Jared Rhodes</name></author><category term="ai-ml" /><category term="postgresql" /><category term="ai-ml" /><category term="ai" /><category term="machine-learning" /><category term="data" /><summary type="html"><![CDATA[J]]></summary><media:thumbnail xmlns:media="http://search.yahoo.com/mrss/" url="https://jaredrhodes.com/assets/media/2020/06/21651-1200px-postgresql_elephant.svg_.png" /><media:content medium="image" url="https://jaredrhodes.com/assets/media/2020/06/21651-1200px-postgresql_elephant.svg_.png" xmlns:media="http://search.yahoo.com/mrss/" /></entry><entry><title type="html">Using Cognitive Services: Custom Vision Service with Azure IoT Edge</title><link href="https://jaredrhodes.com/blog/using-cognitive-services-custom-vision-service-with-azure-iot-edge/" rel="alternate" type="text/html" title="Using Cognitive Services: Custom Vision Service with Azure IoT Edge" /><published>2020-02-25T10:45:21+00:00</published><updated>2020-02-25T10:45:21+00:00</updated><id>https://jaredrhodes.com/blog/using-cognitive-services-custom-vision-service-with-azure-iot-edge</id><content type="html" xml:base="https://jaredrhodes.com/blog/using-cognitive-services-custom-vision-service-with-azure-iot-edge/"><![CDATA[<p>This is a guide on how to use Cognitive Services: Custom Vision Service with Azure IoT Edge without having the Edge module host a web endpoint but instead use the built in Module to Module communication. This post will break down the steps into four major sections:</p>

<ul>
  <li>Creating the Custom Vision Model</li>
  <li>Creating the Edge Module in Python</li>
  <li>Adding the model and custom code for Custom Vision</li>
  <li>Deploy the Module</li>
</ul>

<h2 id="creating-the-custom-vision-model">Creating the Custom Vision Model</h2>

<p>To use the Custom Vision Service for image classification, you must first build a classifier model. In this guide, you’ll learn how to build a classifier through the Custom Vision website.</p>

<h3 id="prerequisites">Prerequisites</h3>

<ul>
  <li>A valid Azure subscription. <a href="https://azure.microsoft.com/free/">Create an account</a> for free.</li>
  <li>A set of images with which to train your classifier. See below for tips on choosing images.</li>
</ul>

<h3 id="create-custom-vision-resources-in-the-azure-portal">Create Custom Vision resources in the Azure portal</h3>

<p>To use Custom Vision Service, you will need to create Custom Vision Training and Prediction resources in the <a href="https://portal.azure.com/?microsoft_azure_marketplace_ItemHideKey=microsoft_azure_cognitiveservices_customvision#create/Microsoft.CognitiveServicesCustomVision">Azure portal</a>. This will create both a Training and Prediction resource.</p>

<h3 id="create-a-new-project">Create a new project</h3>

<p>In your web browser, navigate to the <a href="https://customvision.ai">Custom Vision web page</a> and select <strong>Sign in</strong>. Sign in with the same account you used to sign into the Azure portal.</p>

<p><img src="https://docs.microsoft.com/en-us/azure/cognitive-services/custom-vision-service/media/browser-home.png" alt="Image of the sign-in page" /></p>

<ol>
  <li>To create your first project, select <strong>New Project</strong>. The <strong>Create new project</strong> dialog box will appear.<img src="https://docs.microsoft.com/en-us/azure/cognitive-services/custom-vision-service/media/getting-started-build-a-classifier/new-project.png" alt="The new project dialog box has fields for name, description, and domains." /></li>
  <li>Enter a name and a description for the project. Then select a Resource Group. If your signed-in account is associated with an Azure account, the Resource Group dropdown will display all of your Azure Resource Groups that include a Custom Vision Service Resource.</li>
  <li>Select <strong>Classification</strong> under <strong>Project Types</strong>. Then, under <strong>Classification Types</strong>, choose either <strong>Multilabel</strong> or <strong>Multiclass</strong>, depending on your use case. Multilabel classification applies any number of your tags to an image (zero or more), while multiclass classification sorts images into single categories (every image you submit will be sorted into the most likely tag). You will be able to change the classification type later if you wish.</li>
  <li>
    <p>Next, select one of the available domains. Each domain optimizes the classifier for specific types of images, as described in the following table. You will be able to change the domain later if you wish.
| Domain | Purpose |
 |—|—|
 | <strong>Generic</strong> | Optimized for a broad range of image classification tasks. If none of the other domains are appropriate, or you are unsure of which domain to choose, select the Generic domain. |
 | <strong>Food</strong> | Optimized for photographs of dishes as you would see them on a restaurant menu. If you want to classify photographs of individual fruits or vegetables, use the Food domain. |
 | <strong>Landmarks</strong> | Optimized for recognizable landmarks, both natural and artificial. This domain works best when the landmark is clearly visible in the photograph. This domain works even if the landmark is slightly obstructed by people in front of it. |
 | <strong>Retail</strong> | Optimized for images that are found in a shopping catalog or shopping website. If you want high precision classifying between dresses, pants, and shirts, use this domain. |
 | <strong>Compact domains</strong> | Optimized for the constraints of real-time classification on mobile devices. The models generated by compact domains can be exported to run locally. |</p>
  </li>
  <li>Finally, select <strong>Create project</strong>.</li>
</ol>

<h3 id="choose-training-images">Choose training images</h3>

<p>As a minimum, we recommend you use at least 30 images per tag in the initial training set. You’ll also want to collect a few extra images to test your model once it is trained.</p>

<p>In order to train your model effectively, use images with visual variety. Select images with that vary by:</p>

<ul>
  <li>camera angle</li>
  <li>lighting</li>
  <li>background</li>
  <li>visual style</li>
  <li>individual/grouped subject(s)</li>
  <li>size</li>
  <li>type</li>
</ul>

<p>Additionally, make sure all of your training images meet the following criteria:</p>

<ul>
  <li>.jpg, .png, or .bmp format</li>
  <li>no greater than 6MB in size (4MB for prediction images)</li>
  <li>no less than 256 pixels on the shortest edge; any images shorter than this will be automatically scaled up by the Custom Vision Service</li>
</ul>

<h3 id="upload-and-tag-images">Upload and tag images</h3>

<p>In this section you will upload and manually tag images to help train the classifier.</p>

<ol>
  <li>To add images, click the <strong>Add images</strong> button and then select <strong>Browse local files</strong>. Select <strong>Open</strong> to move to tagging. Your tag selection will be applied to the entire group of images you’ve selected to upload, so it is easier to upload images in separate groups according to their desired tags. You can also change the tags for individual images after they have been uploaded.<img src="https://docs.microsoft.com/en-us/azure/cognitive-services/custom-vision-service/media/getting-started-build-a-classifier/add-images01.png" alt="The add images control is shown in the upper left, and as a button at bottom center." /></li>
  <li>To create a tag, enter text in the <strong>My Tags</strong> field and press Enter. If the tag already exists, it will appear in a dropdown menu. In a multilabel project, you can add more than one tag to your images, but in a multiclass project you can add only one. To finish uploading the images, use the <strong>Upload [number] files</strong> button.<img src="https://docs.microsoft.com/en-us/azure/cognitive-services/custom-vision-service/media/getting-started-build-a-classifier/add-images03.png" alt="Image of the tag and upload page" /></li>
  <li>Select <strong>Done</strong> once the images have been uploaded.<img src="https://docs.microsoft.com/en-us/azure/cognitive-services/custom-vision-service/media/getting-started-build-a-classifier/add-images04.png" alt="The progress bar shows all tasks completed." /></li>
</ol>

<p>To upload another set of images, return to the top of this section and repeat the steps.</p>

<h3 id="train-the-classifier">Train the classifier</h3>

<p>To train the classifier, select the <strong>Train</strong> button. The classifier uses all of the current images to create a model that identifies the visual qualities of each tag.</p>

<p><img src="https://docs.microsoft.com/en-us/azure/cognitive-services/custom-vision-service/media/getting-started-build-a-classifier/train01.png" alt="The train button in the top right of the web page's header toolbar" /></p>

<p>The training process should only take a few minutes. During this time, information about the training process is displayed in the <strong>Performance</strong> tab.</p>

<p><img src="https://docs.microsoft.com/en-us/azure/cognitive-services/custom-vision-service/media/getting-started-build-a-classifier/train02.png" alt="The browser window with a training dialog in the main section" /></p>

<p>Custom Vision Service supports the following exports:</p>

<ul>
  <li><strong>Tensorflow</strong> for <strong>Android</strong>.</li>
  <li><strong>CoreML</strong> for <strong>iOS11</strong>.</li>
  <li><strong>ONNX</strong> for <strong>Windows ML</strong>.</li>
  <li>A Windows or Linux <strong>container</strong>. The container includes a Tensorflow model and service code to use the Custom Vision Service API.</li>
</ul>

<h3 id="convert-to-a-compact-domain">Convert to a compact domain</h3>

<p>To convert the domain of an existing classifier, use the following steps:</p>

<ol>
  <li>From the <a href="https://customvision.ai">Custom vision page</a>, select the <strong>Home</strong> icon to view a list of your projects. You can also use the <a href="https://customvision.ai/projects">https://customvision.ai/projects</a> to see your projects.<img src="https://docs.microsoft.com/en-us/azure/cognitive-services/custom-vision-service/media/export-your-model/projects-list.png" alt="Image of the home icon and projects list" /></li>
  <li>Select a project, and then select the <strong>Gear</strong> icon in the upper right of the page.<img src="https://docs.microsoft.com/en-us/azure/cognitive-services/custom-vision-service/media/export-your-model/gear-icon.png" alt="Image of the gear icon" /></li>
  <li>In the <strong>Domains</strong> section, select a <strong>compact</strong> domain. Select <strong>Save Changes</strong> to save the changes.<img src="https://docs.microsoft.com/en-us/azure/cognitive-services/custom-vision-service/media/export-your-model/domains.png" alt="Image of domains selection" /></li>
  <li>From the top of the page, select <strong>Train</strong> to retrain using the new domain.</li>
</ol>

<h3 id="export-your-model">Export your model</h3>

<p>To export the model after retraining, use the following steps:</p>

<ol>
  <li>
    <p>Go to the <strong>Performance</strong> tab and select <strong>Export</strong>.<img src="https://docs.microsoft.com/en-us/azure/cognitive-services/custom-vision-service/media/export-your-model/export.png" alt="Image of the export icon" />
<em>Tip</em></p>

    <p><em>If the <strong>Export</strong> entry is not available, then the selected iteration does not use a compact domain. Use the <strong>Iterations</strong> section of this page to select an iteration that uses a compact domain, and then select <strong>Export</strong>.</em></p>
  </li>
  <li>
    <p>Select the export format, and then select <strong>Export</strong> to download the model.</p>
  </li>
</ol>

<h2 id="creating-the-edge-module-in-python">Creating the Edge Module in Python</h2>

<p>You can use Azure IoT Edge modules to deploy code that implements your business logic directly to your IoT Edge devices. This tutorial walks you through creating an IoT Edge module that will be edited to use the Custom Vision model exported. In this tutorial, you learn how to:</p>

<ul>
  <li>Use Visual Studio Code to create an IoT Edge Python module.</li>
  <li>Use Visual Studio Code and Docker to create a Docker image and publish it to your registry.</li>
</ul>

<p>If you don’t have an <a href="https://docs.microsoft.com/en-us/azure/guides/developer/azure-developer-guide#understanding-accounts-subscriptions-and-billing">Azure subscription</a>, create a <a href="https://azure.microsoft.com/free/?ref=microsoft.com&amp;utm_source=microsoft.com&amp;utm_medium=docs&amp;utm_campaign=visualstudio">free account</a> before you begin.</p>

<h3 id="prerequisites-1">Prerequisites</h3>

<p>Before beginning this tutorial, you should have gone through the previous tutorial to set up your development environment for Linux container development: <a href="https://docs.microsoft.com/en-us/azure/iot-edge/tutorial-develop-for-linux">Develop IoT Edge modules for Linux devices</a>. By completing either of those tutorials, you should have the following prerequisites in place:</p>

<ul>
  <li>A free or standard-tier <a href="https://docs.microsoft.com/en-us/azure/iot-hub/iot-hub-create-through-portal">IoT Hub</a> in Azure.</li>
  <li>A <a href="https://docs.microsoft.com/en-us/azure/iot-edge/quickstart-linux">Linux device running Azure IoT Edge</a></li>
  <li>A container registry, like <a href="https://docs.microsoft.com/azure/container-registry/">Azure Container Registry</a>.</li>
  <li><a href="https://code.visualstudio.com/">Visual Studio Code</a> configured with the <a href="https://marketplace.visualstudio.com/items?itemName=vsciot-vscode.azure-iot-tools">Azure IoT Tools</a>.</li>
  <li><a href="https://docs.docker.com/install/">Docker CE</a> configured to run Linux containers.</li>
</ul>

<p>To develop an IoT Edge module in Python, install the following additional prerequisites on your development machine:</p>

<ul>
  <li><a href="https://marketplace.visualstudio.com/items?itemName=ms-python.python">Python extension</a> for Visual Studio Code.</li>
  <li><a href="https://www.python.org/downloads/">Python</a>.</li>
  <li><a href="https://pip.pypa.io/en/stable/installing/#installation">Pip</a> for installing Python packages (typically included with your Python installation).</li>
</ul>

<h3 id="create-a-module-project">Create a module project</h3>

<p>The following steps create an IoT Edge Python module by using Visual Studio Code and the Azure IoT Tools.</p>

<h4 id="create-a-new-project-1">Create a new project</h4>

<p>Use the Python package <strong>cookiecutter</strong> to create a Python solution template that you can build on top of.</p>

<ol>
  <li>In Visual Studio Code, select <strong>View</strong> &gt; <strong>Terminal</strong> to open the VS Code integrated terminal.</li>
  <li>In the terminal, enter the following command to install (or update) <strong>cookiecutter</strong>, which you use to create the IoT Edge solution template: <code class="language-plaintext highlighter-rouge">
 pip install --upgrade --user cookiecutter
</code></li>
  <li>Select <strong>View</strong> &gt; <strong>Command Palette</strong> to open the VS Code command palette.</li>
  <li>In the command palette, enter and run the command <strong>Azure: Sign in</strong> and follow the instructions to sign in your Azure account. If you’re already signed in, you can skip this step.</li>
</ol>

<p>In the command palette, enter and run the command <strong>Azure IoT Edge: New IoT Edge solution</strong>. Follow the prompts and provide the following information to create your solution:</p>

<table>
  <thead>
    <tr>
      <th>Field</th>
      <th>Value</th>
    </tr>
  </thead>
  <tbody>
    <tr>
      <td>Select folder</td>
      <td>Choose the location on your development machine for VS Code to create the solution files.</td>
    </tr>
    <tr>
      <td>Provide a solution name</td>
      <td>Enter a descriptive name for your solution or accept the default <strong>EdgeSolution</strong>.</td>
    </tr>
    <tr>
      <td>Select module template</td>
      <td>Choose <strong>Python Module</strong>.</td>
    </tr>
    <tr>
      <td>Provide a module name</td>
      <td>Name your module <strong>PythonModule</strong>.</td>
    </tr>
    <tr>
      <td>Provide Docker image repository for the module</td>
      <td>An image repository includes the name of your container registry and the name of your container image. Your container image is prepopulated from the name you provided in the last step. Replace <strong>localhost:5000</strong> with the login server value from your Azure container registry. You can retrieve the login server from the Overview page of your container registry in the Azure portal. The final image repository looks like &lt;registry name&gt;.azurecr.io/pythonmodule.</td>
    </tr>
  </tbody>
</table>

<p><img src="https://docs.microsoft.com/en-us/azure/iot-edge/media/tutorial-python-module/repository.png" alt="Provide Docker image repository" /></p>

<h4 id="add-your-registry-credentials">Add your registry credentials</h4>

<p>The environment file stores the credentials for your container repository and shares them with the IoT Edge runtime. The runtime needs these credentials to pull your private images onto the IoT Edge device.</p>

<ol>
  <li>In the VS Code explorer, open the <strong>.env</strong> file.</li>
  <li>Update the fields with the <strong>username</strong> and <strong>password</strong> values that you copied from your Azure container registry.</li>
  <li>Save the .env file.</li>
</ol>

<h4 id="select-your-target-architecture">Select your target architecture</h4>

<p>Currently, Visual Studio Code can develop C modules for Linux AMD64 and Linux ARM32v7 devices. You need to select which architecture you’re targeting with each solution, because the container is built and run differently for each architecture type. The default is Linux AMD64.</p>

<ol>
  <li>Open the command palette and search for <strong>Azure IoT Edge: Set Default Target Platform for Edge Solution</strong>, or select the shortcut icon in the side bar at the bottom of the window.</li>
  <li>In the command palette, select the target architecture from the list of options. For this tutorial, we’re using an Ubuntu virtual machine as the IoT Edge device, so will keep the default <strong>amd64</strong>.</li>
</ol>

<h2 id="adding-the-model-and-custom-code-for-custom-vision">Adding the model and custom code for Custom Vision</h2>

<h2 id="deploy-the-module">Deploy the Module</h2>

<h3 id="build-and-push-your-module">Build and push your module</h3>

<p>In the previous section, you created an IoT Edge solution and added code to the PythonModule that will filter out messages where the reported machine temperature is within the acceptable limits. Now you need to build the solution as a container image and push it to your container registry.</p>

<ol>
  <li>Open the VS Code integrated terminal by selecting <strong>View</strong> &gt; <strong>Terminal</strong>.</li>
  <li>Sign in to Docker by entering the following command in the terminal. Sign in with the username, password, and login server from your Azure container registry. You can retrieve these values from the <strong>Access keys</strong> section of your registry in the Azure portal. ```
    <div class="language-plaintext highlighter-rouge"><div class="highlight"><pre class="highlight"><code> docker login -u &lt;ACR username&gt; -p &lt;ACR password&gt; &lt;ACR login server&gt;

 ```You may receive a security warning recommending the use of ```
 --password-stdin
 ```. While that best practice is recommended for production scenarios, it's outside the scope of this tutorial. For more information, see the &lt;a href="https://docs.docker.com/engine/reference/commandline/login/#provide-a-password-using-stdin"&gt;docker login&lt;/a&gt; reference. In the VS Code explorer, right-click the &lt;strong&gt;deployment.template.json&lt;/strong&gt; file and select &lt;strong&gt;Build and Push IoT Edge solution&lt;/strong&gt;.
</code></pre></div>    </div>

    <p>The build and push command starts three operations. First, it creates a new folder in the solution called <strong>config</strong> that holds the full deployment manifest, built out of information in the deployment template and other solution files. Second, it runs <code class="language-plaintext highlighter-rouge">docker build</code> to build the container image based on the appropriate dockerfile for your target architecture. Then, it runs <code class="language-plaintext highlighter-rouge">docker push</code> to push the image repository to your container registry.</p>
  </li>
</ol>

<h3 id="deploy-modules-to-device">Deploy modules to device</h3>

<p>Use the Visual Studio Code explorer and the Azure IoT Tools extension to deploy the module project to your IoT Edge device. You already have a deployment manifest prepared for your scenario, the <strong>deployment.json</strong> file in the config folder. All you need to do now is select a device to receive the deployment.</p>

<p>Make sure that your IoT Edge device is up and running.</p>

<ol>
  <li>In the Visual Studio Code explorer, expand the <strong>Azure IoT Hub Devices</strong> section to see your list of IoT devices.</li>
  <li>Right-click the name of your IoT Edge device, then select <strong>Create Deployment for Single Device</strong>.</li>
  <li>Select the <strong>deployment.json</strong> file in the <strong>config</strong> folder and then click <strong>Select Edge Deployment Manifest</strong>. Do not use the deployment.template.json file.</li>
  <li>Click the refresh button. You should see the new <strong>PythonModule</strong> running along with the <strong>TempSensor</strong> module and the <strong>$edgeAgent</strong> and <strong>$edgeHub</strong>.</li>
</ol>]]></content><author><name>Jared Rhodes</name></author><category term="iot-edge" /><category term="azure-iot-edge" /><category term="azure" /><category term="cognitive-services" /><category term="custom-vision-service" /><category term="edge" /><category term="iot-edge" /><category term="iot" /><category term="ai" /><summary type="html"><![CDATA[J]]></summary><media:thumbnail xmlns:media="http://search.yahoo.com/mrss/" url="https://jaredrhodes.com/assets/media/2018/08/f7620-iot-edge.png" /><media:content medium="image" url="https://jaredrhodes.com/assets/media/2018/08/f7620-iot-edge.png" xmlns:media="http://search.yahoo.com/mrss/" /></entry></feed>