# New Blog Site
https://jaredrhodes.com/blog/first-blog-post/
I decided to move my blog to a hosted provider and actually pay for it. This makes it so much easier. The content will still be focused around Cloud, Mobile, and IoT.
---
# CodeMash 2018
https://jaredrhodes.com/blog/codemash-2018/
_Archived: originally published October 2017; details may be out of date._
At [CodeMash](http://www.codemash.org/), I will be presenting [Configure, Control, and Manage IoT with Mobile](http://jaredrhodescom.wordpress.com/configure-control-and-manage-iot-with-mobile/). This presentation is to showcase how to create a [Xamarin Forms](https://www.xamarin.com/forms) application to interact with the different protocols allowed with mobile. Also in this presentation we will look at the different, easy to create, house hold devices that can be made by the viewer. If you would like to purchase tickets, check it out [here](http://www.codemash.org/buytickets/).
---
# Big IoT week in Atlanta
https://jaredrhodes.com/blog/big-iot-week-in-atlanta/
This coming week there are a few IoT events in Atlanta:
Monday November 6th, the [Atlanta IoT](https://www.meetup.com/atlantaiot) group will be meeting at 7:00 pm to discuss [Turning software into computer chips](https://www.meetup.com/atlantaiot/events/243921473/).
Tuesday November 7th, Kristin Ottofy and Microsoft will be hosting a [Cloud IoT Hack](http://meet.meetup.com/wf/click?upn=dFUbVO7Oo1alrP-2FP1Sl98YAXnsjWmdhx10KmLyoSuaRdq0Z-2BdLS5nnzNdxL44a7AWJwMV4BDpTSdsEOsKiD4DfZ-2BqplDthio3wfM7Xq-2F0YCsLDtSQmPfzg0HDbtY0kFTe4vaMROOiSTvjkLvqSDivVGBX4vnM65T-2BNucUSlzo-2FnNs-2FO6osIki-2Bnw3-2BLOToMB0-2FQTgfW9ua8hRuftnHvSV8lVpJj-2B8nI6TQXthNKDSxW9Bxcl46H80lrKKlRxizmEH8hjxfBUOEHG7mCA1l7-2FNYSXIHDLkAmzzle3zKrxU-2BbHhDQUns-2BWszyWlF7oKwTO5Bh-2Fn2Gk5SM1Rtvr36qd5bmhiVK6tx3JeHm0-2Bgwcn-2F7lJCnuQ7A5LuzgisaUaYYKnsHqNPu7zXcc5OG3Uii3xmpytLz0setFNVPDo2Ssa7X31OPJA0WmGHZMAiBJdn7zzHAJg-2BStIwkuETO-2F-2FuhTtxG6tBSM9PzinnXbaNvDoeX7CmfNcAjB9X8lZLN6ttnxIi-2FIsPl7HwE3SA0W6j9RaZxDCdDnm0pa-2FyqYn1C4V7A-3D_WWv1n2mptWsL1FjInYb9No7kTtGPhRXA3MTUc77jLF-2BBweywr58QG1JDMNJaHJaJ57FSSWwiktMuiNWtyJDLLj1WK6h5HEDFUvbIZsWIrbcX9UN2eDYf9neT9iOsxh2TmKqpt7m9Z4zQvd7qNq2P1CmWtfbpEj4kfhQ7juT8D8TkYOT-2FpuEZhXLlUb5Ms6OFK65VAi7E-2FSiwqt3zINVNI4WVbqfAAocMa5y6mueK-2BcA-3D) at the [Tabernacle](http://www.tabernacleatl.com).
Wednesday November 8th, [Georgia Tech](http://www.gatech.edu) will be hosting the [Internet of Things for Manufacturing Workshop](http://ws17.iotfm.org).
Thursday November 9th, IoT.ATL will be having a Workgroup meeting.
---
# Mentoring at HackGT's Health Hackathon
https://jaredrhodes.com/blog/mentoring-at-hackgts-health-hackathon/
_Archived: originally published November 2017; details may be out of date._
This Friday and Saturday I will be mentoring at [HackGT's Health Hackathon](https://www.facebook.com/events/120532098661195/). I've been looking to put together a larger medical focused hackathon in the Atlanta area. If you or anyone you know would be interested in helping organize an event that focuses on advancing technology that allows for because access to medicine contact me.
---
# Spoke at Health Hack GT
https://jaredrhodes.com/blog/spoke-at-health-hack-gt/
I recently spoke on Virtual Reality and IoT at the Georgia Tech Health Hackathon. Here is the video, the audio didn't turn out to great: [watch it on YouTube](https://www.youtube.com/watch?v=QmxPRkh0A58).
---
# Your app is currently in read-only mode because you have published a generated function.json
https://jaredrhodes.com/blog/your-app-is-currently-in-read-only-mode-because-you-have-published-a-generated-function-json/
If you published your Azure function from Visual Studio and are seeing the message:
> Your app is currently in read-only mode because you have published a generated function.json
Then do the following steps:
From the functions page click Platform Features.
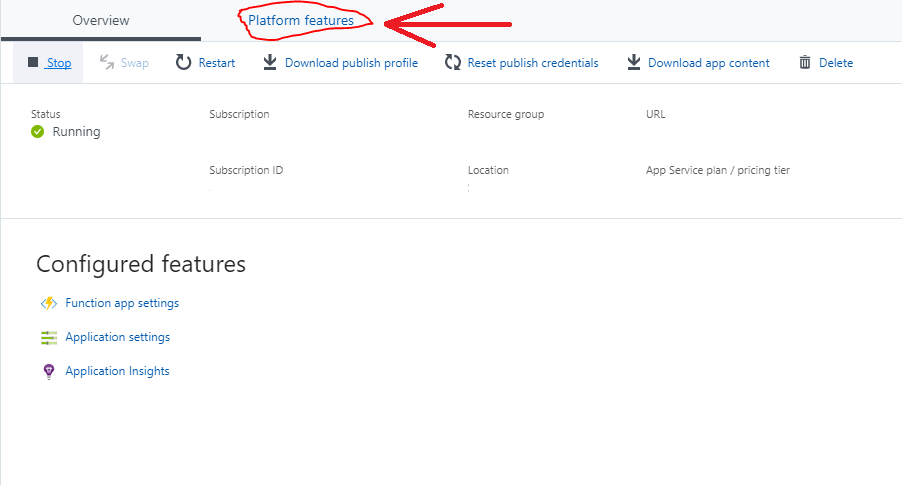{: width="902" height="485" loading="lazy" }
After you go to the platform features page, click on App Service Editor
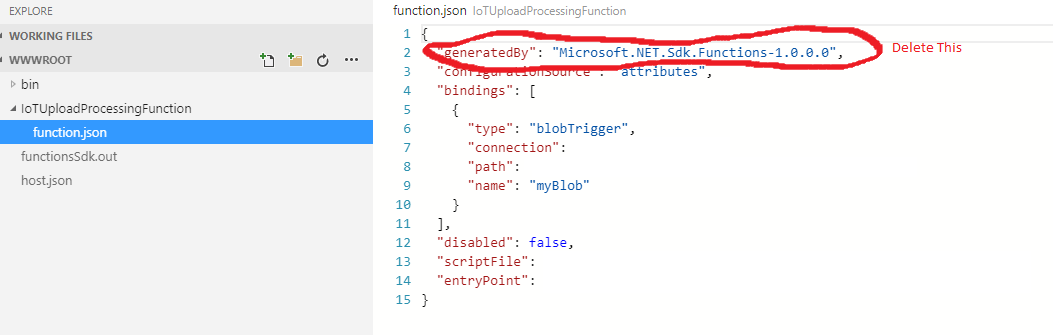
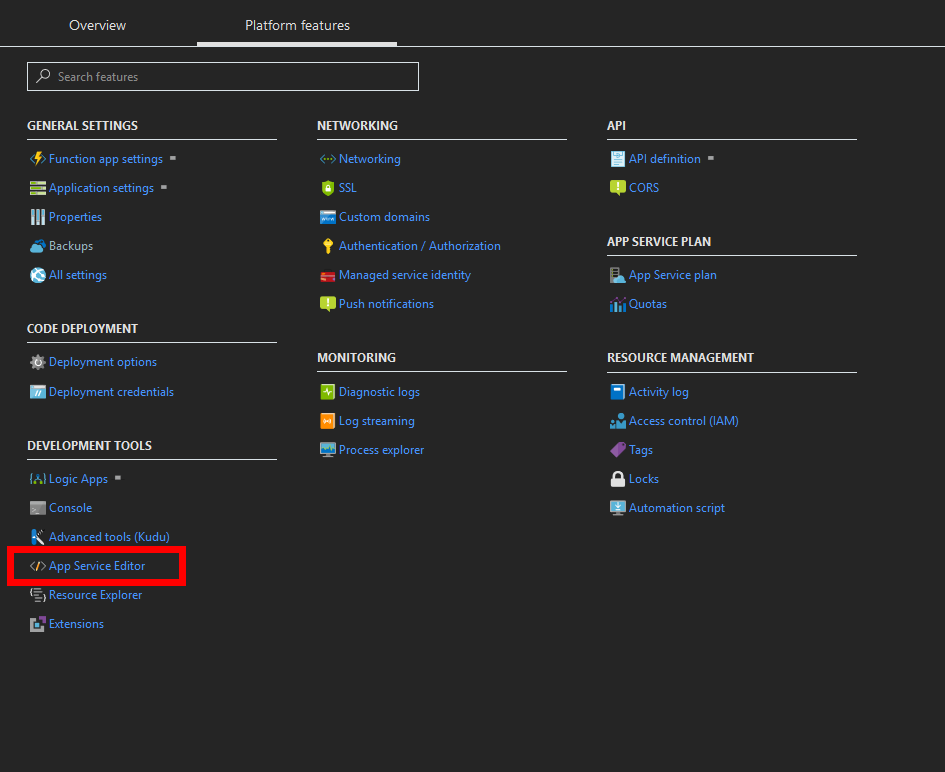{: width="945" height="772" loading="lazy" }After that, find your function in the list of functions. In the image below the function name is "IoTUploadProcessingFunction". Expand the files underneath it and select the **function.json** file. **Delete** the line **"generatedBy": "Microsoft.NET.Sdk.Functions-1.0.0.0".**
{: width="1053" height="335" loading="lazy" }
After that your function should be running. If not go back to the functions screen in Azure and start it.
---
# Create Azure Function to process IoT Hub file upload
https://jaredrhodes.com/blog/create-azure-function-to-process-iot-hub-file-upload/
On the Wren Solutions project, there was need to sync a large data set from a device and merge data from it into an existing data set in [Microsoft Azure](https://azure.microsoft.com/en-us/). To accomplish this we decided to use the following workflow:
- Upload the file using [Azure IoT Hub](https://azure.microsoft.com/en-us/services/iot-hub/)
- Trigger a function on the [Azure Blob](https://azure.microsoft.com/en-us/services/storage/blobs/) creation
# Upload the file using Azure IoT Hub
If you haven't, first you have to [create an Azure IoT Hub](https://docs.microsoft.com/en-us/azure/iot-hub/iot-hub-csharp-csharp-getstarted#create-an-iot-hub).
### Associate an Azure Storage account to IoT Hub
When you associate an [Azure Storage](https://docs.microsoft.com/en-us/azure/storage/common/storage-create-storage-account#create-a-storage-account) account with an IoT hub, the IoT hub generates a SAS URI. A device can use this SAS URI to securely upload a file to a blob container. The IoT Hub service and the device SDKs coordinate the process that generates the SAS URI and makes it available to a device to use to upload a file.
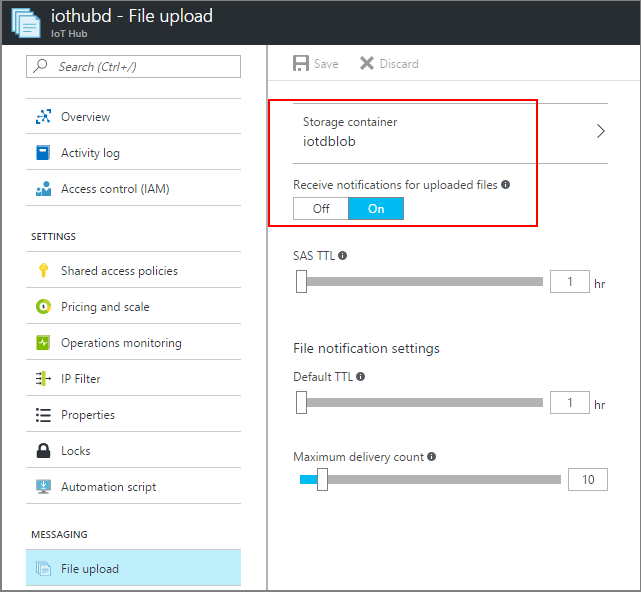
Make sure that a blob container is associated with your IoT hub and that file notifications are enabled.
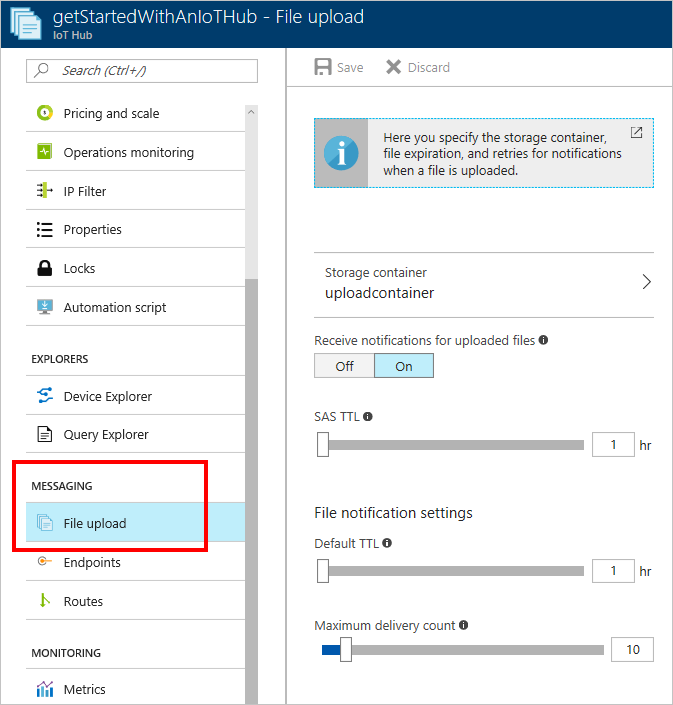
To use the [file upload functionality in IoT Hub](https://docs.microsoft.com/en-us/azure/iot-hub/iot-hub-devguide-file-upload), you must first associate an Azure Storage account with your hub. Select **File upload** to display a list of file upload properties for the IoT hub that is being modified.
{: width="673" height="705" loading="lazy" }
**Storage container**: Use the Azure portal to select a blob container in an Azure Storage account in your current Azure subscription to associate with your IoT Hub. If necessary, you can create an Azure Storage account on the **Storage accounts** blade and blob container on the **Containers**blade. IoT Hub automatically generates SAS URIs with write permissions to this blob container for devices to use when they upload files.
{: width="641" height="592" loading="lazy" }
### Use Azure IoT SDK to upload blob
Use the [Azure IoT Hub C# SDK](https://github.com/Azure/azure-iot-sdk-csharp) to upload the file. Below is a [Gist of a code sample showing how to upload](https://gist.github.com/QiMata/940a00a94038cdd557e64f3b91767e6d) using the SDK. The code showcases how to utilize **UploadToBlobAsync** method on the Device Client. To use the sample replace the *DeviceConnectionString* and the *FilePath* variable.
https://gist.github.com/QiMata/940a00a94038cdd557e64f3b91767e6d
# Trigger a function on the Azure Blob creation
A Blob storage trigger starts an [Azure Function](https://azure.microsoft.com/en-us/services/functions/) when a new or updated blob is detected. The blob contents are provided as input to the function. Setup the blob trigger to use the container we linked to the Azure IoT Hub previously. First lets configure and manage your function apps in the Azure portal.
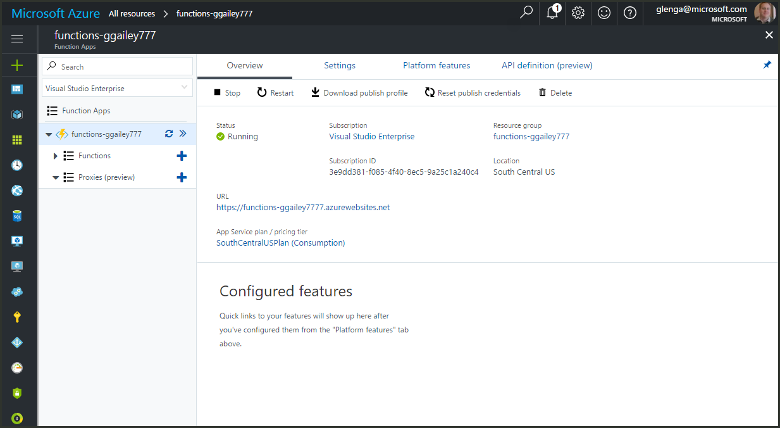
To begin, go to the [Azure portal](http://portal.azure.com/) and sign in to your Azure account. In the search bar at the top of the portal, type the name of your function app and select it from the list. After selecting your function app, you see the following page:
{: width="780" height="428" loading="lazy" }
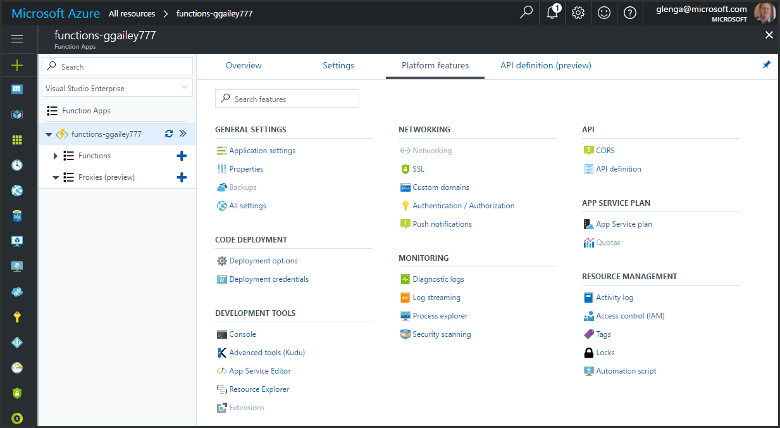
Go to the Platform Features tab by clicking the tab of the same name.
{: width="780" height="428" loading="lazy" }
Function apps run in, and are maintained, by the Azure App Service platform. As such, your function apps have access to most of the features of Azure's core web hosting platform. The **Platform features** tab is where you access the many features of the App Service platform that you can use in your function apps.
{: width="586" height="800" loading="lazy" }
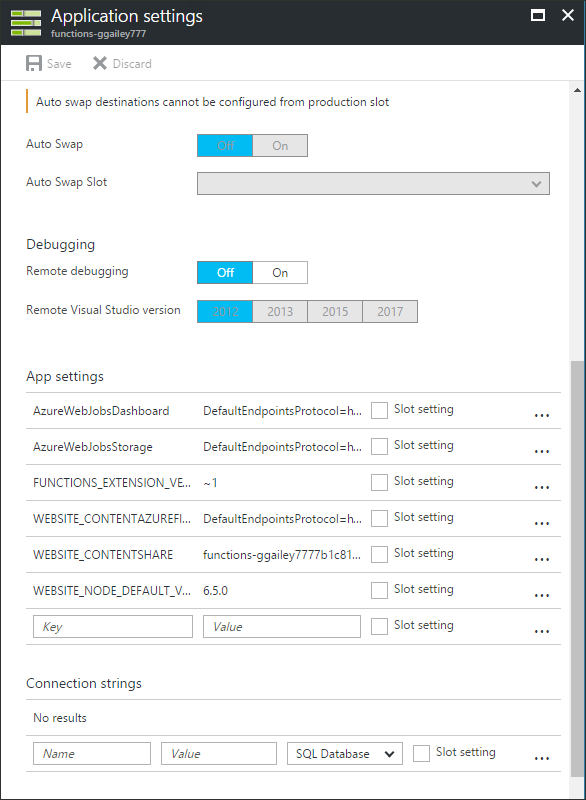
Add a [connection string from the blob storage account](https://www.connectionstrings.com/windows-azure/) as an app setting. For the sack of this demo lets name it MyStorageAccountAppSetting. Reference that in your JSON for you Blob Trigger. Then use that blob name as a reference to that blob in your function.
https://gist.github.com/QiMata/cc9c58a85826ff8bf35f1cb525ced04b
---
# Creating a Common Loading Page for Xamarin Forms
https://jaredrhodes.com/blog/creating-a-common-loading-page-for-xamarin-forms/
A common pitfall I see in [Xamarin Forms](https://www.xamarin.com/forms) is adding a Loading page icon for every page. This is one of the problems that plagued the current Home Control Flex application. Instead of having a loading icon on each page you can create a base page that has a loading screen on each. You can do this using the [**ContentPropertyAttribute**](https://developer.xamarin.com/api/type/Xamarin.Forms.ContentPropertyAttribute/) on your base page as shown below.
https://gist.github.com/QiMata/1a1e55afb91ebdfaf8280dd3b7179136
---
# Unable to load DLL 'e_sqlite3' dotnet core Raspian
https://jaredrhodes.com/blog/unable-to-load-dll-e-sqlite3-dotnet-core-raspian/
If you get the error message "Unable to load DLL 'e\_sqlite3' dotnet core Raspian", that means that the libe\_sqlite3.so was not loaded to the runtime directory. There is a copy of the libe\_sqlite.so library [here](https://github.com/ericsink/SQLitePCL.raw). Copy the library to the directory of the dotnet application and it should be picked up the next time the application is launched.
---
# Creating an ASP.NET Core application for Raspberry Pi
https://jaredrhodes.com/blog/creating-an-asp-net-core-application-for-raspberry-pi/
As a part of the Wren Hyperion solution, an [ASP.NET Core](https://docs.microsoft.com/en-us/aspnet/core/) application will run on an ARM based Linux OS (we are building a POC for the [Raspberry Pi](http://raspberrypi.org/) and [Raspian](http://raspbian.org)). Here are the steps on how you can get started with ASP.NET Core on Raspian:
- [Setup a Raspberry Pi with Raspian](#setup-a-raspberry-pi-with-raspian)
- Install .NET Core
- Create your ASP.NET Core solution
- Publish to the Raspberry Pi
- Install .NET Core to the Raspberry Pi
- Run your application on the Raspberry Pi
## Setup a Raspberry Pi with Raspian
Follow the [guides on the Raspberry Pi website](https://www.raspberrypi.org/documentation/installation/installing-images/) to install Raspian on your Pi.
## Install .NET Core
This post targets the .NET Core 2.x era. For current SDK installation steps on Windows, Linux, or ARM devices, follow the official guide: [Install .NET SDK, .NET runtime, and tools](https://learn.microsoft.com/en-us/dotnet/core/install/).
## Create your ASP.NET Core Solution
1. Create a new .NET Core project.
On macOS and Linux, open a terminal window. On Windows, open a command prompt.
```
dotnet new razor -o aspnetcoreapp
```
2. Run the app.Use the following commands to run the app:
```
cd aspnetcoreapp
dotnet run
```
3. Browse to [http://localhost:5000](http://localhost:5000/)
4. Open *Pages/About.cshtml* and modify the page to display the message "Hello, world! The time on the server is @DateTime.Now ":
```
@page
@model AboutModel
@{
ViewData["Title"] = "About";
}
@ViewData["Title"]
@Model.Message
Hello, world! The time on the server is @DateTime.Now
```
5. Browse to and verify the changes.
## Publish to the Raspberry Pi
On macOS and Linux, open a terminal window. On Windows, open a command prompt and run:
`dotnet clean .`, `dotnet restore .`, and `dotnet build .`
This will rebuild the solution. Once that is complete run the following command:
`dotnet publish . -r linux-arm`
This will generate all the files needed for running the solution on the Raspberry Pi. After this command completes generating the needed files, the files need to be deployed to the Pi. Run the following command in Powershell from the publish folder:
`& pscp.exe -r .\bin\Debug\netcoreapp2.0\linux-arm\publish\* ${username}@${ip}:${destination}`
Where username is the username for the Pi (default "pi"), ip is the ip address of the Pi, and destination is the folder the files will be published to.
## Install .NET Core to the Raspberry Pi
This section is sourced from [Dave the Engineer's post on the Microsoft blog website](https://blogs.msdn.microsoft.com/david/2017/07/20/setting_up_raspian_and_dotnet_core_2_0_on_a_raspberry_pi/).
The following commands need to be run on the Raspberry Pi whilst connected over an SSH session or via a terminal in the PIXEL desktop environment.
- Run **sudo apt-get install curl libunwind8 gettext**. This will use the apt-get package manager to install three prerequiste packages.
- Run **curl -sSL -o dotnet.tar.gz https://dotnetcli.blob.core.windows.net/dotnet/Runtime/release/2.0.0/dotnet-runtime-latest-linux-arm.tar.gz** to download the latest .NET Core Runtime for ARM32. *This is refereed to as **armhf** on the [Daily Builds](https://github.com/dotnet/core-setup#daily-builds) page.*
- Run **sudo mkdir -p /opt/dotnet && sudo tar zxf dotnet.tar.gz -C /opt/dotnet** to create a destination folder and extract the downloaded package into it.
- Run **sudo ln -s /opt/dotnet/dotnet /usr/local/bin** to set up a symbolic link...a shortcut to you Windows folks to the **dotnet** executable.
- Test the installation by typing **dotnet -help**.
- Try to create a new .NET Core project by typing **dotnet new console**. Note this will prompt you to install the .NET Core SDK however this link won't work for Raspian on ARM32. This is expected behaviour.
## Run your application on the Raspberry Pi
Finally to run your application on the Raspberry Pi, navigate to the folder where the application was published and run the following command:
`dotnet run`
You can then navigate to the website hosted by the Raspberry Pi by navigating to http://{your IP address here}:5000.
---
# DevNexus 2018
https://jaredrhodes.com/blog/devnexus-2018/
I'm proud to be presenting [Enable IoT with Edge Computing and Machine Learning](http://devnexus.com/presentations/1310) at [DevNexus](http://devnexus.com/presentations/1310) this year. This is one of my newer talks. After doing a bit of work with Microsoft Azure's gateway releases I feel that this logic delivery mechanism is going to become more and more pervasive. As a Microsoft MVP I want to showcase what is coming from an AI and compute perspective.
Being able to run compute cycles on local hardware is a practice predating silicon circuits. Mobile and Web technology has pushed computation away from local hardware and onto remote servers. As prices in the cloud have decreased, more and more of the remote servers have moved there. This technology cycle is coming full circle with pushing the computation that would be done in the cloud down to the client. The catalyst for the cycle completing is latency and cost. Running computations on local hardware softens the load in the cloud and reduces overall cost and architectural complexity.
The difference now is how the computational logic is sent to the device. As of now, we rely on app stores and browsers to deliver the logic the client will use. Delivery mechanisms are evolving into writing code once and having the ability to run that logic in the cloud and push that logic to the client through your application and have that logic run on the device. In this presentation, we will look at how to accomplish this with existing Azure technologies and how to prepare for upcoming technologies to run these workloads.
---
# Azure IoT Edge stuck restarting
https://jaredrhodes.com/blog/azure-iot-edge-stuck-restarting/
## NOTE: This is for the private preview version of Azure IoT Edge
If your Azure IoT Edge runtime is giving the status of:
`IoT Edge Status: RESTARTING ERROR: Runtime is restarting. Please retry later.`
and is not allowing for any of the other commands and you have waited an appropriated amount of time, then try the following:
First stop the edgeAgent container in docker:
`sudo docker stop edgeAgent`
Then, run the setup script for the iotedgectl again:
`sudo iotedgectl setup --connection-string "{device connection string}" --auto-cert-gen-force-no-passwords` (make sure to use your parameters)
The edge run-time should restart appropriately.
---
# Xamarin Forms Android crashes after Custom Renderer added
https://jaredrhodes.com/blog/xamarin-forms-android-crashes-after-custom-renderer-added/
If a Custom Renderer is added to a Xamarin Forms Android project and suddenly the application crashes before loading the first screen then do a rebuild or clean of the Android project and re-run.
---
# Azure IoT Edge - exec user process caused "exec format error"
https://jaredrhodes.com/blog/azure-iot-edge-exec-user-process-caused-exec-format-error/
If running Edge on a Raspberry Pi and an Edge container's logs show 'exec user process caused "exec format error"' as an error then most likely you are running a non Raspberry Pi container on the Raspberry Pi. If the docker file used to build the container starts with:
- FROM microsoft/dotnet:2.0.0-runtime
or
- FROM microsoft/dotnet:2.0.0-runtime-nanoserver-1709
then the line above should be changed to one of the following:
- FROM microsoft/dotnet:2.0.5-runtime-stretch-arm32v7
- FROM microsoft/dotnet:2.0-runtime-stretch-arm32v7
- FROM microsoft/dotnet:2.0.5-runtime-deps-stretch-arm32v7
- FROM microsoft/dotnet:2.0-runtime-deps-stretch-arm32v7
---
# DevNet Create
https://jaredrhodes.com/blog/devnet-create/
I'm proud to be presenting [Alternative Device Interfaces and Machine Learning](https://www.devnetcreate.io/2018/pages/agenda/agenda.html) at [DevNet Create](https://www.devnetcreate.io/2018/index.html) this year. With AI becoming more and more ubiquitous, it is important to note the effect on a user's experience. This presentation is meant to show how to create modern applications using machine learning provided by a third party and showcase what some third parties provide.
In this presentation, we will look at the how users interface with machines without the use of touch. These different types of interaction have their benefits and pitfalls. To showcase the power of these user interactions we will explore: Voice commands with mobile applications, Speech Recognition, and Computer Vision. After this presentation, attendees will have the knowledge to create applications that can utilize voice, video, and machine learning.
Users use voice (Alexa, Cortana, Google Now) or video as a mode of interaction with applications. More than a fad, this is a natural interface for users and is becoming more and more common with the ever-decreasing size of hardware.
Different types of interaction have their benefits and pitfalls. To showcase the power of these user interactions we will explore: Voice commands with two app types: UWP and Xamarin Forms (iOS and Android). Speech Recognition with Cognitive Services: Verifying the speaker with Speaker Recognition API. Computer Vision with Cognitive Services: Verifying a user with Face API.
By utilizing UWP, Xamarin, and Cognitive services; a device with the ultimate in customization for user interactions will be created. Come and see how!
---
# Getting started with Elastic Search in Azure
https://jaredrhodes.com/blog/getting-started-with-elastic-search-in-azure/
For the Westworld of Warcraft project, a data store for the host data is required and due to needing to learn Elastic Search for another client, it was chosen. To get started an Elastic Search cluster needed to be deployed in the Azure environment. There is a template in the [Azure Marketplace](https://azure.microsoft.com/marketplace/partners/elastic/elasticsearch/) that makes setup easy.
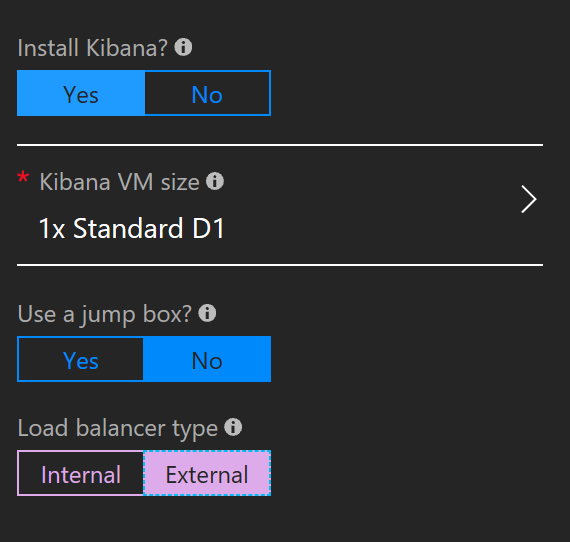
Both [Azure docs](https://docs.microsoft.com/en-us/azure/architecture/elasticsearch/) and [Elastic](https://www.elastic.co/blog/deploying-elasticsearch-on-microsoft-azure) have getting started guides that should be looked over before setting up an enterprise cluster in Azure. For the Westworld of Warcraft project, there only needed to be a public end point for ingest, a public end point for consumption, and a public end point for a jump box. Using the Azure Marketplace template, Kibana was selected as the jump and the load balancer was set to external. The load balancer set to external was specific to this project because the Westworld of Warcraft clients needed a public endpoint to upload to (this changed after a better solution was found).
{: width="570" height="542" loading="lazy" }
Once the cluster successfully deployed, a public IP address is created for the load balancer. That IP address is used by the [Elastic NEST](https://www.elastic.co/guide/en/elasticsearch/client/net-api/current/introduction.html) library in the application. To connect to the external load balancer, use a URI that follows the following format:
{username}:{password}@{external loadbalancer ip}:9200
Now test your configuration with the following code (replacing the URI string with your components):
```
public class Person
{
public int Id { get; set; }
public string FirstName { get; set; }
public string LastName { get; set; }
}
```
```
var settings = new ConnectionSettings
(new Uri("{username}:{password}@{external loadbalancer ip}:9200"))
.DefaultIndex("people");
var client = new ElasticClient(settings);
var person = new Person
{
Id = 1,
FirstName = "Martijn",
LastName = "Laarman"
};
var indexResponse = client.IndexDocument(person);
```
---
# Storing Event Data in Elastic Search
https://jaredrhodes.com/blog/storing-event-data-in-elastic-search/
There was a CPU and network issue when the hosts uploaded data directly from the client to Elastic Search. To allow for the same data load without the elastic overhead running on the client the following architecture was used:
- Hosts use Event Hubs to upload the telemetry data
- Consume Event Hub data with Stream Analytics
- Output Stream Analytics query to Azure Function
- Azure Function to upload output to Elastic Search
# Event Hub
To start, the hosts needed an Event Hub to upload the data. For other projects Azure IoT Hub can be used due to Stream Analytics being able to ingest both. Event Hub was chosen so that each client would not need to provision as a device.
## Create an Event Hubs namespace
1. Log on to the [Azure portal](https://portal.azure.com/), and click **Create a resource** at the top left of the screen.
2. Click **Internet of Things**, and then click **Event Hubs**.
3. In **Create namespace**, enter a namespace name. The system immediately checks to see if the name is available.{: loading="lazy" }
4. After making sure the namespace name is available, choose the pricing tier (Basic or Standard). Also, choose an Azure subscription, resource group, and location in which to create the resource.
5. Click **Create** to create the namespace. You may have to wait a few minutes for the system to fully provision the resources.
6. In the portal list of namespaces, click the newly created namespace.
7. Click **Shared access policies**, and then click **RootManageSharedAccessKey**.{: loading="lazy" }
8. Click the copy button to copy the **RootManageSharedAccessKey** connection string to the clipboard. Save this connection string in a temporary location, such as Notepad, to use later.{: loading="lazy" }
## Create an event hub
1. In the Event Hubs namespace list, click the newly created namespace.{: loading="lazy" }
2. In the namespace blade, click **Event Hubs**.{: loading="lazy" }
3. At the top of the blade, click **Add Event Hub**.{: loading="lazy" }
4. Type a name for your event hub, then click **Create**.{: loading="lazy" }
Your event hub is now created, and you have the connection strings you need to send and receive events.
# Stream Analytics
## Create a Stream Analytics job
1. In the [Azure portal](http://portal.azure.com/), click the plus sign and then type **STREAM ANALYTICS** in the text window to the right. Then select **Stream Analytics job** in the results list.{: loading="lazy" }
2. Enter a unique job name and verify the subscription is the correct one for your job. Then either create a new resource group or select an existing one on your subscription.
3. Then select a location for your job. For speed of processing and reduction of cost in data transfer selecting the same location as the resource group and intended storage account is recommended.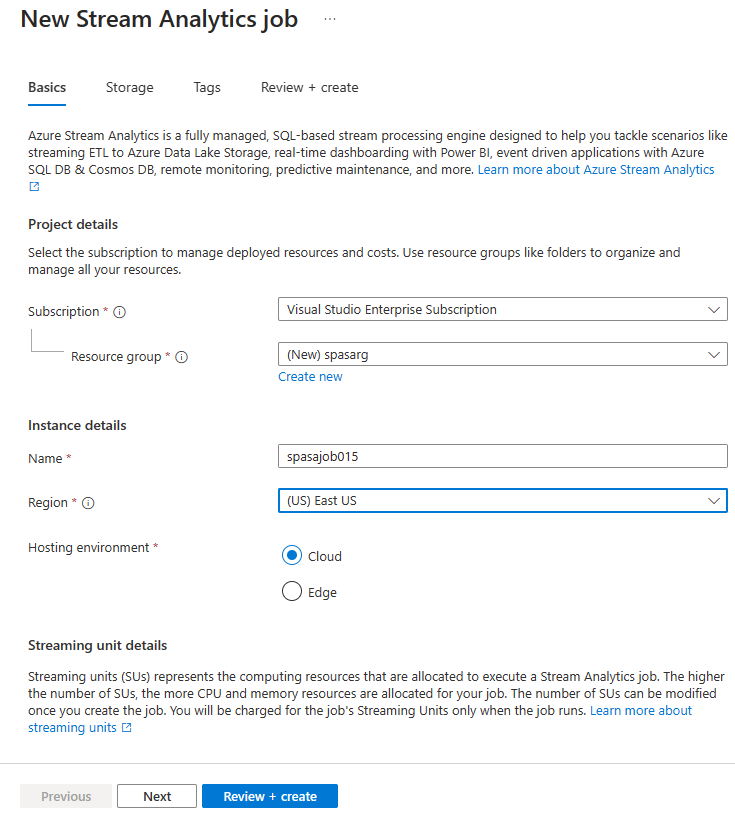{: loading="lazy" }
4. Check the box to place your job on your dashboard and then click **CREATE**.{: loading="lazy" }
5. You should see a 'Deployment started...' displayed in the top right of your browser window. Soon it will change to a completed window as shown below.{: loading="lazy" }
## Create an Azure Stream Analytics query
After your job is created it's time to open it and build a query. You can easily access your job by clicking the tile for it.
{: loading="lazy" }
In the **Job Topology** pane click the **QUERY** box to go to the Query Editor. The **QUERY** editor allows you to enter a T-SQL query that performs the transformation over the incoming event data.
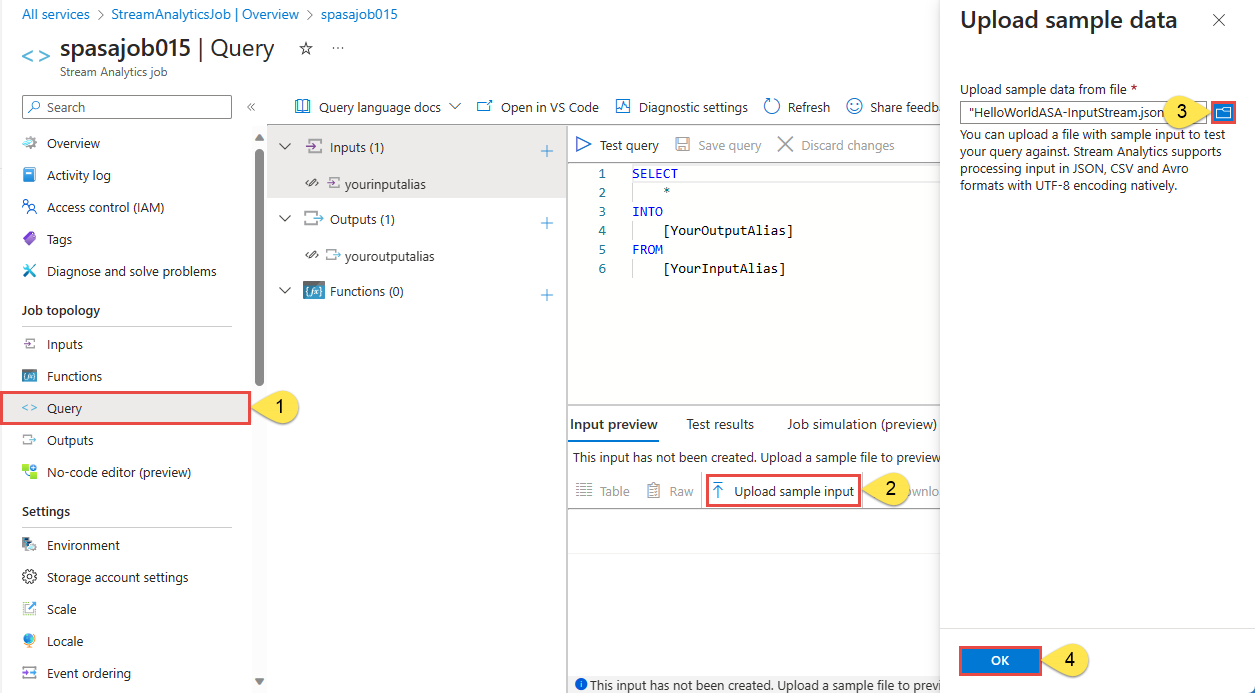{: loading="lazy" }
## Create data stream input from Event Hubs
Azure Event Hubs provides highly scalable publish-subscribe event ingestors. An event hub can collect millions of events per second, so that you can process and analyze the massive amounts of data produced by your connected devices and applications. Event Hubs and Stream Analytics together provide you with an end-to-end solution for real-time analytics-Event Hubs let you feed events into Azure in real time, and Stream Analytics jobs can process those events in real time. For example, you can send web clicks, sensor readings, or online log events to Event Hubs. You can then create Stream Analytics jobs to use Event Hubs as the input data streams for real-time filtering, aggregating, and correlation.
The default timestamp of events coming from Event Hubs in Stream Analytics is the timestamp that the event arrived in the event hub, which is `EventEnqueuedUtcTime`. To process the data as a stream using a timestamp in the event payload, you must use the [TIMESTAMP BY](https://msdn.microsoft.com/library/azure/dn834998.aspx) keyword.
### Consumer groups
You should configure each Stream Analytics event hub input to have its own consumer group. When a job contains a self-join or when it has multiple inputs, some input might be read by more than one reader downstream. This situation impacts the number of readers in a single consumer group. To avoid exceeding the Event Hubs limit of five readers per consumer group per partition, it's a best practice to designate a consumer group for each Stream Analytics job. There is also a limit of 20 consumer groups per event hub. For more information, see [Event Hubs Programming Guide](https://docs.microsoft.com/en-us/azure/event-hubs/event-hubs-programming-guide).
### Configure an event hub as a data stream input
The following table explains each property in the **New input** blade in the Azure portal when you configure an event hub as input.
| Property | Description |
|---|---|
| **Input alias** | A friendly name that you use in the job's query to reference this input. |
| **Service bus namespace** | An Azure Service Bus namespace, which is a container for a set of messaging entities. When you create a new event hub, you also create a Service Bus namespace. |
| **Event hub name** | The name of the event hub to use as input. |
| **Event hub policy name** | The shared access policy that provides access to the event hub. Each shared access policy has a name, permissions that you set, and access keys. |
| **Event hub consumer group** (optional) | The consumer group to use to ingest data from the event hub. If no consumer group is specified, the Stream Analytics job uses the default consumer group. We recommend that you use a distinct consumer group for each Stream Analytics job. |
| **Event serialization format** | The serialization format (JSON, CSV, or Avro) of the incoming data stream. |
| **Encoding** | UTF-8 is currently the only supported encoding format. |
| **Compression** (optional) | The compression type (None, GZip, or Deflate) of the incoming data stream. |
When your data comes from an event hub, you have access to the following metadata fields in your Stream Analytics query:
| Property | Description |
|---|---|
| **EventProcessedUtcTime** | The date and time that the event was processed by Stream Analytics. |
| **EventEnqueuedUtcTime** | The date and time that the event was received by Event Hubs. |
| **PartitionId** | The zero-based partition ID for the input adapter. |
For example, using these fields, you can write a query like the following example:
```
SELECT
EventProcessedUtcTime,
EventEnqueuedUtcTime,
PartitionId
FROM Input
```
## Azure Functions (In Preview)
Azure Functions is a serverless compute service that enables you to run code on-demand without having to explicitly provision or manage infrastructure. It lets you implement code that is triggered by events occurring in Azure or third-party services. This ability of Azure Functions to respond to triggers makes it a natural output for an Azure Stream Analytics. This output adapter allows users to connect Stream Analytics to Azure Functions, and run a script or piece of code in response to a variety of events.
Azure Stream Analytics invokes Azure Functions via HTTP triggers. The new Azure Function Output adapter is available with the following configurable properties:
| Property Name | Description |
|---|---|
| Function App | Name of your Azure Functions App |
| Function | Name of the function in your Azure Functions App |
| Max Batch Size | This property can be used to set the maximum size for each output batch that is sent to your Azure Function. By default, this value is 256 KB |
| Max Batch Count | As the name indicates, this property lets you specify the maximum number of events in each batch that gets sent to Azure Functions. The default max batch count value is 100 |
| Key | If you want to use an Azure Function from another subscription, you can do so by providing the key to access your function |
Note that when Azure Stream Analytics receives 413 (http Request Entity Too Large) exception from Azure function, it reduces the size of the batches it sends to Azure Functions. In your Azure function code, use this exception to make sure that Azure Stream Analytics doesn't send oversized batches. Also, make sure that the max batch count and size values used in the function are consistent with the values entered in the Stream Analytics portal.
Also, in a situation where there is no event landing in a time window, no output is generated. This behavior is consistent with the built-in windowed aggregate functions.
## Query
The query itself is basic for now. There is no need for the advanced query features of Stream Analytics for the host data at the moment however it will be used later for creating workflows for spawning and reducing hosts.
Currently, the query will batch the data outputs from event hub every second. This is simple to accomplish this using the [windowing functions provided by Stream Analytics](https://msdn.microsoft.com/en-us/azure/stream-analytics/reference/windowing-azure-stream-analytics). In the Westworld of Warcraft host query, a tumbling window batches the data every one second. The query looks as follows:
```
SELECT
Collect()
INTO
ElasticUploadFunction
FROM
HostIncomingData
GROUP BY TumblingWindow(Duration(second, 1), Offset(millisecond, -1))
```
# Azure Function
## Create a function app
You must have a function app to host the execution of your functions. A function app lets you group functions as a logic unit for easier management, deployment, and sharing of resources.
1. Click **Create a resource** in the upper left-hand corner of the Azure portal, then select **Compute** > **Function App**.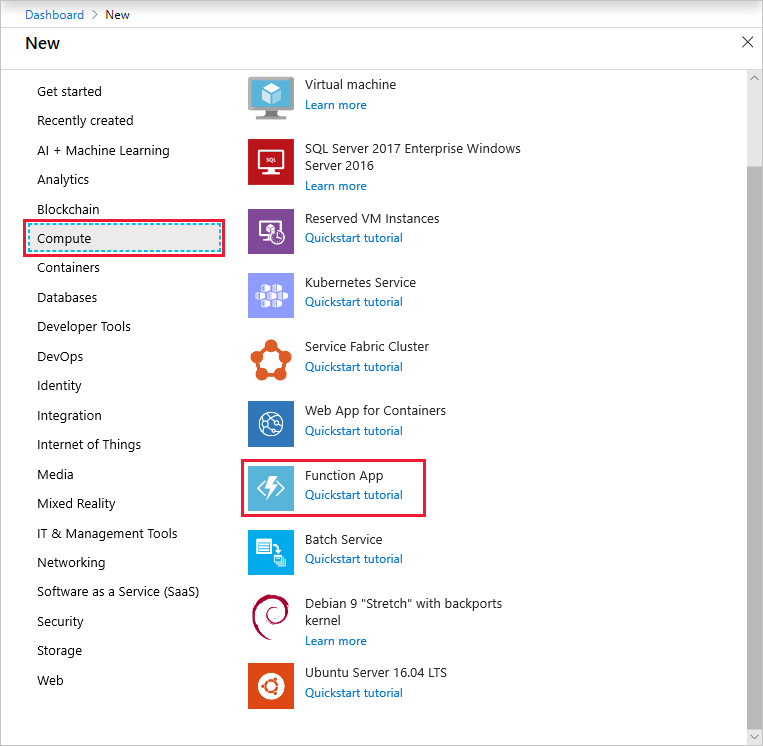{: loading="lazy" }
2. Use the function app settings as specified in the table below the image.{: loading="lazy" }
| Setting | Suggested value | Description |
|---|---|---|
| **App name** | Globally unique name | Name that identifies your new function app. Valid characters are `a-z`, `0-9`, and `-`. |
| **Subscription** | Your subscription | The subscription under which this new function app is created. |
| **[Resource Group](https://docs.microsoft.com/en-us/azure/azure-resource-manager/resource-group-overview)** | myResourceGroup | Name for the new resource group in which to create your function app. |
| **OS** | Windows | Serverless hosting is currently only available when running on Windows. For Linux hosting, see [Create your first function running on Linux using the Azure CLI](https://docs.microsoft.com/en-us/azure/azure-functions/functions-create-first-azure-function-azure-cli-linux). |
| **[Hosting plan](https://docs.microsoft.com/en-us/azure/azure-functions/functions-scale)** | Consumption plan | Hosting plan that defines how resources are allocated to your function app. In the default **Consumption Plan**, resources are added dynamically as required by your functions. In this [serverless](https://azure.microsoft.com/overview/serverless-computing/) hosting, you only pay for the time your functions run. |
| **Location** | West Europe | Choose a [region](https://azure.microsoft.com/regions/) near you or near other services your functions access. |
| **[Storage account](https://docs.microsoft.com/en-us/azure/storage/common/storage-create-storage-account#create-a-storage-account)** | Globally unique name | Name of the new storage account used by your function app. Storage account names must be between 3 and 24 characters in length and may contain numbers and lowercase letters only. You can also use an existing account. |
3. Click **Create** to provision and deploy the new function app. You can monitor the status of the deployment by clicking the Notification icon in the upper-right corner of the portal.{: loading="lazy" }Clicking **Go to resource** takes you to your new function app.
https://gist.github.com/QiMata/0514f72017622b4654ab551a20b2013a
# Elastic Search
Now the data is in Elastic Search which if the instructions in the [Elastic Search](/blog/getting-started-with-elastic-search-in-azure/) setup post were followed, should be accessible from the Kibana endpoint.
---
# CodeStock
https://jaredrhodes.com/blog/codestock/
I'm proud to be presenting Alternative Device Interfaces and Machine Learning at [CodeStock](http://codestock.org/) this year. With AI becoming more and more ubiquitous, it is important to note the effect on a user's experience. This presentation is meant to show how to create modern applications using machine learning provided by a third party and showcase what some third parties provide.
---
# Home Control Flex Major Release
https://jaredrhodes.com/blog/home-control-flex-major-release/
After nearly a year of hard work, the Home Control Flex application has finally reached a new release point. There have been major improvements around the use of [Xamarin Forms](https://www.xamarin.com/forms) and the use of mobile features. There were major changes around framework dependencies and utilization of navigation pages.
The major problems in the previous version was poor usage of navigation pages, dependencies on old frameworks, and lack of sharing of global resources. Adding all of these failures together resulted in an unstable application that crashed on multiple pages. Fixes to those crashes were a slow roll out of shims and hacks to keep the previous decisions working.
The largest problem was the poor usage of navigation pages. For some reason, to implement a tabbed page where the tabs were at the bottom on Android, the previous developers decided to use a ContentPage, and make the tab pages within the ContentPage ContentViews and swap those views out whenever a tab was changed. This caused almost every major problem that could not be resolved in the app moving forward. To fix it, the [BottomNavigationBarXF](https://github.com/thrive-now/BottomNavigationBarXF) Nuget packages was used. The base renderer was overridden to implement some custom functionality but overall it was a clean integration or at least as clean as such a big overhaul to the navigation system can handle.
Since the pages were being swapped out whenever a tab was changed, the previous developers must have decided that instead of needing navigation pages, they would just continue to change the view out and have their own navigation stack. Without using NavigationPage within their app, the page lifecycle was completely off and there were object disposed exceptions that were being thrown by the Forms framework due to the fact that the views lifecycle was not correctly managed. Xamarin Forms couldn't track whether a view was to be reused or not and would collect on disappeared views that were going to come back later. Once NavigationPage was used this was no longer a problem.
When I inherited the app there were multiple frameworks being used in the application. It seemed to have a javascript approach where a framework may be brought in for some partial functionality or even a single method. [Xamarin Forms Labs](https://github.com/XLabs/Xamarin-Forms-Labs) was the biggest offender when I inherited the app. The previous developers had referenced it to use it for one control and two converters. Once it was removed, the application was much more light weight on disk. At the time it was removed there was no noticeable performance gain but that was most likely due to the lack of utilization within the app and the fact that I had only been with the app for a month.
This app was riddled with copy and paste code reuse. Every page shared the same Style declaration with the same name (which was the style for that page). Every page had a declaration of a Converter for inverting a boolean. All these "shared" resources were moved to the [App.XAML](https://developer.xamarin.com/api/type/Xamarin.Forms.Application/) for reuse by every page within the application.
After fixing the above issues, changing a variety of pages within the app, and adding a load of new features, the app should finally be a stable release with market effects that was expected out of its first release. I hope to continue to improve on the line of applications from Telular including this app.
---
# Azure Global Bootcamp Atlanta
https://jaredrhodes.com/blog/azure-global-bootcamp-atlanta/
_Archived: originally published March 2018; details may be out of date._
This year will be the 4th annual [Azure Global Bootcamp in Atlanta](https://gabatl2018.eventbrite.com). If you don't know about Azure Global Bootcamp here is their snippet:
_**Welcome to Global Azure Bootcamp!** All around the world user groups and communities want to learn about Azure and Cloud Computing!_
_On **April 21, 2018**, all communities will come together once again in the sixth great Global Azure Bootcamp event! Each user group will organize their own one day deep dive class on Azure the way they see fit and how it works for their members. The result is that thousands of people get to learn about Azure and join together online under the social hashtag [\#GlobalAzure](https://twitter.com/search?q=%23GlobalAzure)!_
_Join hundreds of other organizers to help out and be part of the experience! Check out the [different locations](https://global.azurebootcamp.net/locations) worldwide and if there is no location near you, why not [organize one](https://global.azurebootcamp.net/frequently-asked-questions-for-organizers/how-to-register-a-global-azure-bootcamp-location/)?_
I will be leading off the IoT track after the Keynote. All around there is an amazing line up of speakers and it looks to be a great experience for both developers and decision makers. There are a limited number of seats so don't waste time waiting to sign up.
---
# IRIS Conference
https://jaredrhodes.com/blog/iris-conference/
_Archived: originally published April 2018; details may be out of date._
April 14th is the [Integrative Research and Ideas Symposium](http://graduatestudents.org/conference/) (IRIS) hosted by the UGA Graduate-Professional Student Association. I will be speaking on three separate topics at the event:
- Virtual Reality and IoT - Interacting with the Changing World
- Enable IoT with Edge Computing and Machine Learning
- Alternative Device Interfaces and Machine Learning
More than that though I look forward to hearing about the innovations and research provided by the graduate students and professionals at UGA. Here is their synopsis of IRIS:
_The UGA Graduate-Professional Student Association is proud to announce IRIS 2018, a unique and exciting opportunity for students and other researchers from throughout the UGA community._
_This initiative's focus on community-building, cross-pollination of ideas, transferrable skills, and service will:_
- _Provide an excellent opportunity to enhance research communication skills and present research to an interdisciplinary audience._
- _Expose students to cutting-edge scholarship, industry professionals, and rich professional development opportunities._
- _Help attendees refine the content and language of their C.V.'s and resumes through career workshops._
- _Encourage shared scholarship, research, and service._
- _Equip attendees with new knowledge and skills which can strengthen teaching, learning, and career outcomes._
- _Empower attendees to translate skills and research interests into career competencies._
---
# Interview with The Cube
https://jaredrhodes.com/blog/interview-with-the-cube/
At DevNet Create I was interviewed by theCUBE. Here is the resulting interview:
---
# Mixed3d Scans
https://jaredrhodes.com/blog/mixed3d-scans/
About four days ago [Lamar](https://www.linkedin.com/in/lamar-rhodes-32282414/) and I went to [Mixed3D](https://www.mixed3d.com/) to get some scans done for his birthday. They have an interesting booth filled with Raspberry Pis that generate a 3D model. They also offer to print those 3D models in full color using sandstone (which we took them up on). From the scans we picked 2 that best fit the theme of the day and were most usable in Lamar's Unity projects.
https://sketchfab.com/models/c28a086e9af84a92b970e2b2f82c83ea
https://sketchfab.com/models/a4df50c3025e4d049e1577d2f0fac962
Also, [Adam](https://www.linkedin.com/in/adamblalock/) got one done to use around the office
https://sketchfab.com/models/ba253785f03242dcaa35c25c72e66848
---
# Third Annual Internet of Things Startup Showcase
https://jaredrhodes.com/blog/join-the-greater-atlanta-internet-of-thi/
Join the Greater Atlanta Internet of Things at the Third Annual Internet of Things Startup Showcase on May 15th at Atlanta Tech Park.
We will host tables for IOT Startups, Innovation Teams, Companies and Hobbyists to show their IOT products and services.
12:00 pm to 5:00 pm - Atlanta Tech Park will host an open house for IOT members to learn about the ATP facility and its services to its members.
5:00 pm to 6:00 pm - Tech Connect Hub will host a Session on Collaboration between Startups and Corporate Teams
6:00 pm - Showcase will include tables for demonstrating IOT solutions for startups, hobbyists, Innovation Teams and Companies.
6:00 pm - Seminar for Startups and Sponsors to pitch their IOT Solutions (details will be forthcoming)
8:00 pm - Wrapup
Tables are still available
Sponsorships are available
Thanks to Atanta Tech Park
---
# Music City Code - IoT with Mobile
https://jaredrhodes.com/blog/music-city-code-iot-with-mobile/
This year I will be at [Music City Code](https://musiccitytech.ticketspice.com/music-city-tech-2018) presenting [Configure, Control, and Manage IoT with Mobile](http://www.musiccitytech.com/sessions/#sz-session-36254).
## Configure, Control, and Manage IoT with Mobile
### Abstract
The internet of things allows for communication with devices through various means (without touch, mouse, keyboard, or a screen). Mobile devices give users a dynamic interactive experience with these devices by communicating over several different wireless protocols or through the cloud. In this presentation, we will see how to use Xamarin to create a cross platform mobile application to control devices of all shapes and sizes. After this presentation, attendees should be able to create a basic mobile application and have that application communicate with peripherals over Bluetooth and the cloud.
### Description
This presentation is to showcase creating mobile applications with Xamarin and how those applications can interact with both off the shelf and with custom hardware. First, we will create a Xamarin Forms application; for iOS, Android, and Windows; that will interact with both Microsoft Azure and Bluetooth Low Energy to create an interactive experience with the hardware and the cloud. To get a better understanding, we will discuss mobile communication with the cloud and hardware to get a picture of how mobile can act as a bridge between the two.
---
# Announcing - Atlanta Medical Hackathon
https://jaredrhodes.com/blog/announcing-atlanta-medical-hackathon/
_Archived: originally published June 2018; details may be out of date._
Finally, the Atlanta Medical Hackathon (`medhackatl.com`, no longer online; [archived copy](https://web.archive.org/web/20180817165930/https://medhackatl.com/)) will have its inaugural hack October 19th-20th. It will be held at the [Pediatric Technology Center at Georgia Tech](https://ptc.gatech.edu/). The hackathon is open to students and graduate students focusing on information technology or medicine.
Medicine and technology go hand in hand but professionals of each speak a different language. The professions have different workflows, different standards, and different needs. The Atlanta Medical Hackathon plans to bring students from those different professions together to learn how to work with one another and remove the current barriers that exist.
The challenges of the hackathon are as follows:
- **Navigating Healthcare** - Patients have great difficulty knowing where to get the care they need at the right time. Part of the challenge comes with having an incredibly complex health care delivery system. To help patients, create new tools to improve patients navigate through the health care system and obtain access to community based care, wellness programs, and other ancillary services that support individuals improve their health.
- **Transparency in Healthcare** - Transparency, whether cost, data, or anything else, has been a great issue in health care. Without information patients cannot make the right decisions on treatments, doctors, or labs/imaging amongst a long list of other things such as wait times. Tackle problems in data transparency to allow for patients to discover what medical information is around them (providers, insurance acceptance, pricing, wait times, etc.). Solutions should consider open access and HIPPA compliance.
- **Accessible Healthcare** - Patients need to be supported by tools that will educate and empower them to make the right lifestyle choices and help them stick to their treatment plans. They get some information from their physicians or other sources but a single source would dispel a lot of mixed messages and help patients follow suit with decisions that support a health life. Create a solution that allow patients to make better health decisions allowing for self-management of disease and condition and to know when to contact their medical provider. Think creatively on how to change patients' thinking from "The doctor will see you now" to "The patient will see you now",
- **Medical Imaging** - Create innovative solutions using imaging technologies and data analytics to provide better patient care.
- **Transitioning to Adult Healthcare** - Changing doctors is never easy. When you're a teenager new to advocating for your own health care, or one who has a chronic illness like diabetes or cystic fibrosis, it can be even more challenging to make the transition. Create new tools to assist pediatricians, family physicians, and internists to support all adolescents, including those with special health care needs, as they transition to an adult model of health care.
---
# TechBash 2018
https://jaredrhodes.com/blog/techbash-2018/
_Archived: originally published June 2018; details may be out of date._
This year I will be presenting [Enable IoT with Edge Computing and Machine Learning](https://techbash.com/Submissions/Submission/639) at [TechBash](https://techbash.com). Here is the outline:
Being able to run compute cycles on local hardware is a practice predating silicon circuits. Mobile and Web technology has pushed computation away from local hardware and onto remote servers. As prices in the cloud have decreased, more and more of the remote servers have moved there. This technology cycle is coming full circle with pushing the computation that would be done in the cloud down to the client. The catalyst for the cycle completing is latency and cost. Running computations on local hardware softens the load in the cloud and reduces overall cost and architectural complexity.
The difference now is how the computational logic is sent to the device. As of now, we rely on app stores and browsers to deliver the logic the client will use. Delivery mechanisms are evolving into writing code once and having the ability to run that logic in the cloud and push that logic to the client through your application and have that logic run on the device. In this presentation, we will look at how to accomplish this with existing Azure technologies and how to prepare for upcoming technologies to run these workloads.
---
# MVP Renewal
https://jaredrhodes.com/blog/mvp-renewal-2/
_Archived: originally published July 2018; details may be out of date._
Proudly, I will be entering my second year as a Microsoft MVP. This will be under the [Microsoft Azure](https://azure.microsoft.com/en-us/) category again. Moving forward, I look forward to doing a large amount of work and training with [Azure Edge](https://azure.microsoft.com/en-us/services/iot-edge/) and [Azure ML](https://azure.microsoft.com/en-us/services/machine-learning-services/). Specifically, I look forward to working on the Scry Unlimited (`scryunlimited.com`, no longer online; [archived copy](https://web.archive.org/web/20180830134511/https://scryunlimited.com/)) and [West World of Warcraft](https://jaredrhodescom.wordpress.com/westworld-of-warcraft/) projects. To contact me for for your project, please visit the [contact page](https://jaredrhodescom.wordpress.com/consulting/).
As a start, on 7/2/2018 I will be presenting [AI on the Edge](https://www.meetup.com/atlantaIntelligentDevices/events/251413460/) at the [Atlanta Intelligent Devices](https://www.meetup.com/atlantaIntelligentDevices/) user group. Following that up I will be speaking at events around the country and hopefully internationally. In addition to my normal speaking on Mobile, Cloud, and Edge; I will be adding Machine Learning and Artificial Intelligence specifically focusing on the integration with Edge and Mobile computing. If you are looking for a speaker, check out my [speaker page](https://jaredrhodescom.wordpress.com/speaking-engagements/) and fill out the form.
Finally, I am still putting together events in Atlanta. If you would like to participate in any of the following events, just follow their links or message me on [Twitter](https://twitter.com/QiMata):
- Atlanta Code Camp
- [Atlanta Intelligent Devices User Group](https://www.meetup.com/atlantaIntelligentDevices/)
- Atlanta Medical Hackathon (`medhackatl.com`, no longer online; [archived copy](https://web.archive.org/web/20180817165930/https://medhackatl.com/))
---
# WordPress iFrame using Azure
https://jaredrhodes.com/blog/wordpress-iframe-using-azure/
There was a need to host some javascript in a WordPress page due to how [sessionize](https://sessionize.com/) embeds speaker sessions. Due to WordPress' limitations on javascript usage, the script could not be used in the page. To bypass this limitation, an Azure website can host the script; and then be used as an iFrame inside the WordPress page. To accomplish this requires the following steps:
- Create an Azure Website
- Change the page to include the script
- Host the script as an iFrame in WordPress page
## Create an Azure Website
[Azure Web Apps](https://docs.microsoft.com/en-us/azure/app-service/app-service-web-overview) provides a highly scalable, self-patching web hosting service. This quickstart shows how to deploy a basic HTML+CSS site to Azure Web Apps. You'll complete this quickstart in [Cloud Shell](https://docs.microsoft.com/en-us/azure/cloud-shell/overview), but you can also run these commands locally with [Azure CLI](https://docs.microsoft.com/en-us/cli/azure/install-azure-cli).
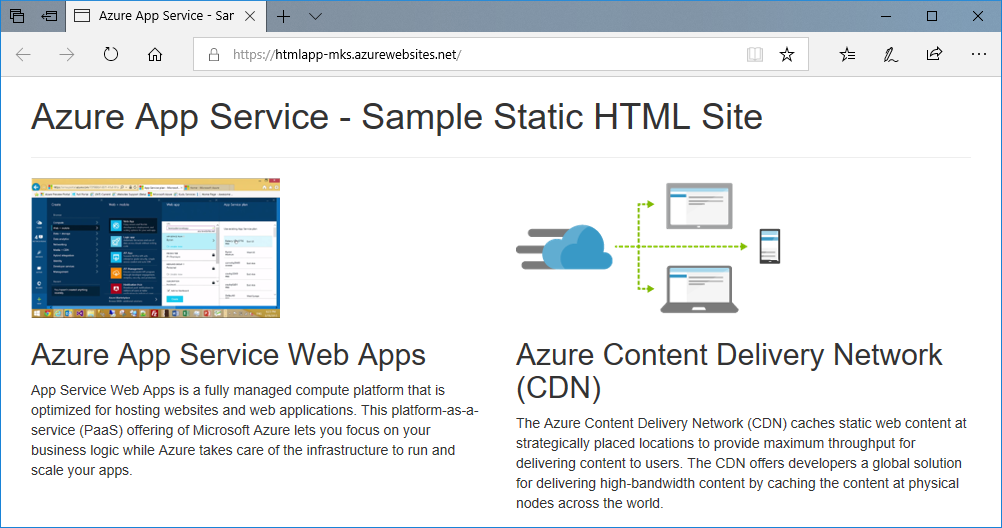
If you don't have an Azure subscription, create a [free account](https://azure.microsoft.com/free/?ref=microsoft.com&utm_source=microsoft.com&utm_medium=docs&utm_campaign=visualstudio) before you begin.
## Open Azure Cloud Shell
Azure Cloud Shell is a free, interactive shell that you can use to run the steps in this article. Common Azure tools are preinstalled and configured in Cloud Shell for you to use with your account. Just select the **Copy** button to copy the code, paste it in Cloud Shell, and then press Enter to run it. There are a few ways to open Cloud Shell:
| | |
|---|---|
| Select **Try It** in the upper-right corner of a code block. | {: loading="lazy" } |
| Open Cloud Shell in your browser. | [{: loading="lazy" }](https://shell.azure.com/bash) |
| Select the **Cloud Shell** button on the menu in the upper-right corner of the [Azure portal](https://portal.azure.com/). | {: loading="lazy" } |
| | |
## Install web app extension for Cloud Shell
To complete this quickstart, you need to add the [az web app extension](https://docs.microsoft.com/en-us/cli/azure/extension?view=azure-cli-latest#az-extension-add). If the extension is already installed, you should update it to the latest version. To update the web app extension, type `az extension update -n webapp`.
To install the webapp extension, run the following command:
```
az extension add -n webapp
```
When the extension has been installed, the Cloud Shell shows information to the following example:
```
The installed extension 'webapp' is in preview.
```
## Download the sample
In the Cloud Shell, create a quickstart directory and then change to it.
```
mkdir quickstart
cd quickstart
```
Next, run the following command to clone the sample app repository to your quickstart directory.
```
git clone https://github.com/Azure-Samples/html-docs-hello-world.git
```
## Create a web app
Change to the directory that contains the sample code and run the `az webapp up` command.
In the following example, replace <app\_name> with a unique app name.
```
cd html-docs-hello-world
az webapp up -n
```
The `az webapp up` command does the following actions:
- Create a default resource group.
- Create a default app service plan.
- Create an app with the specified name.
- [Zip deploy](https://docs.microsoft.com/en-us/azure/app-service/app-service-deploy-zip) files from the current working directory to the web app.
This command may take a few minutes to run. While running, it displays information similar to the following example:
```
{
"app_url": "https://.azurewebsites.net",
"location": "Central US",
"name": "",
"os": "Windows",
"resourcegroup": "appsvc_rg_Windows_CentralUS ",
"serverfarm": "appsvc_asp_Windows_CentralUS",
"sku": "FREE",
"src_path": "/home/username/quickstart/html-docs-hello-world "
}
```
Make a note of the `resourceGroup` value. You need it for the [clean up resources](https://docs.microsoft.com/en-us/azure/app-service/app-service-web-get-started-html#clean-up-resources) section.
## Browse to the app
In a browser, go to the Azure web app URL: `http://.azurewebsites.net`.
The page is running as an Azure App Service web app.
{: loading="lazy" }
**Congratulations!** You've deployed your first HTML app to App Service.
## Change the page to include the script
In the Cloud Shell, type `nano index.html` to open the nano text editor. Change the body of the app to include only the javascript tag you need.
Save your changes and exit nano. Use the command `^O` to save and `^X` to exit.
You'll now redeploy the app with the same `az webapp up` command.
```
az webapp up -n
```
Once deployment has completed, switch back to the browser window that opened in the **Browse to the app** step, and refresh the page.
{: loading="lazy" }
## Host the script as an iFrame in WordPress page
In your WordPress page, add an iframe shortcode - `iframe src="https://.azurewebsites.net/"` wrapped in square brackets - where app\_name is the name of the application you created in Azure.
---
# Took my Niece to Mixed3D
https://jaredrhodes.com/blog/took-my-niece-to-mixed3d/
Just [like with my brother](https://jaredrhodescom.wordpress.com/2018/04/17/mixed3d-scans/), I took my Niece to Mixed3D so that we could get a 3D model of her dressed up as her favorite princess (who happens to be Rapunzel).
We even got one with her mom holding her.
---
# Update Conference Prague
https://jaredrhodes.com/blog/update-conference-prague/
I have been selected to speak at [Update Conference Prague](https://www.updateconference.net/) during
- Enable IoT with Edge Computing and Machine Learning
- **V**irtual Reality and IoT - Interacting with the changing world
## Enable IoT with Edge Computing and Machine Learning
Being able to run compute cycles on local hardware is a practice predating silicon circuits. Mobile and Web technology has pushed computation away from local hardware and onto remote servers. As prices in the cloud have decreased, more and more of the remote servers have moved there. This technology cycle is coming full circle with pushing the computation that would be done in the cloud down to the client. The catalyst for the cycle completing is latency and cost. Running computations on local hardware softens the load in the cloud and reduces overall cost and architectural complexity.
The difference now is how the computational logic is sent to the device. As of now, we rely on app stores and browsers to deliver the logic the client will use. Delivery mechanisms are evolving into writing code once and having the ability to run that logic in the cloud and push that logic to the client through your application and have that logic run on the device. In this presentation, we will look at how to accomplish this with existing Azure technologies and how to prepare for upcoming technologies to run these workloads.
## **V**irtual Reality and IoT - Interacting with the changing world
Using IoT Devices, powered by Windows 10 IoT and Raspbian, we can collect data from the world surrounding us. That data can be used to create interactive environments for mixed reality, augmented reality, or virtual reality. To move the captured data from the devices to the interactive environment, the data will travel through Microsoft's Azure. First it will be ingested through the Azure IoT Hub which provides the security, bi-directional communication, and input rates needed for the solution. We will move the data directly from the IoT Hub to an Azure Service Bus Topic. The Topic allows for data to be sent to every Subscription listening for the data that was input. Azure Web Apps subscribe to the Topics and forward the data through a SignalR Hub that forwards the data to a client. For this demo, the client is a Unity Application that creates a Virtual Reality simulation showcasing that data.
Once finished with this introduction to these technologies, utilizing each component of this technology stack should be approachable. Before seeing the pieces come together, the technologies used in this demonstration may not seem useful to a developer. When combined, they create a powerful tool to share nearly unlimited amounts of incoming data across multiple channels.
---
# Hosting a permanent redirect in Azure
https://jaredrhodes.com/blog/hosting-a-permanent-redirect-in-azure/
WordPress charges for each domain attached to a blog. That is a bit much when you consider .net, .org, .whatever domains that are used on top of the .com domain most use. To get the use out of a single domain, a permanent redirect can be used. Since Azure has a fixed price, invariant of how many domains you host there; it can be used for the permanent redirect.
## Prerequisites
- An [Azure App Service](https://docs.microsoft.com/en-us/azure/app-service/) app on a paid tier (**Shared** or better - Free/Shared plans cannot map custom domains).
- A domain you own with access to its DNS records at the registrar.
## Map the domain
In your registrar's DNS settings, create a **CNAME** record pointing `www` (or the subdomain you want) at `.azurewebsites.net`. For the apex domain, use the **A record** Azure shows under the app's *Custom domains* blade instead (CNAME at the apex is not supported by most registrars).
Then in the portal: **App Service > Custom domains > Add hostname**, validate, and let Azure wire up the mapping.
## Add the redirect
Open the Kudu console for the app (`https://.scm.azurewebsites.net`), navigate to `site -> wwwroot`, and edit (or create) `web.config`:
```xml
```
Replace `<>` with the domain you wish to redirect to. The `{R:0}` preserves the original path, so deep links like `/2018/some-post/` land on the same path at the new domain - which is exactly what a permanent (`301`) redirect should do for search engines that are still holding onto the old URLs.
---
# Sponsors Wanted - Atlanta Medical Hackathon
https://jaredrhodes.com/blog/sponsors-wanted-atlanta-medical-hackathon/
_Archived: originally published July 2018; details may be out of date._
The Atlanta Medical Hackathon is looking for Sponsors. Sponsors can look forward to getting in front of soon to graduate, undergraduate and graduate students interested in a career in technology or medicine.
Hackathons are a design sprint-like event in which computer programmers and others involved in software development, including graphic designers, interface designers, project managers, and others, often including subject-matter-experts, collaborate intensively on software projects. The Atlanta Medical Hackathon brings business, technology, and medical professionals together to solve problems within the medical industry by combining the knowledge base of different specialties in an innovative environment.
This event is unique in that it looks to bring together professionals from both worlds to solve business problems. Therefore, when you help to sponsor the Atlanta Medical Hackathon, you are seen by attendees as a supporter of local innovative initiatives and are recognized as a primary player within the Atlanta medical technology community. Additionally, this event is continually promoted by technology and medical professionals in the weeks and months preceding the event as they talk with their clients. This ensures that you are receiving qualified attendees that are currently engaged with medical technologies within their current organization.
This is the inaugural Atlanta Medical Hackathon. We hope that this event can be the start to a continued engagement of innovate excellence of medical technology. The qualified leads generated by Atlanta Medical Hackathon will be unequaled!
---
# Atlanta Code Camp - Call for Speakers
https://jaredrhodes.com/blog/atlanta-code-camp-call-for-speakers/
_Archived: originally published July 2018; details may be out of date._
The Atlanta Code Camp call for speakers is open and we are looking for speakers on the following topics:
- Cloud Computing (Cloud architecture, Serverless)
- Data Engineering (RDBMS, NOSQL, Analytics)
- Data Science (Big Data, AI/ML, Functional Programming)
- Mobile Computing (Native and/or Hybrid)
- Modern Web Development, Languages and Tools
- DevOps and ALM (Including Agile, TDD, and related topics)
- VR and Game Development
- Infrastructure (Security, Networking, Identity)
- Professional Development (Soft Skills, Career Advancement)
- Business Tools (Office, CRM)
- Emerging Technologies (IoT, MR)
The event will be at the Marietta campus of Kennesaw State University and out keynote will be Jeremy Likeness.
---
# Update - Techbash
https://jaredrhodes.com/blog/update-techbash/
_Archived: originally published July 2018; details may be out of date._
## UPDATE:
Another one of my talks was selected for Techbash: [Alternative Device Interfaces and Machine Learning](https://techbash.com/sessions/alternative-device-interfaces-and-machine-learning).
In this presentation, we will look at the how users interface with machines without the use of touch. These different types of interaction have their benefits and pitfalls. To showcase the power of these user interactions we will explore: Voice commands with mobile applications, Speech Recognition, and Computer Vision. After this presentation, attendees will have the knowledge to create applications that can utilize voice, video, and machine learning.
Users use voice (Alexa, Cortana, Google Now) or video as a mode of interaction with applications. More than a fad, this is a natural interface for users and is becoming more and more common with the ever-decreasing size of hardware.
Different types of interaction have their benefits and pitfalls. To showcase the power of these user interactions we will explore: Voice commands with two app types: UWP and Xamarin Forms (iOS and Android). Speech Recognition with Cognitive Services: Verifying the speaker with Speaker Recognition API. Computer Vision with Cognitive Services: Verifying a user with Face API.
By utilizing UWP, Xamarin, and Cognitive services; a device with the ultimate in customization for user interactions will be created. Come and see how!
## Original:
This year I will be presenting [Enable IoT with Edge Computing and Machine Learning](https://techbash.com/Submissions/Submission/639) at [TechBash](https://techbash.com). Here is the outline:
Being able to run compute cycles on local hardware is a practice predating silicon circuits. Mobile and Web technology has pushed computation away from local hardware and onto remote servers. As prices in the cloud have decreased, more and more of the remote servers have moved there. This technology cycle is coming full circle with pushing the computation that would be done in the cloud down to the client. The catalyst for the cycle completing is latency and cost. Running computations on local hardware softens the load in the cloud and reduces overall cost and architectural complexity.
The difference now is how the computational logic is sent to the device. As of now, we rely on app stores and browsers to deliver the logic the client will use. Delivery mechanisms are evolving into writing code once and having the ability to run that logic in the cloud and push that logic to the client through your application and have that logic run on the device. In this presentation, we will look at how to accomplish this with existing Azure technologies and how to prepare for upcoming technologies to run these workloads.
---
# Atlanta Code Camp - Tickets for sale
https://jaredrhodes.com/blog/atlanta-code-camp-2018-tickets-for-sale/
_Archived: originally published July 2018; details may be out of date._
[Register Here](https://www.eventbrite.com/e/atlanta-code-camp-2018-registration-48330862912?aff=ebdssbdestsearch)
Code Camps are community focused events by and for the developer community. The Atlanta Code Camp draws upon the expertise of local and regional developers, architects, and experts who come together to share their real world experiences, lessons learned, best practices, and general knowledge with other interested individuals.
**Date:** Saturday, September 15th, 2018
**Registration Time:** 8:00 AM to 8:45 AM
**Time:** 8:00 AM to 6:00 PM
**Location:** Kennesaw State University, Marietta, GA (formerly Southern Polytechnic State University)
**Address:** 1100 South Marietta Parkway, Marietta, GA 30060
**Ticket Price:** $10 (Cover your lunch)
---
# Quicken Loans TechCon 2018
https://jaredrhodes.com/blog/quicken-loans-techcon-2018/
September 20th at Cobb Center in Detroit I will be presenting:
## Alternative Device Interfaces and Machine Learning
### Abstract
In this presentation, we will look at the how users interface with machines without the use of touch. These different types of interaction have their benefits and pitfalls. To showcase the power of these user interactions we will explore: Voice commands with mobile applications, Speech Recognition, and Computer Vision. After this presentation, attendees will have the knowledge to create applications that can utilize voice, video, and machine learning.
### Description
Users use voice (Alexa, Cortana, Google Now) or video as a mode of interaction with applications. More than a fad, this is a natural interface for users and is becoming more and more common with the ever-decreasing size of hardware.
Different types of interaction have their benefits and pitfalls. To showcase the power of these user interactions we will explore: Voice commands with two app types: UWP and Xamarin Forms (iOS and Android). Speech Recognition with Cognitive Services: Verifying the speaker with Speaker Recognition API. Computer Vision with Cognitive Services: Verifying a user with Face API.
By utilizing UWP, Xamarin, and Cognitive services; a device with the ultimate in customization for user interactions will be created. Come and see how!
---
# Elastic Search - "All shards failed" on pagination
https://jaredrhodes.com/blog/elastic-search-all-shards-failed-on-pagination/
If you are trying to page past the first 10000 documents in an Elasticsearch index and have not set the max\_result\_window setting for that index then you may receive one of the two following errors:
```
All shards failed
```
```
Result window is too large, from + size must be less than or equal to: [10000] but was [*].
```
To resolve this the max\_result\_window setting must be set for the index that is being paged through. Use CURL or the Kibana dev console to make a PUT request to update the setting.
```
PUT {MY_INDEX}/_settings
{
"index" : { "max_result_window" : {MAX_VALUE}}
}
```
Replacing MY\_INDEX with the index you wish to update the settings to and replacing MAX\_VALUE with the maximum value for the result window. For the current project it was set to 50,000,000.
Note that large max\_result\_window values increase heap pressure on the cluster since search hits are buffered per shard, so set this no higher than your paging use case requires.
---
# TechBash Discount Code
https://jaredrhodes.com/blog/techbash-discount-code/
_Archived: originally published August 2018; details may be out of date._
For TechBash 2018, TechBash created [EventBrite](https://techbash.us12.list-manage.com/track/click?u=699f5a552980818acd17e9293&id=1c005d4260&e=c1baecef53) discount codes for each speaker to share with developers in our community. My code was Rhodes. Each code provided a **$40 discount on any Standard 3-day or 4-day ticket**, 10% off admission to the core 3 days of the event. That discount code has long since expired.
---
# DragonCon 2018 - Helpful Links
https://jaredrhodes.com/blog/dragoncon-2018-helpful-links/
Leave a useful link in the comments and I will add it
## Emergency
- Emergency: [911](tel:911)
- DragonCon Security - Marriott Rooms L405 and L406 - [404-586-6316](tel:4045866316)
- [Georgia Traffic Info](http://georgianavigator.com/): [511](tel:511)
- Hit 1 in the menu to request a HERO unit for vehicle emergencies (flat tire, out of gas, breakdown, etc)
- [Georgia Poison Control Hotline](http://www.georgiapoisoncenter.org/): [1-800-222-1222](tel:18002221222) or [404-616-9000](tel:4046169000)
- [Grady Memorial Hospital](http://www.gradyhealthsystem.org/) (nearest to the D\*C host hotels, use [911](tel:911) first for medical emergencies): [404-616-1000](tel:4046161000)
## Getting to DragonCon
- [Ticket Purchase](http://store.dragoncon.org/index.php?main_page=index&cPath=26)
- [Packing List](https://www.reddit.com/r/dragoncon/comments/3b9buz/recommendations_for_dragoncon_survival_packing/)
- [Hotels](http://dragoncon.org/?q=hotels_overflow)
- [Transportation](http://dragoncon.org/?q=transportation_resources)
## Schedule
- DragonCon Official App [Android](https://play.google.com/store/apps/details?id=com.coreapps.android.followme.dragoncon14&hl=en_US) [iOS](https://itunes.apple.com/us/app/dragon-con/id898937808?mt=8)
- [2018 Dragon Con Schedule Grid On Google Sheets](https://docs.google.com/spreadsheets/d/1W5S-SOH1xq6UBGCm28rCCKYI3su-pDu1VTNp2MId30M/edit?usp=sharing)
- DragonCon Parade - [CBS](https://cwatlanta.cbslocal.com/dragon-con-parade/)
## Social Networking
- [DragonCon on Facebook](http://www.facebook.com/#!/pages/Atlanta-GA/DragonCon/58381388805?ref=ts&__a=7&ajaxpipe=1)
- [DragonCon on MySpace](http://www.myspace.com/dragoncon)
- [DragonCon on LiveJournal](http://community.livejournal.com/dragoncon/)
- [DragonCon on Discord](https://discord.gg/6nR4CFu)
- [DragonCon Official Twitter](http://twitter.com/Dragon_Con)
- [DragonConTV on Twitter](http://twitter.com/DragonConTV)
- [Items with the #DragonCon tag on Twitter](http://twitter.com/#search?q=%23DragonCon)
- [DragonCon on Reddit](http://www.reddit.com/r/dragoncon/)
- [DragonCon on Instagram](https://instagram.com/dragoncon/)
## Unofficial Guides
- Dementia's ["Everything you want to know about Dragon\*Con"](http://dementia.livejournal.com/55335.html) post (via LiveJournal)
- Cosplay.com's [How to Survive Dragon\*Con](http://www.cosplay.com/showthread.php?t=117465) thread (via Cosplay.com)
- Lycorne's [Rules & Tips for Con' Roomates](http://lycorne.livejournal.com/450605.html) post (via LiveJournal)
## Food
- [The Hub at Peachtree Center](https://peachtreecenter.com/dine-shop/) - [Directions](https://peachtreecenter.com/location/#directions-parking)
- [Suntrust Food Court](https://www.suntrustplaza.com/template/tenant/right_nav/Page2.aspx) - [Directions](https://www.suntrustplaza.com/template/tenant/menu3/Page14.aspx)
## Photo Galleries
[Fan Photo Galleries](http://dragon-con.pbworks.com/w/page/18183830/Fan%20Photo%20Galleries)
## Maps
- [Marta Rail Map](http://www.itsmarta.com/getthere/schedules/index-rail.htm)
- [Google Map with landmarks](http://maps.google.com/maps/ms?f=l&hl=en&geocode=&ie=UTF8&near=Atlanta,+GA&msa=0&msid=112314567109086195815.00043732f0b151b577537&om=1&ll=33.760222,-84.383068&spn=0.008188,0.019312&z=16)
- [Downtown parking map](http://www.atlantadowntown.com/parking/index.html)
- [Hyatt Convention Levels Map ](http://dragon-con.pbworks.com/f/HyattMap.pdf)
## Forums
- [DragonCon LiveJournal](http://community.livejournal.com/dragoncon/)
- [Cosplay.com](http://www.cosplay.com/forumdisplay.php?f=85)
- [DragonCon Forum](http://www.cosplay.com/forumdisplay.php?f=85)
- [DragonconForums.org](http://www.dragonconforums.org/)
## Costuming Groups
Not DragonCon specific, but maintain a strong presence.
- 300 (Spartans):
- Battlestar Galactica: [The Colonial Fleet](http://dragon-con.pbworks.com/The-Colonial-Fleet)
- 501st Legion (Stormtroopers): [http://501stlegion.org](http://501stlegion.org/)
- The Georgia Gems (Steven Universe)
---
# Using Angular Kendo Grid with Elastic Search and ASP.NET Core
https://jaredrhodes.com/blog/using-angular-kendo-grid-with-elastic-search-and-asp-net-core/
There was a need for using a [Kendo Grid](https://www.telerik.com/kendo-angular-ui/components/grid/) in an [Angular 5](https://angular.io/) website where the backing store for the data was [Elastic Search](https://www.elastic.co/). Utilizing the filtering on local data was simple enough but for the needs of filtering there needed to be server side integration. The server was running [ASP.NET Core](https://docs.microsoft.com/en-us/aspnet/core/?view=aspnetcore-2.1).
To get started create a view and view model for Angular to expose the grid.
https://gist.github.com/QiMata/ebaef2f9b6d7a27a88c4dbc3b808e964
To wire the view and view model to the server side data, there needs to be an Angular HTTP service and an ASP.NET Core Controller. The controller needs to be able to accept the filter and paging options of the grid as the user changes them and react to them server side. To accomplish this, some objects need to be created to handle the request:
First, the filter object, which is changed whenever a new filter is selected or is cleared; must be mapped to a C# object that can be serialized. The structure of the Kendo Grid filter is as such:
```
filter: {
logic: 'and',
filters: [{ field: 'ProductName', operator: 'contains', value: 'Chef' }]
}
```
To make that object transportable to C#, lets create a POCO:
https://gist.github.com/QiMata/8d22ed102ea119664d7aec6e1b913f45
Now lets create an ASP.NET Core controller endpoint for our Filter.
https://gist.github.com/QiMata/4b95bbb30c163fb00d3b1922d27acfd0
The only thing missing now for the query to work is the CompositeFilterMapper.
https://gist.github.com/QiMata/81e08d880401e0111b2c62415ed7e1cd
You will need to build in your own express and type mapping for properties, but otherwise this is built for Strings and DateTimes. From this base you should be able to implement different types and queries you would need for the Kendo Grid to work with ElasticSearch.
---
# Azure IoT Edge - docker.sock connect: permission denied
https://jaredrhodes.com/blog/azure-iot-edge-docker-sock-connect-permission-denied/
The [Azure IoT Edge](https://azure.microsoft.com/en-us/services/iot-edge/) getting started guide currently utilizes [VS Code](https://code.visualstudio.com/) and [Docker](https://www.docker.com/) to create modules. If you receive "docker.sock connect: permission denied" after trying to build, run the following two commands in the terminal:
```
sudo usermod -aG docker $USER
```
```
newgrp docker
```
If you still have the error, **restart** your machine and try again.
---
# Generate Protocol Buffers on build with CMake
https://jaredrhodes.com/blog/generate-protocol-buffers-on-build-with-cmake/
Just to see if it was possible on my current project, I tried to generate C++ code files from their .proto definitions whenever [CMake](https://cmake.org/) ran. To do this, I added a few lines to the CMakeLists.txt file of the project. The idea is to use [execute\_process](https://cmake.org/cmake/help/latest/command/execute_process.html) to call [protoc](http://google.github.io/proto-lens/installing-protoc.html) and generate the files in the appropriate folder in the solution.
First, **file(GLOB ...)** is used to set all of the .proto files into an iterable variable. Then, variables are setup for the proto\_path and cpp\_out variables.
After that, the files variable is looped and for each of the files we use [execute\_process](https://cmake.org/cmake/help/latest/command/execute_process.html) to invoke [protoc](http://google.github.io/proto-lens/installing-protoc.html) and generate the .pb.h and .pb.cc files.
https://gist.github.com/QiMata/7586d6e42b5efa62c2aed892d8410dd9
Finally, we want to add the .pb.h and .pb.cc files to a variable for the final build. To do so, use **file(GLOB ...)** again to search for all appropriate files.
---
# Authoring for Pluralsight
https://jaredrhodes.com/blog/authoring-for-pluralsight/
_Archived: originally published September 2018; details may be out of date._
Coming soon I will be authoring a course for Pluralsight titled - "Identify Existing Products, Services and Technologies in Use For Microsoft Azure" . This course targets software developers who are looking to get started with Microsoft Azure services to build modern cloud-enabled solutions and want to further extend their knowledge of those services by learning how to use existing products, services, and technologies offered by Microsoft Azure.
Microsoft Azure is a host for almost any application, but determining how to use it within existing workflows is paramount for success. In this course, Identify Existing Products, Services and Technologies in Use, you will learn how to integrate existing workflows, technologies, and processes with Microsoft Azure.
We explore Microsoft Azure with the following technologies:
- Languages, Frameworks, and IDEs -
- IntelliJ IDEA
- WebStorm
- Visual Studio Code
- .NET Core
- C#
- Java
- JavaScript
- Spring
- NodeJS
- Docker
- Microsoft Azure Products
- Azure App Services
- Azure Kubernetes
- Azure Functions
- Azure IoT Hub
Hopefully we can take a developer familiar with the languages, frameworks, and ides available and make have them up and running on Microsoft Azure after this short course.
---
# LeadTools common.mk as CMake
https://jaredrhodes.com/blog/leadtools-common-mk-as-cmake/
I am trying out the [Lead Tools](https://www.leadtools.com/) SDK for a Linux based OCR embedded project. In the demo for the OCR portion there is a make file and the project I am trying to integrate it with uses CMake. I wrote a CMake equivalent for integration:
https://gist.github.com/QiMata/f1591881a758a405b63ddfc6f63b4154
---
# CodeMash 2019 - Alternative Device Interfaces and Machine Learning
https://jaredrhodes.com/blog/codemash-2019-alternative-device-interfaces-and-machine-learning/
_Archived: originally published October 2018; details may be out of date._
I was once again accepted to speak at [CodeMash](http://www.codemash.org/). This year I will be presenting - [Alternative Device Interfaces and Machine Learning](https://jaredrhodescom.wordpress.com/speaking-engagements/alternative-device-interface-and-machine-learning/). If you would like to purchase tickets, [they are for sell](https://www.eventbrite.com/e/codemash-2019-tickets-49850504200). Here is what is going to be covered:
## Alternative Device Interfaces and Machine Learning
In this presentation, we will look at the how users interface with machines without the use of touch. These different types of interaction have their benefits and pitfalls. To showcase the power of these user interactions we will explore: Voice commands with mobile applications, Speech Recognition, and Computer Vision. After this presentation, attendees will have the knowledge to create applications that can utilize voice, video, and machine learning.
---
# South Florida Code Camp - Azure IoT Overview
https://jaredrhodes.com/blog/south-florida-code-camp-virtual-reality-and-iot/
_Archived: originally published October 2018; details may be out of date._
March 2nd 2019, I will be presenting [Azure IoT Overview](http://www.fladotnet.com/codecamp/SpeakerBio.aspx?SpeakerID=929) at the [South Florida Code Camp](http://www.fladotnet.com/codecamp/Home.aspx) in Davie, FL. You can [register here](https://www.eventbrite.com/e/south-florida-code-camp-2019-tickets-49310081782) - and its FREE. Here is the synopsis of the presentation:
## Abstract
Keeping up to date on all the new services and features for an entire cloud portfolio could be a full-time job. In this presentation, we will look at the state of IoT in Microsoft Azure and discuss how the different services work together to implement an enterprise solution. Use this presentation to get an overview of architecture and products so that the next time you are presented with an IoT problem in Azure you know the solution.
---
# .NET Rocks Interview
https://jaredrhodes.com/blog/net-rocks-interview/
After my sessions at [Update Conference Prague](https://jaredrhodescom.wordpress.com/2018/07/09/update-conference-prague/) I will be discussing the [Azure IoT Edge](https://azure.microsoft.com/en-us/services/iot-edge/) platform with [.NET Rocks!](https://www.dotnetrocks.com/). Hopefully I will have recovered from jet lag and my other presentations to give a coherent and passable interview. One of the questions they asked me was, what hardware would I buy if I had $5000 to spend on it?
---
# .NET Rocks Podcast is out!
https://jaredrhodes.com/blog/net-rocks-podcast-is-out/
The interview I had with [.NET Rocks!](https://dotnetrocks.com/) is [here](https://dotnetrocks.com/?show=1605).
---
# Pluralsight Course is out!
https://jaredrhodes.com/blog/pluralsight-course-is-out/
My Pluralsight course, **[Identifying Existing Products, Services, and Technologies in Use for Microsoft Azure](http://www.pluralsight.com/courses/microsoft-azure-existing-products-services-technologies-identify)**, is out an available here. Check it out, here is the short and long descriptions:
**Short description:**
Microsoft Azure can host almost any application, but understanding how to use it with existing workflows is a must. In this course, you will learn how to integrate existing workflows, technologies, and processes with Microsoft Azure.
**Long description:**
Knowing how to integrate Microsoft Azure with an existing app's workflow is essential to using Azure to host that application. In this course, Identifying Existing Products, Services, and Technologies in Use for Microsoft Azure, you will learn foundational knowledge of and gain the ability to navigate the Microsoft Azure documentation and utilize the tools for Microsoft Azure. First, you will discover how to navigate through the Microsoft Azure documentation. Next, you will learn how to utilize the different guides and tutorials of the Microsoft Azure products. Finally, you will explore how to work with Microsoft Azure using your existing tools and workflows. When you are finished with this course, you will have the skills and knowledge of Microsoft Azure tools and documentation needed to use the products, services, and technologies provided.
---
# Using Protocol Buffers with Azure IoT Edge
https://jaredrhodes.com/blog/using-protocol-buffers-with-azure-iot-edge/
[Google's Protocol Buffers](https://developers.google.com/protocol-buffers/) are a perfect fit with the multilingual approach of [Azure IoT Edge](https://azure.microsoft.com/en-us/services/iot-edge/). Using ProtoBuf, a message format can be written once and used across multiple frameworks and languages while benefiting from the [speed and message size](https://codeburst.io/json-vs-protocol-buffers-vs-flatbuffers-a4247f8bda6f) intrinsic to ProtoBuf. For this Azure IoT Edge use case, we will generate a message in C++ and send it to a module written in Python to filter out the values that are sent to IoT Hub.
## Steps
- Create the message format
- Create a C Azure IoT Edge Module
- Add ProtoBuffers to build
- Create C models
- Create a Python Azure IoT Edge Module
- Add ProtoBuffers to project
- Create Python Module
## Create the message format
Creating the message format is trivial. Following the [language guide](https://developers.google.com/protocol-buffers/docs/proto3), there are two message types to create.
1. A temperature reading, consisting of a float and a string
2. An array of the previous reading with a string
```
syntax = "proto3";
message TemperatureReading {
int32 reading = 1;
string timestamp = 2;
}
message TemperatureReadingUpload {
string uploaded_timestamp = 1;
repeated TemperatureReading readings = 2;
}
```
The above is all that is needed to create the model for ProtoBuf. Creating the language specific code for each module is covered in their module sections.
## Create a C Azure IoT Edge Module
### Prerequisites
This article assumes that you use a computer or virtual machine running Windows or Linux as your development machine. And you simulate your IoT Edge device on your development machine.
#### Needs:
- [Visual Studio Code](https://code.visualstudio.com/)
- [Azure IoT Edge extension](https://marketplace.visualstudio.com/items?itemName=vsciot-vscode.azure-iot-edge)
- [C/C++ extension](https://marketplace.visualstudio.com/items?itemName=ms-vscode.cpptools) for Visual Studio Code.
- [Docker extension](https://marketplace.visualstudio.com/items?itemName=PeterJausovec.vscode-docker)
To create a module, you need Docker to build the module image, and a container registry to hold the module image:
- [Docker Community Edition](https://docs.docker.com/install/) on your development machine.
- [Azure Container Registry](https://docs.microsoft.com/azure/container-registry/) or [Docker Hub](https://docs.docker.com/docker-hub/repos/#viewing-repository-tags)
### Create a new solution template
Take these steps to create an IoT Edge module based on Azure IoT C SDK using Visual Studio Code and the Azure IoT Edge extension. First you create a solution, and then you generate the first module in that solution. Each solution can contain more than one module.
1. In Visual Studio Code, select **View** > **Integrated Terminal**.
2. Select **View** > **Command Palette**.
3. In the command palette, enter and run the command **Azure IoT Edge: New IoT Edge Solution**.
4. Browse to the folder where you want to create the new solution. Choose **Select folder**.
5. Enter a name for your solution.
6. Select **C Module** as the template for the first module in the solution.
7. Enter a name for your module. Choose a name that's unique within your container registry.
8. Provide the name of the module's image repository. VS Code autopopulates the module name with **localhost:5000**. Replace it with your own registry information. If you use a local Docker registry for testing, then **localhost** is fine. If you use Azure Container Registry, then use the login server from your registry's settings. The login server looks like **<registry name>.azurecr.io**.
VS Code takes the information you provided, creates an IoT Edge solution, and then loads it in a new window.
{: loading="lazy" }
There are four items within the solution:
- A **.vscode** folder contains debug configurations.
- A **modules** folder has subfolders for each module. At this point, you only have one. But you can add more in the command palette with the command **Azure IoT Edge: Add IoT Edge Module**.
- An **.env** file lists your environment variables. If Azure Container Registry is your registry, you'll have an Azure Container Registry username and password in it.
Note
The environment file is only created if you provide an image repository for the module. If you accepted the localhost defaults to test and debug locally, then you don't need to declare environment variables.
- A **deployment.template.json** file lists your new module along with a sample **tempSensor** module that simulates data you can use for testing. For more information about how deployment manifests work, see [Learn how to use deployment manifests to deploy modules and establish routes](https://docs.microsoft.com/en-us/azure/iot-edge/module-composition).
### Develop your module
The default C module code that comes with the solution is located at **modules** >> **main.c**. The module and the deployment.template.json file are set up so that you can build the solution, push it to your container registry, and deploy it to a device to start testing without touching any code. The module is built to simply take input from a source (in this case, the tempSensor module that simulates data) and pipe it to IoT Hub.
When you're ready to customize the C template with your own code, use the [Azure IoT Hub SDKs](https://docs.microsoft.com/en-us/azure/iot-hub/iot-hub-devguide-sdks) to build modules that address the key needs for IoT solutions such as security, device management, and reliability.
### Compile the Protocol Buffer file
To compile the Protocol Buffer file, use the command line compiler protoc. For more information on how to use protoc for each platform, check out the [Protocol Buffer documentation](https://developers.google.com/protocol-buffers/docs/reference/overview). For the C module, we will use the [C++ compiler options](https://developers.google.com/protocol-buffers/docs/reference/cpp-generated):
```
protoc --proto_path=src --cpp_out=model src/temp.proto
```
To create and serialize the object, use the following code:
```
TemperatureReading reading;
reading.set_reading(get_temperature_reading()); //get_temperature_reading is your function on generating the temperature reading value
auto message_body = reading.SerializeAsString();
```
### Build and deploy your module for debugging
In each module folder, there are several Docker files for different container types. Use any of these files that end with the extension **.debug** to build your module for testing. Currently, C modules support debugging only in Linux amd64 containers.
1. In VS Code, navigate to the `deployment.template.json` file. Update your module image URL by adding **.debug** to the end.{: loading="lazy" }
2. Replace the C module createOptions in **deployment.template.json** with below content and save this file:
```
"createOptions": "{\"HostConfig\": {\"Privileged\": true}}"
```
3. In the VS Code command palette, enter and run the command **Edge: Build IoT Edge solution**.
4. Select the `deployment.template.json` file for your solution from the command palette.
5. In Azure IoT Hub Device Explorer, right-click an IoT Edge device ID. Then select **Create deployment for Single device**.
6. Open your solution's **config** folder. Then select the `deployment.json` file. Choose **Select Edge Deployment Manifest**.
You'll see the deployment successfully created with a deployment ID in a VS Code-integrated terminal.
Check your container status in the VS Code Docker explorer or by running the `docker ps` command in the terminal.
### Start debugging C module in VS Code
VS Code keeps debugging configuration information in a `launch.json` file located in a `.vscode` folder in your workspace. This `launch.json` file was generated when you created a new IoT Edge solution. It updates each time you add a new module that supports debugging.
1. Navigate to the VS Code debug view. Select the debug configuration file for your module. The debug option name should be similar to **ModuleName Remote Debug (C)**.
2. Navigate to `main.c`. Add a breakpoint in this file.
3. Select **Start Debugging** or select **F5**. Select the process to attach to.
4. In VS Code Debug view, you'll see the variables in the left panel.
The preceding example shows how to debug C IoT Edge modules on containers. It set your module container createOptions to run privileged. After you finish debugging your C modules, we recommend you remove this setting for production-ready IoT Edge modules.
## Create a Python Azure IoT Edge Module
### Create an IoT Edge module project
The following steps create an IoT Edge Python module by using Visual Studio Code and the Azure IoT Edge extension.
#### Create a new solution
Use the Python package **cookiecutter** to create a Python solution template that you can build on top of.
1. In Visual Studio Code, select **View** > **Integrated Terminal** to open the VS Code integrated terminal.
2. In the integrated terminal, enter the following command to install (or update) **cookiecutter**, which you use to create the IoT Edge solution template in VS Code:
```
pip install --upgrade --user cookiecutter
```
Ensure the directory where cookiecutter will be installed is in your environment's `Path` in order to make it possible to invoke it from a command prompt.
3. Select **View** > **Command Palette** to open the VS Code command palette.
4. In the command palette, enter and run the command **Azure: Sign in** and follow the instructions to sign in your Azure account. If you're already signed in, you can skip this step.
5. In the command palette, enter and run the command **Azure IoT Edge: New IoT Edge solution**. In the command palette, provide the following information to create your solution:
1. Select the folder where you want to create the solution.
2. Provide a name for your solution or accept the default **EdgeSolution**.
3. Choose **Python Module** as the module template.
4. Name your module **PythonModule**.
5. Specify the Azure container registry that you created in the previous section as the image repository for your first module. Replace **localhost:5000** with the login server value that you copied. The final string looks like <registry name>.azurecr.io/pythonmodule.
The VS Code window loads your IoT Edge solution workspace: the modules folder, a deployment manifest template file, and a .env file.
### Add your registry credentials
The environment file stores the credentials for your container repository and shares them with the IoT Edge runtime. The runtime needs these credentials to pull your private images onto the IoT Edge device.
1. In the VS Code explorer, open the .env file.
2. Update the fields with the **username** and **password** values that you copied from your Azure container registry.
3. Save this file.
### Compile the Protocol Buffer file
To compile the Protocol Buffer file, use the command line compiler protoc. For more information on how to use protoc for each platform, check out the [Protocol Buffer documentation](https://developers.google.com/protocol-buffers/docs/reference/overview). For the Python module, we will use the [Python compiler options](https://developers.google.com/protocol-buffers/docs/reference/python-generated):
```
protoc --proto_path=src --python_out=model src/temp.proto
```
### Update the module with custom code
Each template includes sample code, which takes simulated sensor data from the **tempSensor** module and routes it to the IoT hub. In this section, add the code that expands the **PythonModule** to analyze the messages before sending them.
1. In the VS Code explorer, open **modules** > **PythonModule** > **main.py**.
2. At the top of the **main.py** file, import the **temp\_pb2** library that was created by protoc:
```
import temp_pb2
```
3. Add the **TEMPERATURE\_THRESHOLD** and **TWIN\_CALLBACKS** variables under the global counters. The temperature threshold sets the value that the measured machine temperature must exceed for the data to be sent to the IoT hub.
```
TEMPERATURE_THRESHOLD = 25
TWIN_CALLBACKS = 0
```
> Note: this callback is preserved as written in 2019. It mixes patterns from two IoT Edge SDK generations (the C-style `IoTHubMessageDispositionResult` return alongside the Python `hubManager` helpers) and borrows the tempSensor sample's payload shape, so it will not run verbatim against current SDKs. Treat it as a historical sketch of the buffering approach.
4. Replace the **receive\_message\_callback** function with the following code:
```
# receive_message_callback is invoked when an incoming message arrives on the specified
# input queue (in the case of this sample, "input1"). Because this is a filter module,
# we forward this message to the "output1" queue.
def receive_message_callback(message, hubManager):
global RECEIVE_CALLBACKS
global TEMPERATURE_THRESHOLD
message_buffer = message.get_bytearray()
map_properties = message.properties()
key_value_pair = map_properties.get_internals()
print ( " Properties: %s" % key_value_pair )
RECEIVE_CALLBACKS += 1
print ( " Total calls received: %d" % RECEIVE_CALLBACKS )
data = TemperatureReading.ParseFromString(message_buffer)
if data.reading > TEMPERATURE_THRESHOLD:
map_properties.add("MessageType", "Alert")
print("Machine temperature %s exceeds threshold %s" % (data["machine"]["temperature"], TEMPERATURE_THRESHOLD))
hubManager.forward_event_to_output("output1", message, 0)
return IoTHubMessageDispositionResult.ACCEPTED
```
5. Add a new function called **module\_twin\_callback**. This function is invoked when the desired properties are updated.
```
# module_twin_callback is invoked when the module twin's desired properties are updated.
def module_twin_callback(update_state, payload, user_context):
global TWIN_CALLBACKS
global TEMPERATURE_THRESHOLD
print ( "\nTwin callback called with:\nupdateStatus = %s\npayload = %s\ncontext = %s" % (update_state, payload, user_context) )
data = json.loads(payload)
if "desired" in data and "TemperatureThreshold" in data["desired"]:
TEMPERATURE_THRESHOLD = data["desired"]["TemperatureThreshold"]
if "TemperatureThreshold" in data:
TEMPERATURE_THRESHOLD = data["TemperatureThreshold"]
TWIN_CALLBACKS += 1
print ( "Total calls confirmed: %d\n" % TWIN_CALLBACKS )
```
6. In the **HubManager** class, add a new line to the **init** method to initialize the **module\_twin\_callback** function that you just added:
```
# Sets the callback when a module twin's desired properties are updated.
self.client.set_module_twin_callback(module_twin_callback, self)
```
7. Save this file.
### Build your IoT Edge solution
In the previous section, you created an IoT Edge solution and added code to the **PythonModule** to filter out messages where the reported machine temperature is below the acceptable threshold. Now you need to build the solution as a container image and push it to your container registry.
1. Sign in to Docker by entering the following command in the Visual Studio Code integrated terminal. Then you can push your module image to your Azure container registry:
```
docker login -u -p
```
Use the username, password, and login server that you copied from your Azure container registry in the first section. You can also retrieve these values from the **Access keys** section of your registry in the Azure portal.
2. In the VS Code explorer, open the deployment.template.json file in your IoT Edge solution workspace.This file tells the **$edgeAgent** to deploy two modules: **tempSensor**, which simulates device data, and **PythonModule**. The **PythonModule.image** value is set to a Linux amd64 version of the image. To learn more about deployment manifests, see [Understand how IoT Edge modules can be used, configured, and reused](https://docs.microsoft.com/en-us/azure/iot-edge/module-composition).This file also contains your registry credentials. In the template file, your user name and password are filled in with placeholders. When you generate the deployment manifest, the fields are updated with the values that you added to the .env file.
3. Add the **PythonModule** module twin to the deployment manifest. Insert the following JSON content at the bottom of the **moduleContent** section, after the **$edgeHub** module twin:
```
"PythonModule": {
"properties.desired":{
"TemperatureThreshold":25
}
}
```
4. Save this file.
5. In the VS Code explorer, right-click the deployment.template.json file and select **Build and Push IoT Edge solution**.
When you tell Visual Studio Code to build your solution, it first takes the information in the deployment template and generates a deployment.json file in a new folder named **config**. Then it runs two commands in the integrated terminal: `docker build` and `docker push`. These two commands build your code, containerize the Python code, and then push the code to the container registry that you specified when you initialized the solution.
You can see the full container image address with tag in the `docker build` command that runs in the VS Code integrated terminal. The image address is built from information in the module.json file with the format <repository>:<version>-<platform>. For this tutorial, it should look like registryname.azurecr.io/pythonmodule:0.0.1-amd64.
### Deploy and run the solution
You can use the Azure portal to deploy your Python module to an IoT Edge device like you did in the quickstarts. You can also deploy and monitor modules from within Visual Studio Code. The following sections use the Azure IoT Edge extension for VS Code that was listed in the prerequisites. Install the extension now, if you didn't already.
1. Open the VS Code command palette by selecting **View** > **Command Palette**.
2. Search for and run the command **Azure: Sign in**. Follow the instructions to sign in your Azure account.
3. In the command palette, search for and run the command **Azure IoT Hub: Select IoT Hub**.
4. Select the subscription that contains your IoT hub, and then select the IoT hub that you want to access.
5. In the VS Code explorer, expand the **Azure IoT Hub Devices** section.
6. Right-click the name of your IoT Edge device, and then select **Create Deployment for IoT Edge device**.
7. Browse to the solution folder that contains the **PythonModule**. Open the config folder, select the deployment.json file, and then choose **Select Edge Deployment Manifest**.
8. Refresh the **Azure IoT Hub Devices** section. You should see the new **PythonModule** running along with the **TempSensor** module and the **$edgeAgent** and **$edgeHub.**
---
# Using Open CV C++ with Azure IoT Edge
https://jaredrhodes.com/blog/using-open-cv-c-with-azure-iot-edge/
If you are looking for a guide on creating an Open CV module in Python, check out a guide [here](https://kevinsaye.wordpress.com/2018/04/16/creating-an-opencv-module-for-iot-edge/). This guide will focus on creating an [Azure IoT Edge](https://azure.microsoft.com/en-us/services/iot-edge/) module in C++. To accomplish this we need to take the following steps:
- [Create the Azure IoT Edge Module](#create-the-azure-iot-edge-module)
- [Create a working Open CV Build](#create-a-working-open-cv-build)
- [Deploy the Azure IoT Edge Module](#deploy-the-azure-iot-edge-module)
## Create the Azure IoT Edge Module
### Prerequisites
This article assumes that you use a computer or virtual machine running Windows or Linux as your development machine. And you simulate your IoT Edge device on your development machine.
#### Needs:
- [Visual Studio Code](https://code.visualstudio.com/)
- [Azure IoT Edge extension](https://marketplace.visualstudio.com/items?itemName=vsciot-vscode.azure-iot-edge)
- [C/C++ extension](https://marketplace.visualstudio.com/items?itemName=ms-vscode.cpptools) for Visual Studio Code.
- [Docker extension](https://marketplace.visualstudio.com/items?itemName=PeterJausovec.vscode-docker)
To create a module, you need Docker to build the module image, and a container registry to hold the module image:
- [Docker Community Edition](https://docs.docker.com/install/) on your development machine.
- [Azure Container Registry](https://docs.microsoft.com/azure/container-registry/) or [Docker Hub](https://docs.docker.com/docker-hub/repos/#viewing-repository-tags)
### Create a new solution template
Take these steps to create an IoT Edge module based on Azure IoT C SDK using Visual Studio Code and the Azure IoT Edge extension. First you create a solution, and then you generate the first module in that solution. Each solution can contain more than one module.
1. In Visual Studio Code, select **View** > **Integrated Terminal**.
2. Select **View** > **Command Palette**.
3. In the command palette, enter and run the command **Azure IoT Edge: New IoT Edge Solution**.
4. Browse to the folder where you want to create the new solution. Choose **Select folder**.
5. Enter a name for your solution.
6. Select **C Module** as the template for the first module in the solution.
7. Enter a name for your module. Choose a name that's unique within your container registry.
8. Provide the name of the module's image repository. VS Code autopopulates the module name with **localhost:5000**. Replace it with your own registry information. If you use a local Docker registry for testing, then **localhost** is fine. If you use Azure Container Registry, then use the login server from your registry's settings. The login server looks like **<registry name>.azurecr.io**.
VS Code takes the information you provided, creates an IoT Edge solution, and then loads it in a new window.
{: loading="lazy" }
There are four items within the solution:
- A **.vscode** folder contains debug configurations.
- A **modules** folder has subfolders for each module. At this point, you only have one. But you can add more in the command palette with the command **Azure IoT Edge: Add IoT Edge Module**.
- An **.env** file lists your environment variables. If Azure Container Registry is your registry, you'll have an Azure Container Registry username and password in it.
Note
The environment file is only created if you provide an image repository for the module. If you accepted the localhost defaults to test and debug locally, then you don't need to declare environment variables.
- A **deployment.template.json** file lists your new module along with a sample **tempSensor** module that simulates data you can use for testing. For more information about how deployment manifests work, see [Learn how to use deployment manifests to deploy modules and establish routes](https://docs.microsoft.com/en-us/azure/iot-edge/module-composition).
### Develop your module
The default C module code that comes with the solution is located at **modules** > > **main.c**. The module and the deployment.template.json file are set up so that you can build the solution, push it to your container registry, and deploy it to a device to start testing without touching any code. The module is built to simply take input from a source (in this case, the tempSensor module that simulates data) and pipe it to IoT Hub.
When you're ready to customize the C template with your own code, use the [Azure IoT Hub SDKs](https://docs.microsoft.com/en-us/azure/iot-hub/iot-hub-devguide-sdks) to build modules that address the key needs for IoT solutions such as security, device management, and reliability.
### Build and deploy your module for debugging
In each module folder, there are several Docker files for different container types. Use any of these files that end with the extension **.debug** to build your module for testing. Currently, C modules support debugging only in Linux amd64 containers.
1. In VS Code, navigate to the `deployment.template.json` file. Update your module image URL by adding **.debug** to the end.{: loading="lazy" }
2. Replace the C module createOptions in **deployment.template.json** with below content and save this file:
```
"createOptions": "{\"HostConfig\": {\"Privileged\": true}}"
```
3. In the VS Code command palette, enter and run the command **Edge: Build IoT Edge solution**.
4. Select the `deployment.template.json` file for your solution from the command palette.
5. In Azure IoT Hub Device Explorer, right-click an IoT Edge device ID. Then select **Create deployment for IoT Edge device**.
6. Open your solution's **config** folder. Then select the `deployment.json` file. Choose **Select Edge Deployment Manifest**.
You'll see the deployment successfully created with a deployment ID in a VS Code-integrated terminal.
Check your container status in the VS Code Docker explorer or by running the `docker ps` command in the terminal.
### Start debugging C module in VS Code
VS Code keeps debugging configuration information in a `launch.json` file located in a `.vscode` folder in your workspace. This `launch.json` file was generated when you created a new IoT Edge solution. It updates each time you add a new module that supports debugging.
1. Navigate to the VS Code debug view. Select the debug configuration file for your module. The debug option name should be similar to **ModuleName Remote Debug (C)**.
2. Navigate to `main.c`. Add a breakpoint in this file.
3. Select **Start Debugging** or select **F5**. Select the process to attach to.
4. In VS Code Debug view, you'll see the variables in the left panel.
The preceding example shows how to debug C IoT Edge modules on containers. It added exposed ports in your module container createOptions. After you finish debugging your C modules, we recommend you remove these exposed ports for production-ready IoT Edge modules.
## Create a working Open CV Build
The working environment is an [Ubuntu 18.04 64 bit Desktop OS](https://www.ubuntu.com/desktop) running [Clion](https://www.jetbrains.com/clion/) using an embedded version of [CMake 3.10](https://cmake.org/). [Open CV](https://opencv.org/) is added via [source](https://github.com/opencv/opencv) as a submodule to the project and added as a package in the CMakeLists.txt with the following line:
`FIND_PACKAGE (OpenCV REQUIRED)`
Once that was added to the CMakeLists.txt, the main.cpp file was changed to the following code:
https://gist.github.com/QiMata/9e05b89e8edf462cb9769e32326020c1
## Deploy the Azure IoT Edge Module
Once you create IoT Edge modules with your business logic, you want to deploy them to your devices to operate at the edge. If you have multiple modules that work together to collect and process data, you can deploy them all at once and declare the routing rules that connect them.
This article shows how to create a JSON deployment manifest, then use that file to push the deployment to an IoT Edge device. For information about creating a deployment that targets multiple devices based on their shared tags, see [Deploy and monitor IoT Edge modules at scale](https://docs.microsoft.com/en-us/azure/iot-edge/how-to-deploy-monitor)
### Prerequisites
- An [IoT hub](https://docs.microsoft.com/en-us/azure/iot-hub/iot-hub-create-through-portal) in your Azure subscription.
- An [IoT Edge device](https://docs.microsoft.com/en-us/azure/iot-edge/how-to-register-device-portal) with the IoT Edge runtime installed.
- [Visual Studio Code](https://code.visualstudio.com/).
- [Azure IoT Edge extension](https://marketplace.visualstudio.com/items?itemName=vsciot-vscode.azure-iot-edge) for Visual Studio Code.
### Configure a deployment manifest
A deployment manifest is a JSON document that describes which modules to deploy, how data flows between the modules, and desired properties of the module twins. For more information about how deployment manifests work and how to create them, see [Understand how IoT Edge modules can be used, configured, and reused](https://docs.microsoft.com/en-us/azure/iot-edge/module-composition).
To deploy modules using Visual Studio Code, save the deployment manifest locally as a .JSON file. You will use the file path in the next section when you run the command to apply the configuration to your device.
Here's a basic deployment manifest with one module as an example:
```
{
"modulesContent": {
"$edgeAgent": {
"properties.desired": {
"schemaVersion": "1.0",
"runtime": {
"type": "docker",
"settings": {
"minDockerVersion": "v1.25",
"loggingOptions": "",
"registryCredentials": {}
}
},
"systemModules": {
"edgeAgent": {
"type": "docker",
"settings": {
"image": "mcr.microsoft.com/azureiotedge-agent:1.0",
"createOptions": "{}"
}
},
"edgeHub": {
"type": "docker",
"status": "running",
"restartPolicy": "always",
"settings": {
"image": "mcr.microsoft.com/azureiotedge-hub:1.0",
"createOptions": "{}"
}
}
},
"modules": {
"tempSensor": {
"version": "1.0",
"type": "docker",
"status": "running",
"restartPolicy": "always",
"settings": {
"image": "mcr.microsoft.com/azureiotedge-simulated-temperature-sensor:1.0",
"createOptions": "{}"
}
}
}
}
},
"$edgeHub": {
"properties.desired": {
"schemaVersion": "1.0",
"routes": {
"route": "FROM /* INTO $upstream"
},
"storeAndForwardConfiguration": {
"timeToLiveSecs": 7200
}
}
},
"tempSensor": {
"properties.desired": {}
}
}
}
```
### Sign in to access your IoT hub
You can use the Azure IoT extensions for Visual Studio Code to perform operations with your IoT hub. For these operations to work, you need to sign in to your Azure account and select the IoT hub that you are working on.
1. In Visual Studio Code, open the **Explorer** view.
2. At the bottom of the Explorer, expand the **Azure IoT Hub Devices** section.
3. Click on the **...** in the **Azure IoT Hub Devices** section header. If you don't see the ellipsis, hover over the header.
4. Choose **Select IoT Hub**.
5. If you are not signed in to your Azure account, follow the prompts to do so.
6. Select your Azure subscription.
7. Select your IoT hub.
### Deploy to your device
You deploy modules to your device by applying the deployment manifest that you configured with the module information.
1. In the Visual Studio Code explorer view, expand the **Azure IoT Hub Devices** section.
2. Right-click on the device that you want to configure with the deployment manifest.
3. Select **Create Deployment for IoT Edge Device**.
4. Navigate to the deployment manifest JSON file that you want to use, and click **Select Edge Deployment Manifest**.
The results of your deployment are printed in the VS Code output. Successful deployments are applied within a few minutes if the target device is running and connected to the internet.
### View modules on your device
Once you've deployed modules to your device, you can view all of them in the **Azure IoT Hub Devices** section. Select the arrow next to your IoT Edge device to expand it. All the currently running modules are displayed.
If you recently deployed new modules to a device, hover over the **Azure IoT Hub Devices** section header and select the refresh icon to update the view.
Right-click the name of a module to view and edit the module twin.
---
# Hacking Izon Cameras and using Azure IoT Edge
https://jaredrhodes.com/blog/hacking-izon-cameras-and-using-azure-iot-edge/
After Izon announced that they were closing down their services (leaving the cameras I already owned useless), I decided to turn them into something useful using Azure. First let me list some resources:
- [RSA Security Research](https://www.rsaconference.com/writable/presentations/file_upload/hta-f03a-eyes-on-izon-surveilling-ip-camera-security.pdf) - by [Mark Stanislav](https://www.linkedin.com/in/mstanislav/)
- Will it hack (`willithack.com/izon/`) - no longer online; see the note below
- [Azure IoT Edge product page](https://azure.microsoft.com/en-us/services/iot-edge/)
- [VLC download page](https://www.videolan.org/vlc/index.html)
At the time, the Will it hack site tracked the published exploits for the Izon line, and checking it against your own camera confirmed whether the device was still streaming through its web interface. That site is offline now, so this step survives only as history: if your camera still serves its web UI, you are already done with edits to the device unless you would like to change the passwords (which you should).
Our goals are as follows:
- Process the video feed from the Izon camera (we will cheat this early on and only use the image feed)
- Check for motion
- Check for faces
- Check if faces are white listed
- Check for my dog
- Process the audio feed
- Check for any noise
- Check for non human noises
- Check for dog barks
- Check for my and my wife's voice
These are all stretch goals that will be referred back to as the project moves forward.
### Create the Azure IoT Edge module
For the first module, we will use the C Module base image. We are looking for two things from this module:
- Download the picture feed and pass it to the Edge Hub
- Download the audio feed and pass it to the Edge Hub
If you don't know where to get started with the C module of the Azure IoT Edge platform, there is helpful information on the [Azure Documentation page](https://docs.microsoft.com/en-us/azure/iot-edge/tutorial-c-module). Once the C module is created and ready for editing, we are going to connect to the image feed from the devices. To make this simple, both feeds will be retrieved using HTTP. For the video feed, its simple enough to grab images from the Izon camera existing camera feed.
Now one thing we need, is to be able to connect to each camera within the local network shared with the Edge. Since we would like to be able to add and remove cameras, we will use the device twin to update and manage the list of IP address. The code for updating the list is as follows:
```c
#include
#include
#include "iothub_module_client_ll.h"
#include "iothub_client_options.h"
#include "iothub_message.h"
#include "azure_c_shared_utility/threadapi.h"
#include "azure_c_shared_utility/crt_abstractions.h"
#include "azure_c_shared_utility/platform.h"
#include "azure_c_shared_utility/shared_util_options.h"
#include "iothubtransportmqtt.h"
#include "iothub.h"
#include "time.h"
#include "parson.h"
typedef struct IP_ADDRESS_NODE
{
const char * address;
struct IP_ADDRESS_NODE * next;
} ip_address_node;
ip_address_node * add_address(const char * address,ip_address_node * previous)
{
ip_address_node * new_node = (ip_address_node *)malloc(sizeof(ip_address_node));
new_node->address = address;
new_node->next = NULL;
if (previous == NULL)
{
return new_node;
}
previous->next = new_node;
return previous;
}
void delete_address(ip_address_node * current)
{
if (current == NULL)
{
return;
}
delete_address(current->next);
//free(current->address);
free(current);
}
ip_address_node * root_node = NULL;
ip_address_node * add_address_to_root(const char * address)
{
if (root_node = NULL)
{
root_node = add_address(address,root_node);
}
ip_address_node * current = root_node;
while(current->next != NULL)
{
current = current->next;
}
add_address(address,current);
}
static void moduleTwinCallback(DEVICE_TWIN_UPDATE_STATE update_state, const unsigned char* payLoad, size_t size, void* userContextCallback)
{
printf("\r\nTwin callback called with (state=%s, size=%zu):\r\n%s\r\n",
ENUM_TO_STRING(DEVICE_TWIN_UPDATE_STATE, update_state), size, payLoad);
JSON_Value *root_value = json_parse_string(payLoad);
JSON_Object *root_object = json_value_get_object(root_value);
JSON_Array * ipaddresses = json_object_dotget_array(root_object, "desired.CameraAddresses");
if (ipaddresses != NULL) {
delete_address(root_node);
for (int i = 0; i < json_array_get_count(ipaddresses); i++) {
add_address_to_root(json_array_get_string(ipaddresses,i));
}
return;
}
ipaddresses = json_object_get_array(root_object, "CameraAddresses");
if (ipaddresses != NULL) {
delete_address(root_node);
for (int i = 0; i < json_array_get_count(ipaddresses); i++) {
add_address_to_root(json_array_get_string(ipaddresses,i));
}
return;
}
}
```
With that code in place, the list of IP addresses can be updated from the Azure UI and the Azure Service SDKs.
#### Downloading from the Image feed
The Izon cameras make downloading the image feed trivial. There is an existing endpoint where you can grab the latest image directly from the camera's web server. The latest image is always at */cgi-bin/img-d1.cgi*. (**NOTE**: if you are checking this image from a browser, be sure to have some cache busting!). To download this image into our module, we will use the [Curl](https://github.com/curl/curl) library for it's easy HTTP implementation. To add Curl to our Edge module, we will add the following lines to the *Dockerfile.amd64.debug*:
```dockerfile
FROM ubuntu:xenial AS base
RUN apt-get update && \
apt-get install -y --no-install-recommends software-properties-common gdb && \
add-apt-repository -y ppa:aziotsdklinux/ppa-azureiot && \
apt-get update && \
apt-get install -y azure-iot-sdk-c-dev && \
rm -rf /var/lib/apt/lists/*
FROM base AS build-env
RUN apt-get update && \
apt-get install -y --no-install-recommends cmake gcc g++ make libcurl4-openssl-dev && \
rm -rf /var/lib/apt/lists/*
WORKDIR /app
COPY . ./
RUN cmake -DCMAKE_BUILD_TYPE=Debug .
RUN make
FROM base
WORKDIR /app
COPY --from=build-env /app ./
CMD ["./main"]
```
With curl now added to the image, it can be utilized in code by adding it to the method invoked in our main loop. The code will download the file for each entry in the IP address list. Once the image is downloaded, it will send it as a message to the Edge Hub and add the IP address of the camera to the message header. Here is that code:
```c
struct MemoryStruct {
char *memory;
size_t size;
};
static size_t
WriteMemoryCallback(void *contents, size_t size, size_t nmemb, void *userp)
{
size_t realsize = size * nmemb;
struct MemoryStruct *mem = (struct MemoryStruct *)userp;
char *ptr = realloc(mem->memory, mem->size + realsize + 1);
if(ptr == NULL) {
/* out of memory! */
printf("not enough memory (realloc returned NULL)\n");
return 0;
}
mem->memory = ptr;
memcpy(&(mem->memory[mem->size]), contents, realsize);
mem->size += realsize;
mem->memory[mem->size] = 0;
return realsize;
}
struct MemoryStruct download_file(const char * address)
{
struct MemoryStruct chunk;
chunk.memory = malloc(1); /* will be grown as needed by the realloc above */
chunk.size = 0; /* no data at this point */
/* init the curl session */
CURL * curl_handle = curl_easy_init();
/* specify URL to get */
curl_easy_setopt(curl_handle, CURLOPT_URL, address);
/* send all data to this function */
curl_easy_setopt(curl_handle, CURLOPT_WRITEFUNCTION, WriteMemoryCallback);
/* we pass our 'chunk' struct to the callback function */
curl_easy_setopt(curl_handle, CURLOPT_WRITEDATA, (void *)&chunk);
/* some servers don't like requests that are made without a user-agent
field, so we provide one */
curl_easy_setopt(curl_handle, CURLOPT_USERAGENT, "libcurl-agent/1.0");
/* get it! */
CURLcode res = curl_easy_perform(curl_handle);
/* check for errors */
if(res != CURLE_OK) {
fprintf(stderr, "curl_easy_perform() failed: %s\n",
curl_easy_strerror(res));
}
/* cleanup curl stuff */
curl_easy_cleanup(curl_handle);
return chunk;
}
void download_image(IOTHUB_MODULE_CLIENT_LL_HANDLE iotHubModuleClientHandle)
{
ip_address_node * address_node = root_node;
do
{
struct MemoryStruct image = download_file(address_node->address);
if (image.size > 1)
{
IOTHUB_MESSAGE_HANDLE message_handle = IoTHubMessage_CreateFromByteArray((char*)image.memory, image.size);
MAP_HANDLE propMap = IoTHubMessage_Properties(message_handle);
Map_AddOrUpdate(propMap, "IpAddress", address_node->address);
IOTHUB_CLIENT_RESULT clientResult = IoTHubModuleClient_LL_SendEventToOutputAsync(iotHubModuleClientHandle, message_handle, "IncomingImage", NULL,NULL);
if (clientResult != IOTHUB_CLIENT_OK)
{
IoTHubMessage_Destroy(message_handle);
printf("IoTHubModuleClient_LL_SendEventToOutputAsync failed on sending to output IncomingImage, err=%d\n", clientResult);
}
}
free(image.memory);
address_node = address_node->next;
} while(address_node != NULL);
}
```
#### Downloading from the Audio feed
Now that the image feed is being published to the Edge Hub, it is time to look at the audio feed. That feed is trickier, since the Izon camera does not have an easy-to-use endpoint (that I know of) for downloading audio samples the way it serves images. The planned follow-up, deriving an audio feed from the RTSP stream, never made it into a post, so the audio items in the goal list above stayed stretch goals.
---
# Authoring for Pluralsight - Microsoft Azure Cognitive Services: Text to Speech API
https://jaredrhodes.com/blog/authoring-for-pluralsight-microsoft-azure-cognitive-services-text-to-speech-api/
_Archived: originally published January 2019; details may be out of date._
I'm excited to announce that I am authoring another course for [Pluralsight](https://app.pluralsight.com/profile/author/jared-rhodes). This course targets software developers who are looking to get started with [Microsoft Azure Cognitive Services: Text to Speech API](https://azure.microsoft.com/en-us/services/cognitive-services/text-to-speech/) to build modern AI solutions and want to get started building an AI solution with a simple REST interface. This course continues from the other Cognitive Services courses created and being created for the Cognitive Services track.
#### Abstract
With AI becoming more and more ubiquitous, it is important to quickly and easily integrate with AI services. This course will show how to create modern applications using Microsoft Azure Cognitive Services: Text to Speech API with JavaScript, C#, Java, C++, and Python.
#### Prerequisites
This course assumes viewers are familiar with C# or Java or JavaScript or Python or C++ and understands REST APIs and JSON.
#### Description
Contoso is an insurance company that has decided to integrate text to speech for multiple consumer facing applications. This course will take a look at utilizing the following features of Cognitive Services - Text to Speech API:
- Default API interface through multiple SDKs: JavaScript, C#, Java, C++, and Python
- Creating custom voice fonts
- Popular scenarios and use case for Text to Speech
---
# Speaking at Orlando Code Camp
https://jaredrhodes.com/blog/speaking-at-orlando-code-camp/
I am happy to announce I will speaking at the [Orlando Code Camp](https://www.orlandocodecamp.com/) again this year. I will be presenting [AI on the Edge](https://www.orlandocodecamp.com/Sessions/Details/12), a look into Microsoft's [Azure IoT Edge](https://azure.microsoft.com/en-us/services/iot-edge/).
### Title
AI on the Edge
### Description
The next evolution in cloud computing is a smarter application not in the cloud. As the cloud has continued to evolve, the applications that utilize it have had more and more capabilities of the cloud. This presentation will show how to push logic and machine learning from the cloud to an edge application. Afterward, creating edge applications which utilize the intelligence of the cloud should become effortless.
---
# Microsoft Azure Cognitive Services: Text to Speech API - Published!
https://jaredrhodes.com/blog/microsoft-azure-cognitive-services-text-to-speech-api-published/
My new Pluralsight course, [Microsoft Azure Cognitive Services: Text to Speech API](http://www.pluralsight.com/courses/microsoft-azure-cognitive-services-text-speech-api), has just been published. You can find it [here](http://www.pluralsight.com/courses/microsoft-azure-cognitive-services-text-speech-api). If you would like to check out my other courses, you can find them on my [author's profile](https://app.pluralsight.com/profile/author/jared-rhodes). Here is the course synopsis:
**Short description:**
In this course, you will gain a foundational knowledge of the Text to Speech API that will help you move forward with your overall understanding of the Microsoft Cognitive Services Suite.
**Long description:**
With AI becoming more and more ubiquitous in application development, it is important to quickly and easily integrate intelligence into your application. In this course, Microsoft Azure Cognitive Services: Text to Speech API, you will learn how to understand, configure, and utilize the Text to Speech API. First, you will discover how to use out of the box voices. Next, you will explore how to use machine learning-based voices in your app. Finally, you will learn how to create and use custom voices for your application and brand. When you are finished with this course, you will have a foundational knowledge of the Text to Speech API that will help you move forward with your overall understanding of the Microsoft Cognitive Services Suite.
**Tags for this course:**
Audience/Roles: software-development
Topics/Subjects: cloud-platforms
Tools: azure-cognitive-services
---
# Authoring for Pluralsight - Microsoft Azure Cognitive Services: Speech to Text SDK
https://jaredrhodes.com/blog/authoring-for-pluralsight-microsoft-azure-cognitive-services-speech-to-text-sdk/
_Archived: originally published March 2019; details may be out of date._
I am creating a new course or [Pluralsight](https://app.pluralsight.com/library/) titled - Microsoft Azure Cognitive Services: Speech to Text SDK. If you would like to check out my other courses, they can be found in [my author's profile](https://app.pluralsight.com/profile/author/jared-rhodes). Here is the breakdown for the course:
## Audience Profile
This course targets software developers who are looking to get started with Microsoft Azure Cognitive Services: Speech to Text API to build modern AI solutions and want to get started building an AI solution with a simple REST interface and a robust set of device SDKs.
## Abstract
With AI becoming more and more ubiquitous, it is important to quickly and easily integrate with AI services. This course will show how to create modern applications using Microsoft Azure Cognitive Services: Speech to Text API and SDKs.
## Prerequisites
This course assumes viewers are familiar with C# and understands REST APIs and JSON.
---
# Atlanta Code Camp 2019 - Save the Date
https://jaredrhodes.com/blog/atlanta-code-camp-2019-save-the-date/
_Archived: originally published April 2019; details may be out of date._
The Atlanta Code Camp 2019 will be on September 14th 2019. Stay tuned for the opening of the Call for Papers and the subsequent Schedule and Agenda. Also, if you or anyone you know would like to sponsor Atlanta Code Camp 2019, reach out and let us know!
---
# Speaking at DotNetSouth.Tech
https://jaredrhodes.com/blog/speaking-at-dotnetsouth-tech/
_Archived: originally published April 2019; details may be out of date._
I look forward to speaking on [AI on the Edge](http://dotnetsouth.tech/session?id=3614) at [DotNetSouth.Tech](http://dotnetsouth.tech/). This year is the conference's first year so check it out.
## AI on the Edge
The next evolution in cloud computing is a smarter application not in the cloud. As the cloud has continued to evolve, the applications that utilize it have had more and more capabilities of the cloud. This presentation will show how to push logic and machine learning from the cloud to an edge application. Afterward, creating edge applications which utilize the intelligence of the cloud should become effortless.
---
# Upcoming interview with The 6 Figure Developer
https://jaredrhodes.com/blog/upcoming-interview-with-the-6-figure-developer/
_Archived: originally published April 2019; details may be out of date._
On May 6th I will be interviewed by [The 6 Figure Developer](https://6figuredev.com/). Topics of discussion are: Azure, Cognitive Services, and IoT.
---
# Creating a Single Gateway, Multi-Region, VPN Architecture in Microsoft Azure
https://jaredrhodes.com/blog/creating-a-single-gateway-multi-region-vpn-architecture-in-microsoft-azure/
The goal of this post is to showcase how to create a gateway for a multi-region VPN architecture in Microsoft Azure. We can start from a very basic use case, three regions:
- One containing the VPN gateway all clients will connect through
- Two other regions containing resources connected to the vNet gateway
> This post was originally published in April 2019 and walks through the Azure portal as it looked then. The portal has changed since, and VPN gateways now support more SKUs and static public IP allocation than described below. Treat the step-by-step screens as a historical reference and check Microsoft's VPN Gateway documentation for the current flow.
There are two terms that will be used throughout this post:
- *Hub* - this refers to the central VPN Gateway that all other VPN Gateways will connect to.
- *Spoke* - this refers to an individual VPN Gateway that connects to the *Hub*
## Planning
Since there will be a vNet for each region, with each spoke's gateway tunneling back to the hub, address spacing should be taken into consideration before creating each Virtual Network in a region. From previous experience, it was considered best practice to:
Address - {shared}.{region\_specific}.{subnet}.{instance}
For example, the address 10.1.2.3 would break down as shared octet 10, region 1, subnet 2, and instance 3.
- Shared - A common root address was picked for the first octet. This is the best place to avoid conflicts with networks outside of Azure that will connect to the *Hub*.
- Region Specific - Each region would get its own address for the second octet
- Subnet - Each subnet in the region would get an address for the third octet
- Instance - Finally each assigned IP address would fill the fourth octet
This does not account for third party integration and Site-to-Site integrations. Those require future planning.
## Create the vNets
Once the planning phase is complete we will create three Virtual Networks in three separate regions. Which Virtual Network is the *Hub* and which is the *Spokes* does not matter yet. The regions are connected later through VNet-to-VNet connections between the gateways, so all inter-region traffic transits the VPN tunnels rather than VNet peering.
1. Sign in to the [Azure portal](http://portal.azure.com/) and select **Create a resource**. The **New** page opens.
2. In the **Search the marketplace** field, enter *virtual network* and select **Virtual network** from the returned list. The **Virtual network** page opens. 
3. From the **Select a deployment model** list near the bottom of the page, select **Resource Manager**, and then select **Create**. The **Create virtual network** page opens. {: loading="lazy" }
4. On the **Create virtual network** page, configure the VNet settings. When you fill in the fields, the red exclamation mark becomes a green check mark when the characters you enter in the field are validated. Some values are autofilled, which you can replace with your own values:
- **Name**: Enter the name for your virtual network.
- **Address space**: Enter the address space. If you have multiple address spaces to add, enter your first address space here. You can add additional address spaces later, after you create the VNet.
- **Subscription**: Verify that the subscription listed is the correct one. You can change subscriptions by using the drop-down.
- **Resource group**: Select an existing resource group, or create a new one by entering a name for your new resource group. If you're creating a new group, name the resource group according to your planned configuration values. For more information about resource groups, see [Azure Resource Manager overview](https://docs.microsoft.com/en-us/azure/azure-resource-manager/resource-group-overview#resource-groups).
- **Location**: Select the location for your VNet. The location determines where the resources that you deploy to this VNet will live.
- **Subnet**: Add the subnet **Name** and subnet **Address range**. You can add additional subnets later, after you create the VNet.
5. Select **Create**.
Before creating a virtual network gateway for your virtual network, you first need to create the gateway subnet. The gateway subnet contains the IP addresses that are used by the virtual network gateway. If possible, it's best to create a gateway subnet by using a CIDR block of /28 or /27 to provide enough IP addresses to accommodate future additional configuration requirements.
1. In the [Azure portal](http://portal.azure.com/), select the Resource Manager virtual network for which you want to create a virtual network gateway.
2. In the **Settings** section of your virtual network page, select **Subnets** to expand the **Subnets** page.
3. On the **Subnets** page, select **Gateway subnet** to open the **Add subnet** page. {: loading="lazy" }
4. The **Name** for your subnet is automatically autofilled with the value *GatewaySubnet*. This value is required for Azure to recognize the subnet as the gateway subnet. Adjust the autofilled **Address range** values to match your configuration requirements, then select **OK** to create the subnet. {: loading="lazy" }
## Create Virtual Network Gateways
Once the Virtual Networks are created, we will create a Virtual Network Gateway for each of the Virtual Networks. Which Virtual Network Gateway is the *Hub* and which is the *Spokes* does not matter yet.
1. Sign in to the Azure portal and select **Create a resource**. The **New** page opens.
2. In the **Search the marketplace field**, enter *virtual network gateway*, and select **Virtual network gateway** from the search list.
3. On the **Virtual network gateway** page, select **Create** to open the **Create virtual network gateway** page. {: loading="lazy" }
4. On the **Create virtual network gateway** page, fill in the values for your virtual network gateway:
- **Name**: Enter a name for the gateway object you're creating. This name is different than the gateway subnet name.
- **Gateway type**: Select **VPN** for VPN gateways.
- **VPN type**: Select the VPN type that is specified for your configuration. Most configurations require a **Route-based** VPN type.
- **SKU**: Select the gateway SKU from the dropdown. The SKUs listed in the dropdown depend on the VPN type you select. For more information about gateway SKUs, see [Gateway SKUs](https://docs.microsoft.com/en-us/azure/vpn-gateway/vpn-gateway-about-vpn-gateway-settings#gwsku). Only select **Enable active-active mode** if you're creating an active-active gateway configuration. Otherwise, leave this setting unselected.
- **Location**: You may need to scroll to see **Location**. Set **Location** to the location where your virtual network is located. For example, **West US**. If you don't set the location to the region where your virtual network is located, it won't appear in the drop-down list when you select a virtual network.
- **Virtual network**: Choose the virtual network to which you want to add this gateway. Select **Virtual network** to open the **Choose virtual network** page and select the VNet. If you don't see your VNet, make sure the **Location** field is set to the region in which your virtual network is located.
- **Gateway subnet address range**: You'll only see this setting if you didn't previously create a gateway subnet for your virtual network. If you previously created a valid gateway subnet, this setting won't appear.
- **Public IP address**: This setting specifies the public IP address object that's associated with the VPN gateway. At the time this was written, the public IP address was dynamically assigned to this object when the VPN gateway was created. Current VPN gateways support static allocation on newer gateway SKUs, and that is the standard practice now. Whether dynamic or static, allocation doesn't mean that the IP address changes after it has been assigned to your VPN gateway. The only time the public IP address changes is when the gateway is deleted and re-created. It doesn't change across resizing, resetting, or other internal maintenance/upgrades of your VPN gateway.
- Leave **Create new** selected.
- In the text box, enter a name for your public IP address.
- **Configure BGP ASN**: Leave this setting unselected, unless your configuration specifically requires it. If you do require this setting, the default ASN is *65515*, which you can change.
5. Verify the settings and select **Create** to begin creating the VPN gateway. The settings are validated and you'll see the **Deploying Virtual network gateway** tile on the dashboard. Creating a gateway can take up to 45 minutes. You may need to refresh your portal page to see the completed status.
6. After you create the gateway, verify the IP address that's been assigned to it by viewing the virtual network in the portal. The gateway appears as a connected device. You can select the connected device (your virtual network gateway) to view more information.
## Connecting the Gateways
With the Virtual Network Gateways created, it is time to connect the gateways. Starting with the *Hub*, connect the *Hub* to a *Spoke*. Then, connect that *Spoke* back to the *Hub*. Do this for each *Spoke* that is going to connect to the *Hub*.
1. In the Azure portal, select **All resources**, enter *virtual network gateway* in the search box, and then navigate to the virtual network gateway for your VNet. For example, **TestVNet1GW**. Select it to open the **Virtual network gateway** page. {: loading="lazy" }
2. Under **Settings**, select **Connections**, and then select **Add** to open the **Add connection** page. {: loading="lazy" }
3. On the **Add connection** page, fill in the values for your connection:
- **Name**: Enter a name for your connection. For example, *TestVNet1toTestVNet4*.
- **Connection type**: Select **VNet-to-VNet** from the drop-down.
- **First virtual network gateway**: This field value is automatically filled in because you're creating this connection from the specified virtual network gateway.
- **Second virtual network gateway**: This field is the virtual network gateway of the VNet that you want to create a connection to. Select **Choose another virtual network gateway** to open the **Choose virtual network gateway** page.
- View the virtual network gateways that are listed on this page. Notice that only virtual network gateways that are in your subscription are listed. If you want to connect to a virtual network gateway that isn't in your subscription, use the [PowerShell](https://docs.microsoft.com/en-us/azure/vpn-gateway/vpn-gateway-vnet-vnet-rm-ps).
- Select the virtual network gateway to which you want to connect.
- **Shared key (PSK)**: In this field, enter a shared key for your connection. You can generate or create this key yourself. In a site-to-site connection, the key you use is the same for your on-premises device and your virtual network gateway connection. The concept is similar here, except that rather than connecting to a VPN device, you're connecting to another virtual network gateway.
4. Select **OK** to save your changes.
## Verify your connections
Locate the virtual network gateway in the Azure portal. On the **Virtual network gateway** page, select **Connections** to view the **Connections** page for the virtual network gateway. After the connection is established, you'll see the **Status** values change to **Succeeded** and **Connected**. Select a connection to open the **Essentials** page and view more information.
{: loading="lazy" }
After verifying the connection was successful, the connection can be tested with a Point-to-Site connection or a Site-to-Site connection.
---
# New Pluralsight Course Released!
https://jaredrhodes.com/blog/new-pluralsight-course-released/
My new Pluralsight course [Microsoft Azure Cognitive Services: Speech to Text SDK](https://app.pluralsight.com/library/courses/microsoft-azure-cognitive-services-speech-text-sdk?utm_source=jaredrhodes&utm_medium=video&utm_campaign=authordemo) was just released! Here is the synopsis:
## Abstract
This course will teach you how to create applications using Cognitive Services: Speech to Text. With it, your applications are more accessible and easier to use with a natural user interface.
## Description
Creating and integrating advanced artificial intelligence into any application is a monumental task for most developers. In this course, Microsoft Azure Cognitive Services: Speech to Text SDK, you will gain the ability to create applications with Cognitive Services: Speech to Text. First, you will learn how to use the C# SDK. Next, you will discover the extensibility and customization options. Finally, you will explore how to integrate with Azure Functions and batch processing. When you are finished with this course, you will have the skills and knowledge of Cognitive Services: Speech to Text needed to integrate advanced artificial intelligence into any application.
---
# Multi-Region Point-to-Site in Microsoft Azure (Windows Fix)
https://jaredrhodes.com/blog/multi-region-point-to-site-in-microsoft-azure-windows-fix/
In a previous post, I showcased how to: [Create a Single Gateway, Multi-Region, VPN Architecture in Microsoft Azure](/blog/creating-a-single-gateway-multi-region-vpn-architecture-in-microsoft-azure/). If testing with Windows didn't work, it may be because Windows has to have its route tables updated to know how to tunnel past the gateway into the different regions. MAC and Linux can use IKEv2 without additional route adding, because those clients pick up the pushed routes from the IKEv2 negotiation itself; the Windows VPN client does not, which is why it needs the fix below.
A. For Windows, by default, it chooses IKEv2, we need to add a route to your spoke VNET
{: width="664" height="399" loading="lazy" }
Suppose the VNET spoke address space is 10.2.0.0 255.255.0.0, and Client VPN interface IP is 172.16.100.130
{: width="582" height="53" loading="lazy" }
B. We also need to test the [**CMAK** or **manually create a SSTP VPN**](https://lesca.me/archives/manually-setup-azure-p2s-vpn-on-client-computer.html) profile to Azure on Windows client.
---
# Upcoming Pluralsight Course - Designing an Intelligent Edge in Microsoft Azure
https://jaredrhodes.com/blog/upcoming-pluralsight-course-designing-an-intelligent-edge-in-microsoft-azure/
Off to start another course for Pluralsight. This time its Designing an Intelligent Edge in Microsoft Azure. If you would like to check out any of my other courses, visit my [author's profile](https://app.pluralsight.com/profile/author/jared-rhodes). The new course will cover the following topics:
- Edge -
- Scenarios
- Concerns
- Architecture
- Azure AI Pipelines - Overview with edge
- Edge Pipelines -
- Azure Stack
- Azure Databox Edge
- Azure IoT Edge
- Cognitive Services - Overview with Edge
- Azure Databricks - Overview
- Azure Machine Learning VMs
- Project Brainwave
---
# Securing SSH in Azure
https://jaredrhodes.com/blog/securing-ssh-in-azure/
On a recent project I inherited an Azure IaaS setup that managed Linux VMs by connecting via SSH from public IPs. I figured while we did a vNet migration we might as well secure the SSH pipeline.
## Disable SSH Arcfour and CBC Ciphers
Arcfour is compatible with RC4 encryption and has issues with weak keys, which should be avoided. See RFC 4253 for more information [here](https://tools.ietf.org/html/rfc4253#section-6.3).
The SSH server located on the remote host also allows cipher block chaining (CBC) ciphers to be used to establish a Secure Shell (SSH) connection, leaving encrypted content vulnerable to a plaintext recovery attack. SSH is a cryptographic network protocol that allows encrypted connections between machines to be established. These connections can be used for remote login by an end user, or to encrypt network services. SSH leverages various encryption algorithms to make these connections, including ciphers that employ cipher block chaining.
The plaintext recovery attack can return up to thirty two bits of plaintext with a probability of 2^-18 or fourteen bits of plain text with a probability of 2^-14. This exposure is caused by the way CBC ciphers verify the message authentication code (MAC) for a block. Each block's MAC is created by a combination of an unencrypted sequence number and an encrypted section containing the packet length, padding length, payload, and padding. With the length of the message encrypted the receiver of the packet needs to decrypt the first block of the message in order to obtain the length of the message to know how much data to read. As the location of the message length is static among all messages, the first four bytes will always be decrypted by a recipient. An attacker can take advantage of this by submitting an encrypted block, one byte at a time, directly to a waiting recipient. The recipient will automatically decrypt the first four bytes received as it the length is required to process the message's MAC. Bytes controlled by an attacker can then be submitted until a MAC error is encountered, which will close the connection. Note as this attack will lead to the SSH connection to be closed, iterative attacks of this nature will be difficult to carry out against a target system.
Establishing an SSH connection using CBC mode ciphers can result in the exposure of plaintext messages, which are derived from an encrypted SSH connection. Depending on the data being transmitted, an attacker may be able to recover session identifiers, passwords, and any other data passed between the client and server.
Disable Arcfour ciphers in the SSH configuration. These ciphers are now disabled by default in some OpenSSH installations. All CBC mode ciphers should also be disabled on the target SSH server. In the place of CBC, SSH connections should be created using ciphers that utilize CTR (Counter) mode or GCM (Galois/Counter Mode), which are resistant to the plaintext recovery attack.
The sshd\_config file should only contain the following options as far as supported ciphers are concerned:
- aes128-ctr
- aes192-ctr
- aes256-ctr
## Disable SSH Weak MAC Algorithms
The SSH server is configured to allow cipher suites that include weak message authentication code ("MAC") algorithms. Examples of weak MAC algorithms include MD5 and other known-weak hashes, and/or the use of 96-bit or shorter keys. The SSH protocol uses a MAC to ensure message integrity by hashing the encrypted message, and then sending both the message and the output of the MAC hash function to the recipient. The recipient then generates their hash of the message and related content and compares it to the received hash value. If the values match, there is a reasonable guarantee that the message is received "as is" and has not been tampered with in transit.
If the SSH server is configured to accept weak or otherwise vulnerable MAC algorithms, an attacker may be able to crack them in a reasonable timeframe. This has two potential effects:
- The attacker may figure out the shared secret between the client and the server thereby allowing them to read sensitive data being exchanged.
- The attacker may be able to tamper with the data in-transit by injecting their own packets or modifying existing packet data sent within the SSH stream.
Disable all 96-bit HMAC algorithms, MD5-based HMAC algorithms, and all CBC mode ciphers configured for SSH on the server. The sshd\_config file should only contain the following options as far as supported MAC algorithms are concerned:
- hmac-sha2-512
- hmac-sha2-512-etm@openssh.com
- hmac-sha2-256
- hmac-sha2-256-etm@openssh.com
- hmac-ripemd160-etm@openssh.com
- umac-128-etm@openssh.com
- hmac-ripemd160
- umac-128@openssh.com
In addition, all CBC mode ciphers should be replaced with their CTR mode counterparts.
## Testing
To test, run the following command:
```
nmap -sS -sV -p 22 -script ssh2-enum-algos [TARGET IP]
```
---
# Azure IoT Edge - YOLO, Stream Analytics Service, and Blob Storage
https://jaredrhodes.com/blog/azure-iot-edge-yolo-stream-analytics-service-and-blob-storage/
As a continuation of the [Izon camera hack](/blog/hacking-izon-cameras-and-using-azure-iot-edge/), I wanted to detect if my dog was using the doggy door in the main room. The approach was going to be simple at first, detect the dog in the room and not in the room. When in the room changes (or not in the room), upload 10 seconds worth of images to Azure to see if the dog used the door.
#### Image Classification
To detect the dog, the first and largest challenge to these types of tasks is getting enough images to train the model. For me, this meant saving images of the dog in a pre-aligned shot. This is easy enough to accomplish; the room the images will be processed in should only have the dog moving in it. Since he is the only moving object, [YOLO](https://github.com/zhreshold/mxnet-yolo) can be used to detect the position of objects in the room and then the position of these objects can be checked to see if there is any movement. If there is any movement, the images can be saved for later categorization. To accomplish this, there will be four modules:
- [Camera Module](/blog/hacking-izon-cameras-and-using-azure-iot-edge/) - Accesses the camera feeds to save the images
- Object Detection Module - Uses YOLO to detect object and object positions
- Motion Detection Module - Uses Stream Analytics Service to detect if object positions are moving.
- Image Storage Module - Uses Blob Storage so save and delete the images
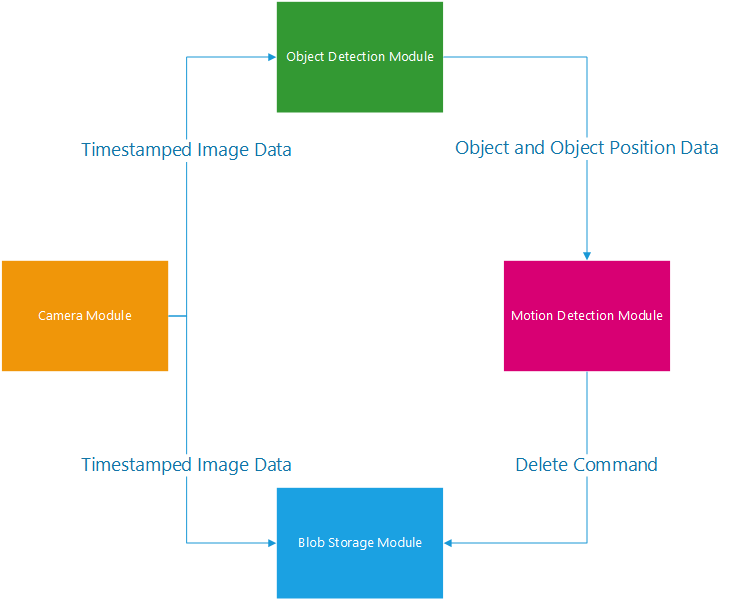{: width="729" height="600" loading="lazy" }
The Camera module will send the timestamped images to the Object Detection Module and the Image Storage Module. The Object Detection Module will then use YOLO to detect the objects and their positions in the image. Those detection results will be sent to the Motion Detection Module, which will use Streaming Analytics Service to see if there was motion detected over the last ten seconds. If there is no motion detected over the last ten seconds, then the Motion Detection Module will send a delete command to the Image Storage Module to remove the image without motion from the store. The routing Table will look as so:
https://gist.github.com/QiMata/668a402c625fe3a1c9f8f74097fb1d7b
These modules will be broken up into their own articles for readability and searchability. If there is no link to a module article it is because that article is not completed or is not published yet.
---
# Communicating between Python and .NET Core with Boost Interprocess
https://jaredrhodes.com/blog/communicating-between-python-and-net-core-with-boost-interprocess/
To see if I could, I put together a cross communication library for [.Net Core](https://docs.microsoft.com/en-us/dotnet/core/) and [Python](https://www.python.org/) applications using [Boost.Interprocess](https://www.boost.org/doc/libs/1_70_0/doc/html/interprocess.html#interprocess.intro.introduction_building_interprocess), [Boost.Python](https://www.boost.org/doc/libs/1_70_0/libs/python/doc/html/index.html), and [Boost.Signals2](https://www.boost.org/doc/libs/1_70_0/doc/html/signals2.html). The goal was simple, expose the same interface for cross communication to C# and Python. The approach taken was to use the [condition example](https://www.boost.org/doc/libs/1_70_0/doc/html/interprocess/synchronization_mechanisms.html#interprocess.synchronization_mechanisms.conditions) and edit it to expose to the different languages.
## Shared Definitions
First I need to create the objects to make the interface. There are four files making up these objects:
- shm\_remove.hpp - just a lifecycle object to clear the shared buffer when it is destructed
- TraceQueue.hpp - The shared memory object
- SharedMemoryConsumer.hpp - The subscriber to the shared memory data
- SharedMemoryProducer.hpp - The publisher for the shared memory data
https://gist.github.com/QiMata/e7192eb93a0910787e0244241351e5e9
These objects comprise the core interface of the shared memory provider. Now, the memory providers need to be exposed to multiple languages. There are different ways to do this and I decided to do it by hand. I should point out [SWIG](http://www.swig.org/) is my usual approach to this task, however, in this instance it seemed easy enough to do it by hand.
## Boost Python
To expose the python code, I needed to create a few classes to expose the interface definitions to [Boost.Python](https://www.boost.org/doc/libs/1_70_0/libs/python/doc/html/index.html). The two classes are:
- PythonSharedMemoryConsumer.hpp - The python interface for the SharedMemoryConsumer
- PythonModule.cpp - The file that exposes the module to python
https://gist.github.com/QiMata/33d364ac9873eca30413ccb5a7606fa8
These two classes combine to expose the files to python and can be used in a python script by just importing the shared library.
## .NET Core
With the python portion complete, I needed to expose the shared memory objects to CSharp. This is easy enough to do by hand if you expose the classes to be used by [PInvoke](https://docs.microsoft.com/en-us/dotnet/standard/native-interop/pinvoke). To accomplish this, I only needed three files:
- NetCoreSharedMemoryProducer.hpp - The .NET Core version of the publisher
- NetCoreSharedMemoryConsumer.hpp - The .NET Core version of the consumer
- NetCoreModule.cpp - The source file exposing the interfaces for PInvoke
https://gist.github.com/QiMata/a702627eb38250e28142773bda03719b
Now we need to call that code from C# using PInvoke Interop
https://gist.github.com/QiMata/a8b08811c7eb37d04756909ce5531570
---
# Multiple TensorFlow Graphs from Cognitive Services - Custom Vision Service
https://jaredrhodes.com/blog/multiple-tensorflow-graphs-from-cognitive-services-custom-vision-service/
For one project, there was a need for multiple models within the same Python application. These models were trained using the [Cognitive Services: Custom Vision Service](https://azure.microsoft.com/en-us/services/cognitive-services/custom-vision-service/). There are two steps to using an exported model:
1. Prepare the image
2. Classify the image
## Prepare an image for prediction
https://gist.github.com/QiMata/6ebb15a8e42450e57c3fe48b44e920cb
## Classify the image
To run multiple models in Python was fairly simple. Simply call *tf.reset\_default\_graph()* after saving the loaded session into memory.
https://gist.github.com/QiMata/b63c7d0699173067d4c60c9f06a63273
After the CustomVisionCategorizer is created, just call *score* and it will score with the labels in the map.
---
# MVP Renewal
https://jaredrhodes.com/blog/mvp-renewal-2019/
_Archived: originally published July 2019; details may be out of date._
Proudly, I will be entering my third year as a Microsoft MVP. This will be under the [Microsoft Azure](https://azure.microsoft.com/en-us/) category again. Moving forward, I look forward to doing a large amount of work and training with [Azure Edge](https://azure.microsoft.com/en-us/services/iot-edge/) and [Azure ML](https://azure.microsoft.com/en-us/services/machine-learning-services/). Specifically, I look forward to working on the [Scry Unlimited](https://scryunlimited.com/) and other projects I find throughout the year. To contact me for your project, please visit the [contact page](https://jaredrhodescom.wordpress.com/consulting/).
As a start, on 7/16/2019 I will be presenting [AI on the Edge](https://www.meetup.com/Azure-in-the-ATL/events/260868527/) at the [Azure in the ATL](https://www.meetup.com/Azure-in-the-ATL/) user group. Following that up I will be speaking at events around the country and hopefully internationally again. In addition to my normal speaking on Mobile, Cloud, and Edge; I will be adding Machine Learning and Artificial Intelligence specifically focusing on the integration with Edge and Mobile computing.
Finally, I am still putting together events in Atlanta. If you would like to participate in any of the following events, just follow their links or message me on [Twitter](https://twitter.com/QiMata):
- Atlanta Code Camp
- [Atlanta Intelligent Devices User Group](https://www.meetup.com/atlantaIntelligentDevices/)
---
# iotedge: error while loading shared libraries: libssl.so.1.0.2: cannot open shared object file: No such file or directory - Raspberry Pi
https://jaredrhodes.com/blog/iotedge-error-while-loading-shared-libraries-libssl-so-1-0-2-cannot-open-shared-object-file-no-such-file-or-directory-raspberry-pi/
After installing Azure IoT Edge using the guide for Linux ARM32, the following error was presented: "***iotedge: error while loading shared libraries: libssl.so.1.0.2: cannot open shared object file: No such file or directory***".
The fix was simple enough, just install the building libssl1.0.2 using the following command:
**sudo apt-get install libssl1.0.2**
Test by running the iotedge command:
***iotedge***
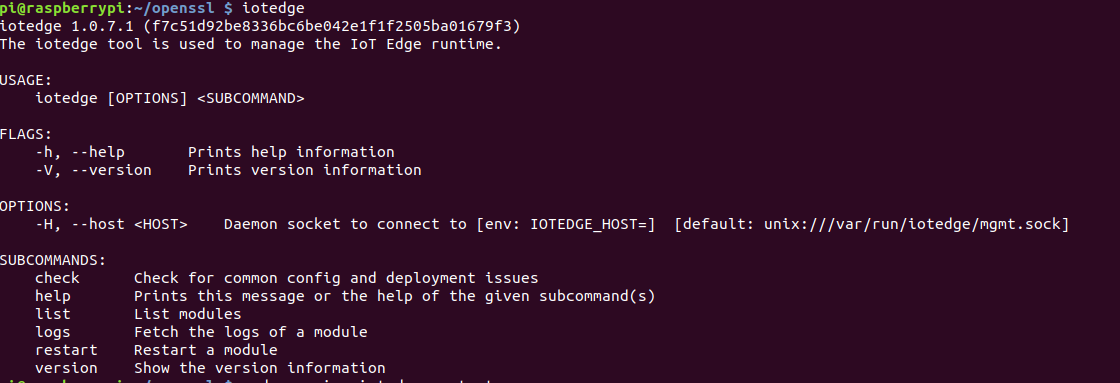{: width="1120" height="383" loading="lazy" }
If that works successfully, restart the iotedge service:
***sudo service iotedge restart***
Verify that it is running by checking the service status:
***sudo service iotedge status***
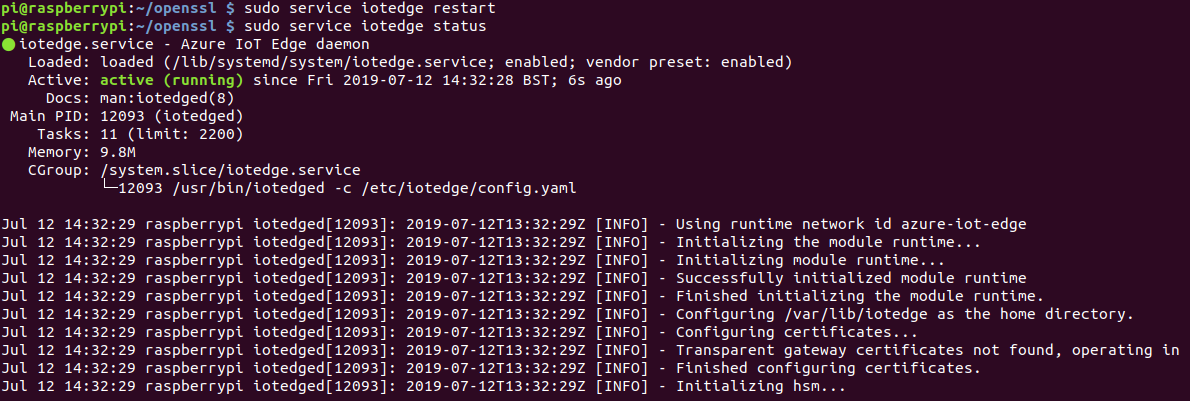{: width="1190" height="401" loading="lazy" }
---
# Pluralsight Course Published - Designing an Intelligent Edge in Microsoft Azure
https://jaredrhodes.com/blog/pluralsight-course-published-designing-an-intelligent-edge-in-microsoft-azure/
[Designing an Intelligent Edge in Microsoft Azure](https://app.pluralsight.com/library/courses/microsoft-azure-intelligent-edge-designing/table-of-contents) was just published on Pluralsight! Check it out. Here is a synopsis of what's in it:
This course targets software developers that are looking to integrate AI solutions in edge scenarios ranging from an edge data center down to secure microcontrollers. This course will showcase how to design solutions using Microsoft Azure.
Cloud computing has moved more and more out of the cloud and onto the edge. In this course, Designing an Intelligent Edge in Microsoft Azure, you will learn foundational knowledge of edge computing, its intersection with AI, and how to utilize both with Microsoft Azure. First, you will learn the concepts of edge computing. Next, you will discover how to create an edge solution utilizing Azure Stack, Azure Data Box Edge, and Azure IoT Edge. Finally, you will explore how to utilize off the shelf AI and build your own for Azure IoT Edge. When you are finished with this course, you will have the skills and knowledge of AI on the edge needed to architect your next edge solution. Software required: Microsoft Azure, .NET
---
# Authoring for Pluralsight - Developing Microsoft Azure Intelligent Edge Solutions
https://jaredrhodes.com/blog/authoring-for-pluralsight-developing-microsoft-azure-intelligent-edge-solutions/
Off to start another course for Pluralsight. This time its Developing Microsoft Azure Intelligent Edge Solutions. If you would like to check out any of my other courses, visit my [author's profile](https://app.pluralsight.com/profile/author/jared-rhodes). The new course will cover the following topics:
- Edge
- IoT Architecture
- IoT use cases and solutions
- Edge Architecture
- Azure IoT Hub
- Overview of the IoT Ecosystem in Azure
- IoT Hub message routing
- Stream processing overview
- Hot, Warm, and Cold paths
- Use cases for hot, warm, and cold paths
- Hot path with event hubs and log app
- Warm path with Cosmos DB
- Cold path with Azure Blob Storage
- Real Time and Batch Processing
- Overview and Demos of Stream Analytics Service
- Overview and Demos of Time Series Insights
---
# numpy/core/_multiarray_umath.cpython-35m-arm-linux-gnueabihf.so: undefined symbol: cblas_sgemm - Raspberry Pi
https://jaredrhodes.com/blog/numpy-core-multiarray-umath-cpython-35m-arm-linux-gnueabihf-so-undefined-symbol-cblas-sgemm-raspberry-pi/
While working on a Raspberry Pi image that had been used prior by an electrical engineer to setup all of the dependencies for the hardware, there was an error when trying to upgrade to use Tensorflow. Tensorflow was needed to run a model trained with Cognitive Services: Custom Vision Service. The error was when the script imported Numpy. That caused the following error:
**numpy/core/\_multiarray\_umath.cpython-35m-arm-linux-gnueabihf.so: undefined symbol: cblas\_sgemm**
To remedy this, all of the installations of Numpy had to be uninstalled. The following commands were run:
- ***apt-get remove python-numpy***
- ***apt-get remove python3-numpy***
- ***pip3 uninstall numpy***
After all three of those commands complete, Numpy was reinstalled using the package provided for raspian:
***apt-get install python3-numpy***
---
# Creating .proto definitions from existing types at runtime
https://jaredrhodes.com/blog/creating-proto-definitions-from-existing-types-at-runtime/
There was a need to create .proto definition files from the definitions of a reverse engineered database first project. The approach taken was that of using System.Emit to generate the type definitions and feed those to protobuf-net and use its ability to generate the .proto files.
There are only three classes needed:
- ContextFinder
- ClassGenerator
- Program
The ContextFinder is pretty straight forward. It uses reflection to get all the generic parameters of DbSet<> properties within a DbContext. Then, ClassGenerator is used to copy the properties of the Types we harvested into a new type with the addition of adding ProtoContract and ProtoMember appropriately. Then, the Program class just loads the assembly from the file specified and runs the previously two mentioned classes.
https://gist.github.com/QiMata/368efca0829362327c8e6ea8b6678e9b
---
# New Pluralsight Courses
https://jaredrhodes.com/blog/new-pluralsight-courses/
I've been busy and not able to update that I have new courses available on Pluralsight:
- [Developing Microsoft Azure Intelligent Edge Solutions](https://app.pluralsight.com/library/courses/microsoft-azure-developing-intelligent-edge-solutions/table-of-contents)
- [Building Your First Data Science Project in Microsoft Azure](https://app.pluralsight.com/library/courses/microsoft-azure-building-first-data-science-project/table-of-contents)
## [Developing Microsoft Azure Intelligent Edge Solutions](https://app.pluralsight.com/library/courses/microsoft-azure-developing-intelligent-edge-solutions/table-of-contents)
This course targets software developers that are looking to build edge solutions that can process data and make intelligent decisions. This course will showcase how to develop those solutions using Microsoft Azure.
Over time, what was once simply Internet of Things solutions has evolved into Edge solutions. In this course, Developing an Intelligent Edge in Microsoft Azure, you will learn foundational knowledge of edge computing, how it interacts with data and messaging systems, and how to utilize both with Microsoft Azure. First, you will learn the concepts of edge and internet of things computing. Next, you will discover how to process streaming data on hot, warm, and cold paths. Finally, you will explore how real-time and batch processing can be utilized in an edge solution. When you are finished with this course, you will have the skills and knowledge of edge and internet of things in Azure needed to architect your next edge solution. Software required: Microsoft Azure, .NET.
## [Building Your First Data Science Project in Microsoft Azure](https://app.pluralsight.com/library/courses/microsoft-azure-building-first-data-science-project/table-of-contents)
This course targets software developers looking to build data science solutions that can utilize the power of the cloud. The content will also showcase how to create those solutions using Microsoft Azure.
The past five years have shown a boom in the data science field with advancements in hardware and cloud computing. In this course, Building Your First Data Science Project in Microsoft Azure, you will learn about data science and how to get started utilizing it in Microsoft Azure. First, you will learn the data science and the tools surrounding it. Next, you will discover how to create a development environment in Microsoft Azure. Finally, you will explore how to maintain and utilize that development environment. When you are finished with this course, you will have the skills and knowledge of data science to build your first data science project in Microsoft Azure. Software required: Microsoft Azure.
---
# Authoring for Pluralsight - Azure Machine Learning
https://jaredrhodes.com/blog/authoring-for-pluralsight-azure-machine-learning/
_Archived: originally published November 2019; details may be out of date._
Off to start another set of courses for Pluralsight:
- Sourcing Data in Microsoft Azure
- Deploying and Managing Models in Microsoft Azure
- Cleaning and Preparing Data in Microsoft Azure
If you would like to check out any of my other courses, visit my [author's profile](https://app.pluralsight.com/profile/author/jared-rhodes).
## Sourcing Data in Microsoft Azure
This course is for people looking to move into the data sciences. They can have an existing background in development or IT.
This course will show how to find data in Microsoft Azure, how to move and change that data, and finally how to build workflows around that data.
This course assumes the developer has an understanding of basic computer terminology and the azure portal.
## Deploying and Managing Models in Microsoft Azure
This course is for data science practitioners who need to learn more about how to utilize tools for managing the models they create.
The audience will be taken through automation and DevOps to learn more about how to manage their workflows. Everything from versioning, automated deployments, automated hyper-parameter tuning, and more will be discussed.
This course assumes the data scientist has an understanding of machine learning and common terminology and integration in machine learning projects. The course also assumes the data scientist has knowledge of Azure and the Azure portal.
## Cleaning and Preparing Data in Microsoft Azure
This course is for people looking to move into the data sciences. They can have an existing background in development or IT.
This course introduces the audience to the different data preparation steps involved with data projects. This course will show how to clean, transform, and wrangle the data needed for a data project.
This course assumes the developer has an understanding of basic computer terminology and the azure portal.
---
# New Pluralsight Course Released!
https://jaredrhodes.com/blog/new-pluralsight-course-released-2/
My new Pluralsight course [Deploying and Managing Models in Microsoft Azure](https://app.pluralsight.com/library/courses/microsoft-azure-deploying-managing-models/table-of-contents?utm_source=jaredrhodes&utm_medium=video&utm_campaign=authordemo) was just released! Here is the synopsis:
## Abstract
In this course, you'll learn about how data science practitioners can utilize tools for managing the models they create. You'll also see those tools showcased in Microsoft Azure.
## Description
One of the most overlooked processes in data science is managing the life cycle of models. In this course, Deploying and Managing Models in Microsoft Azure, you'll gain foundational knowledge of Azure Machine Learning. First, you'll discover how to create and utilize Azure Machine Learning. Next, you'll find out how to integrate with Azure DevOps. Finally, you'll explore how to utilize them together to automate the deployment and management of models. When you're finished with this course, you'll have the skills and knowledge of model life cycle management needed to manage a machine learning project. Software required: Microsoft Azure.
---
# New Pluralsight Course Released!
https://jaredrhodes.com/blog/new-pluralsight-course-released-3/
My new Pluralsight course [Sourcing Data in Microsoft Azure](https://app.pluralsight.com/library/courses/microsoft-azure-sourcing-data/table-of-contents) was just released! Here is the synopsis:
## Abstract
This course targets software developers looking to source data from inside and outside of the cloud. The content will also showcase methods and tools available using Microsoft Azure.
## Description
The cloud has nearly infinite compute power for processing. In this course, Sourcing Data in Microsoft Azure, you'll learn foundational knowledge of data types, data policy, and finding data. First, you'll learn how to register data sources with Azure Data Catalog. Next, you'll discover how to extract, transform, and load data with Azure Data Factory. Finally, you'll explore how to set up data processing with Azure HD Insight. When you're finished with this course, you'll have the skills and knowledge of the tools and processes needed to source data in Microsoft Azure. Software required: Microsoft Azure portal.
---
# Azure IoT Hub - OpenSSL - Generate proof of possession
https://jaredrhodes.com/blog/azure-iot-hub-openssl-generate-proof-of-possession/
The Azure IoT documentation has guides on setting up certifications for production use. That documentation showcases how to properly setup using certificate authorities to generate proof of possession. For development purposes, you may want to use self signed certificates.
1. Assuming the original key and cert were created with the following commands (Azure IoT reports unverified if you upload it):
```
# Create root key
openssl genrsa -out iotHubRoot.key 2048
# Create root cert
openssl req -new -x509 -key iotHubRoot.key -out iotHubRoot.cer -days 500
```
2. Then generate the verification cert (pay attention to fill in common name with verification code):
```
# Create verification key and csr
openssl genrsa -out verification.key 2048
openssl req -new -key verification.key -out verification.csr
#It will prompt for cert fields.
#IMPORTANT: The Common Name needs to be your Verification Code (generate and copy that from portal)
# Create verification pem
openssl x509 -req -in verification.csr -CA iotHubRoot.cer -CAkey iotHubRoot.key -CAcreateserial -out verification.pem -days 500 -sha256
```
3. Upload pem file to portal to verify certificate
---
# gRPC C++ and Self Signed Certificates
https://jaredrhodes.com/blog/grpc-c-and-self-signed-certificates/
Playing around with gRPC with a C++ server caused an issue that took longer to solve than it should. Once the linker and other issues were solved, the following error started to follow:
7562 ssl\_transport\_security.cc:1238] Handshake failed with fatal error SSL\_ERROR\_SSL: error:100000c0:SSL routines:OPENSSL\_internal:PEER\_DID\_NOT\_RETURN\_A\_CERTIFICATE.
After searching, it lead me to [this file](https://github.com/grpc/grpc/blob/614331a50682c74fa8c02dcea674ca2ef5746225/include/grpc/grpc_security_constants.h#L60-L100) where the different enumeration values for the SSL handling could be set.
```c
/** Server does not request client certificate. A client can present a self
signed or signed certificates if it wishes to do so and they would be
accepted. */
GRPC_SSL_DONT_REQUEST_CLIENT_CERTIFICATE,
/** Server requests client certificate but does not enforce that the client
presents a certificate.
If the client presents a certificate, the client authentication is left to
the application based on the metadata like certificate etc.
The key cert pair should still be valid for the SSL connection to be
established. */
GRPC_SSL_REQUEST_CLIENT_CERTIFICATE_BUT_DONT_VERIFY,
/** Server requests client certificate but does not enforce that the client
presents a certificate.
If the client presents a certificate, the client authentication is done by
grpc framework (The client needs to either present a signed cert or skip no
certificate for a successful connection).
The key cert pair should still be valid for the SSL connection to be
established. */
GRPC_SSL_REQUEST_CLIENT_CERTIFICATE_AND_VERIFY,
/** Server requests client certificate but enforces that the client presents a
certificate.
If the client presents a certificate, the client authentication is left to
the application based on the metadata like certificate etc.
The key cert pair should still be valid for the SSL connection to be
established. */
GRPC_SSL_REQUEST_AND_REQUIRE_CLIENT_CERTIFICATE_BUT_DONT_VERIFY,
/** Server requests client certificate but enforces that the client presents a
certificate.
The cerificate presented by the client is verified by grpc framework (The
client needs to present signed certs for a successful connection).
The key cert pair should still be valid for the SSL connection to be
established. */
GRPC_SSL_REQUEST_AND_REQUIRE_CLIENT_CERTIFICATE_AND_VERIFY
```
That lead me to find a more thorough breakdown of the use cases for each enumeration [in this GitHub issue reply](https://github.com/grpc/grpc/issues/15588#issuecomment-413595416). Summarizing the parts that mattered for my case:
- `GRPC_SSL_DONT_REQUEST_CLIENT_CERTIFICATE`: the server never asks; the client may present anything or nothing.
- `GRPC_SSL_REQUEST_CLIENT_CERTIFICATE_BUT_DONT_VERIFY`: the server requests a certificate but leaves signature enforcement to the application, which can verify self-signed certs through an out-of-band mechanism such as a registered hash.
- Request/require/verify are three independent axes: whether the server asks, whether the client must present, and whether the server verifies the presented cert against its SSL roots.
- None of it helps if the key pair itself is mismatched - the connection fails regardless.
- `grpc_auth_context` exposes peer properties (CN, PEM cert, SAN) you can inspect yourself.
**Finally, that lead me to understand that for self-signed certificates in development GRPC\_SSL\_REQUEST\_CLIENT\_CERTIFICATE\_BUT\_DONT\_VERIFY was the right enumeration.**
---
# New Pluralsight Courses Released!
https://jaredrhodes.com/blog/new-pluralsight-courses-released/
My new Pluralsight courses [Cleaning and Preparing Data in Microsoft Azure](https://app.pluralsight.com/library/courses/microsoft-azure-cleaning-preparing-data/table-of-contents?utm_source=blog&utm_medium=video&utm_campaign=authordemo) and [Architecting Xamarin.Forms Applications for Code Reuse](https://app.pluralsight.com/library/courses/architecting-xamarin-forms-applications-code-reuse/table-of-contents?utm_source=youtube&utm_medium=video&utm_campaign=authordemo) were just released! Here are the synopsis:
## Cleaning and Preparing Data in Microsoft Azure
### Abstract
This course targets software developers and data scientists looking to understand the initial steps in a machine learning solution. The content will showcase methods and tools available using Microsoft Azure.
### Description
No data science project of merit has ever started with great data ready to plug into an algorithm. In this course, Cleaning and Preparing Data in Microsoft Azure, you'll learn foundational knowledge of the steps required to utilize data in a machine learning project. First, you'll discover different types of data and languages. Next, you'll learn about managing large data sets and handling bad data. Finally, you'll explore how to utilize Azure Notebooks. When you're finished with this course, you'll have the skills and knowledge of preparing data needed for use in Microsoft Azure. Software required: Microsoft Azure.
## Architecting Xamarin.Forms Applications for Code Reuse
### Abstract
A well-architected application is flexible to changing business requirements. This course will teach you how to architect Xamarin.Forms applications in a way that promotes reusable patterns.
### Description
As business requirements change, so do solution assumptions. In this course, Architecting Xamarin.Forms Applications for Code Reuse, you'll learn different architectural patterns in Xamarin.Forms. First, you'll explore project structure and organization. Next, you'll discover patterns and standards to promote code sharing. Finally, you'll learn how to utilize dependency injection in Xamarin.Forms. When you're finished with this course, you'll have the skills and knowledge of architecting Xamarin.Forms projects needed to optimally promote code reuse.
---
# Using Cognitive Services: Custom Vision Service with Azure IoT Edge
https://jaredrhodes.com/blog/using-cognitive-services-custom-vision-service-with-azure-iot-edge/
This is a guide on how to use Cognitive Services: Custom Vision Service with Azure IoT Edge without having the Edge module host a web endpoint but instead use the built in Module to Module communication. This post will break down the steps into three major sections:
- Creating the Custom Vision Model
- Creating the Edge Module in Python
- Deploy the Module
## Creating the Custom Vision Model
To use the Custom Vision Service for image classification, you must first build a classifier model. In this guide, you'll learn how to build a classifier through the Custom Vision website.
### Prerequisites
- A valid Azure subscription. [Create an account](https://azure.microsoft.com/free/) for free.
- A set of images with which to train your classifier. See below for tips on choosing images.
### Create Custom Vision resources in the Azure portal
To use Custom Vision Service, you will need to create Custom Vision Training and Prediction resources in the [Azure portal](https://portal.azure.com/?microsoft_azure_marketplace_ItemHideKey=microsoft_azure_cognitiveservices_customvision#create/Microsoft.CognitiveServicesCustomVision). This will create both a Training and Prediction resource.
### Create a new project
In your web browser, navigate to the [Custom Vision web page](https://customvision.ai) and select **Sign in**. Sign in with the same account you used to sign into the Azure portal.
1. To create your first project, select **New Project**. The **Create new project** dialog box will appear.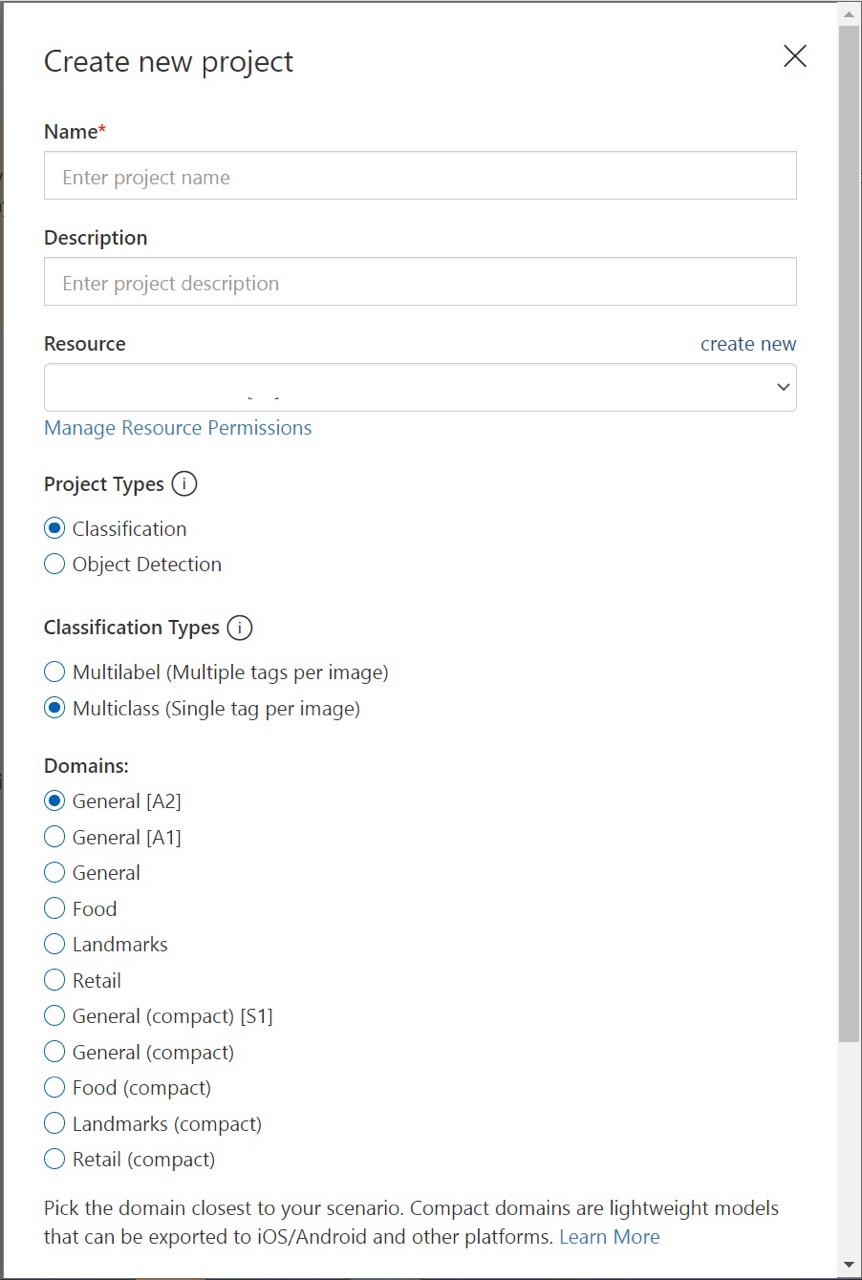{: loading="lazy" }
2. Enter a name and a description for the project. Then select a Resource Group. If your signed-in account is associated with an Azure account, the Resource Group dropdown will display all of your Azure Resource Groups that include a Custom Vision Service Resource.
3. Select **Classification** under **Project Types**. Then, under **Classification Types**, choose either **Multilabel** or **Multiclass**, depending on your use case. Multilabel classification applies any number of your tags to an image (zero or more), while multiclass classification sorts images into single categories (every image you submit will be sorted into the most likely tag). You will be able to change the classification type later if you wish.
4. Next, select one of the available domains. Each domain optimizes the classifier for specific types of images, as described in the following table. You will be able to change the domain later if you wish.
| Domain | Purpose |
|---|---|
| **Generic** | Optimized for a broad range of image classification tasks. If none of the other domains are appropriate, or you are unsure of which domain to choose, select the Generic domain. |
| **Food** | Optimized for photographs of dishes as you would see them on a restaurant menu. If you want to classify photographs of individual fruits or vegetables, use the Food domain. |
| **Landmarks** | Optimized for recognizable landmarks, both natural and artificial. This domain works best when the landmark is clearly visible in the photograph. This domain works even if the landmark is slightly obstructed by people in front of it. |
| **Retail** | Optimized for images that are found in a shopping catalog or shopping website. If you want high precision classifying between dresses, pants, and shirts, use this domain. |
| **Compact domains** | Optimized for the constraints of real-time classification on mobile devices. The models generated by compact domains can be exported to run locally. |
5. Finally, select **Create project**.
### Choose training images
As a minimum, we recommend you use at least 30 images per tag in the initial training set. You'll also want to collect a few extra images to test your model once it is trained.
In order to train your model effectively, use images with visual variety. Select images with that vary by:
- camera angle
- lighting
- background
- visual style
- individual/grouped subject(s)
- size
- type
Additionally, make sure all of your training images meet the following criteria:
- .jpg, .png, or .bmp format
- no greater than 6MB in size (4MB for prediction images)
- no less than 256 pixels on the shortest edge; any images shorter than this will be automatically scaled up by the Custom Vision Service
### Upload and tag images
In this section you will upload and manually tag images to help train the classifier.
1. To add images, click the **Add images** button and then select **Browse local files**. Select **Open** to move to tagging. Your tag selection will be applied to the entire group of images you've selected to upload, so it is easier to upload images in separate groups according to their desired tags. You can also change the tags for individual images after they have been uploaded.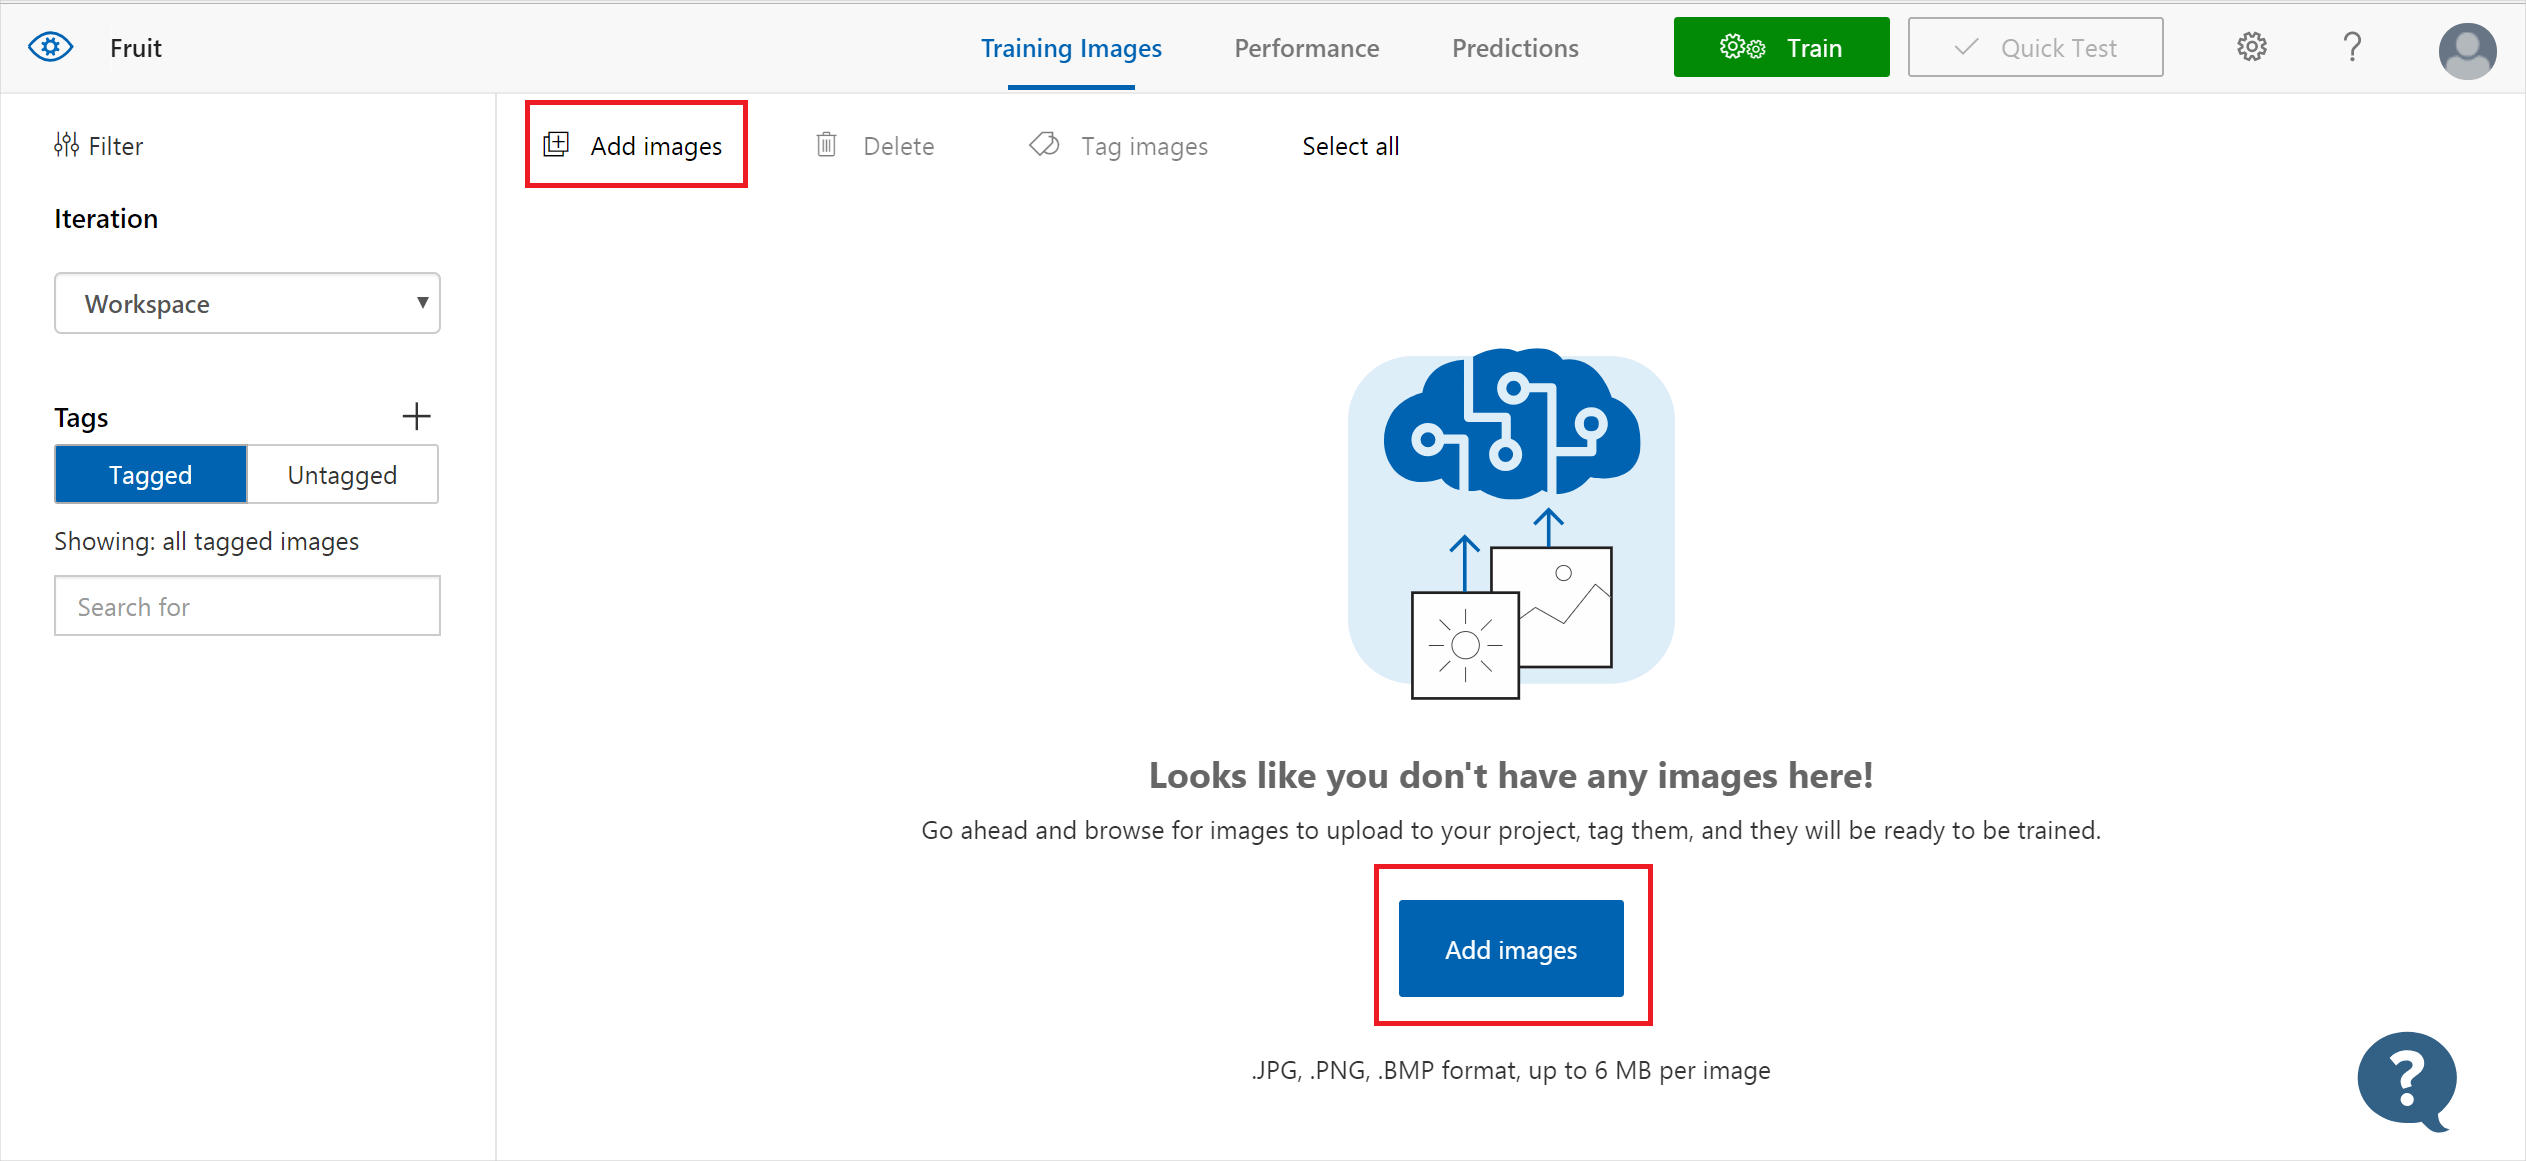{: loading="lazy" }
2. To create a tag, enter text in the **My Tags** field and press Enter. If the tag already exists, it will appear in a dropdown menu. In a multilabel project, you can add more than one tag to your images, but in a multiclass project you can add only one. To finish uploading the images, use the **Upload [number] files** button.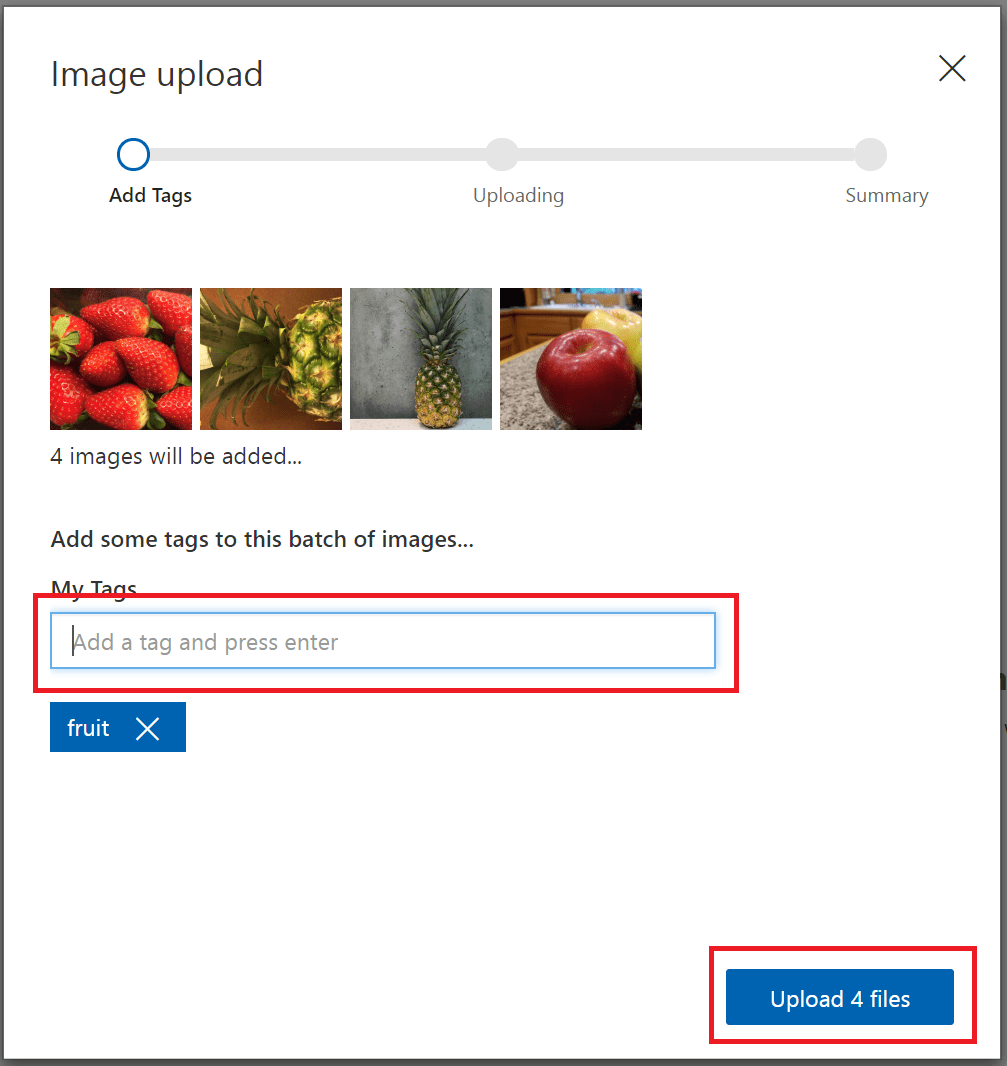{: loading="lazy" }
3. Select **Done** once the images have been uploaded.{: loading="lazy" }
To upload another set of images, return to the top of this section and repeat the steps.
### Train the classifier
To train the classifier, select the **Train** button. The classifier uses all of the current images to create a model that identifies the visual qualities of each tag.
{: loading="lazy" }
The training process should only take a few minutes. During this time, information about the training process is displayed in the **Performance** tab.
{: loading="lazy" }
Custom Vision Service supports the following exports:
- **Tensorflow** for **Android**.
- **CoreML** for **iOS11**.
- **ONNX** for **Windows ML**.
- A Windows or Linux **container**. The container includes a Tensorflow model and service code to use the Custom Vision Service API.
### Convert to a compact domain
To convert the domain of an existing classifier, use the following steps:
1. From the [Custom vision page](https://customvision.ai), select the **Home** icon to view a list of your projects. You can also use the to see your projects.{: loading="lazy" }
2. Select a project, and then select the **Gear** icon in the upper right of the page.{: loading="lazy" }
3. In the **Domains** section, select a **compact** domain. Select **Save Changes** to save the changes.{: loading="lazy" }
4. From the top of the page, select **Train** to retrain using the new domain.
### Export your model
To export the model after retraining, use the following steps:
1. Go to the **Performance** tab and select **Export**.{: loading="lazy" }
*Tip*
*If the **Export** entry is not available, then the selected iteration does not use a compact domain. Use the **Iterations** section of this page to select an iteration that uses a compact domain, and then select **Export**.*
2. Select the export format, and then select **Export** to download the model.
## Creating the Edge Module in Python
You can use Azure IoT Edge modules to deploy code that implements your business logic directly to your IoT Edge devices. This tutorial walks you through creating an IoT Edge module that will be edited to use the Custom Vision model exported. In this tutorial, you learn how to:
- Use Visual Studio Code to create an IoT Edge Python module.
- Use Visual Studio Code and Docker to create a Docker image and publish it to your registry.
If you don't have an [Azure subscription](https://docs.microsoft.com/en-us/azure/guides/developer/azure-developer-guide#understanding-accounts-subscriptions-and-billing), create a [free account](https://azure.microsoft.com/free/?ref=microsoft.com&utm_source=microsoft.com&utm_medium=docs&utm_campaign=visualstudio) before you begin.
### Prerequisites
Before beginning this tutorial, you should have gone through the previous tutorial to set up your development environment for Linux container development: [Develop IoT Edge modules for Linux devices](https://docs.microsoft.com/en-us/azure/iot-edge/tutorial-develop-for-linux). By completing either of those tutorials, you should have the following prerequisites in place:
- A free or standard-tier [IoT Hub](https://docs.microsoft.com/en-us/azure/iot-hub/iot-hub-create-through-portal) in Azure.
- A [Linux device running Azure IoT Edge](https://docs.microsoft.com/en-us/azure/iot-edge/quickstart-linux)
- A container registry, like [Azure Container Registry](https://docs.microsoft.com/azure/container-registry/).
- [Visual Studio Code](https://code.visualstudio.com/) configured with the [Azure IoT Tools](https://marketplace.visualstudio.com/items?itemName=vsciot-vscode.azure-iot-tools).
- [Docker CE](https://docs.docker.com/install/) configured to run Linux containers.
To develop an IoT Edge module in Python, install the following additional prerequisites on your development machine:
- [Python extension](https://marketplace.visualstudio.com/items?itemName=ms-python.python) for Visual Studio Code.
- [Python](https://www.python.org/downloads/).
- [Pip](https://pip.pypa.io/en/stable/installing/#installation) for installing Python packages (typically included with your Python installation).
### Create a module project
The following steps create an IoT Edge Python module by using Visual Studio Code and the Azure IoT Tools.
#### Create a new project
Use the Python package **cookiecutter** to create a Python solution template that you can build on top of.
1. In Visual Studio Code, select **View** > **Terminal** to open the VS Code integrated terminal.
2. In the terminal, enter the following command to install (or update) **cookiecutter**, which you use to create the IoT Edge solution template:
```
pip install --upgrade --user cookiecutter
```
3. Select **View** > **Command Palette** to open the VS Code command palette.
4. In the command palette, enter and run the command **Azure: Sign in** and follow the instructions to sign in your Azure account. If you're already signed in, you can skip this step.
In the command palette, enter and run the command **Azure IoT Edge: New IoT Edge solution**. Follow the prompts and provide the following information to create your solution:
| Field | Value |
|---|---|
| Select folder | Choose the location on your development machine for VS Code to create the solution files. |
| Provide a solution name | Enter a descriptive name for your solution or accept the default **EdgeSolution**. |
| Select module template | Choose **Python Module**. |
| Provide a module name | Name your module **PythonModule**. |
| Provide Docker image repository for the module | An image repository includes the name of your container registry and the name of your container image. Your container image is prepopulated from the name you provided in the last step. Replace **localhost:5000** with the login server value from your Azure container registry. You can retrieve the login server from the Overview page of your container registry in the Azure portal. The final image repository looks like <registry name>.azurecr.io/pythonmodule. |

#### Add your registry credentials
The environment file stores the credentials for your container repository and shares them with the IoT Edge runtime. The runtime needs these credentials to pull your private images onto the IoT Edge device.
1. In the VS Code explorer, open the **.env** file.
2. Update the fields with the **username** and **password** values that you copied from your Azure container registry.
3. Save the .env file.
#### Select your target architecture
Currently, Visual Studio Code can develop C modules for Linux AMD64 and Linux ARM32v7 devices. You need to select which architecture you're targeting with each solution, because the container is built and run differently for each architecture type. The default is Linux AMD64.
1. Open the command palette and search for **Azure IoT Edge: Set Default Target Platform for Edge Solution**, or select the shortcut icon in the side bar at the bottom of the window.
2. In the command palette, select the target architecture from the list of options. For this tutorial, we're using an Ubuntu virtual machine as the IoT Edge device, so will keep the default **amd64**.
## Deploy the Module
### Build and push your module
Now that you have an IoT Edge solution with the PythonModule created, you need to build the solution as a container image and push it to your container registry.
1. Open the VS Code integrated terminal by selecting **View** > **Terminal**.
2. Sign in to Docker by entering the following command in the terminal. Sign in with the username, password, and login server from your Azure container registry. You can retrieve these values from the **Access keys** section of your registry in the Azure portal.
```
docker login -u -p
```
You may receive a security warning recommending the use of `--password-stdin`. While that best practice is recommended for production scenarios, it's outside the scope of this tutorial. For more information, see the [docker login](https://docs.docker.com/engine/reference/commandline/login/#provide-a-password-using-stdin) reference. In the VS Code explorer, right-click the **deployment.template.json** file and select **Build and Push IoT Edge solution**.
The build and push command starts three operations. First, it creates a new folder in the solution called **config** that holds the full deployment manifest, built out of information in the deployment template and other solution files. Second, it runs `docker build` to build the container image based on the appropriate dockerfile for your target architecture. Then, it runs `docker push` to push the image repository to your container registry.
### Deploy modules to device
Use the Visual Studio Code explorer and the Azure IoT Tools extension to deploy the module project to your IoT Edge device. You already have a deployment manifest prepared for your scenario, the **deployment.json** file in the config folder. All you need to do now is select a device to receive the deployment.
Make sure that your IoT Edge device is up and running.
1. In the Visual Studio Code explorer, expand the **Azure IoT Hub Devices** section to see your list of IoT devices.
2. Right-click the name of your IoT Edge device, then select **Create Deployment for Single Device**.
3. Select the **deployment.json** file in the **config** folder and then click **Select Edge Deployment Manifest**. Do not use the deployment.template.json file.
4. Click the refresh button. You should see the new **PythonModule** running along with the **TempSensor** module and the **$edgeAgent** and **$edgeHub**.
---
# PostgreSQL Historical Log by Table
https://jaredrhodes.com/blog/postgresql-historical-log-by-table/
In my current project, there is a need for tracking data changes in the PostgreSQL tables. The end goal is, if a row changes, we copy the previous row before the change transaction completes and write it to a logging table. We will accomplish this in the following steps:
- Creating a table LIKE our table that needs logging
- Create a function for our table
- Apply that function as a trigger
## Table Like
First we need an example table to get started with. For a simple example, lets use a basic address table.
https://gist.github.com/QiMata/ad12fbbf5736fb582249694ac9627757
This basic table has enough constraints to make a decent example. We need to create a copy of this table, one where the columns are the same name and type, but without all of the constraints. Luckily for us, PostgreSQL provides a feature for just a situation. For this, we want to use the like\_option for the CREATE TABLE statement. According to the latest documentation ([PostgreSQL 12](https://www.postgresql.org/docs/12/index.html)) at the time of writing this post:
The `LIKE` clause specifies a table from which the new table automatically copies all column names, their data types, and their not-null constraints.
Unlike `INHERITS`, the new table and original table are completely decoupled after creation is complete. Changes to the original table will not be applied to the new table, and it is not possible to include data of the new table in scans of the original table.
Also unlike `INHERITS`, columns and constraints copied by `LIKE` are not merged with similarly named columns and constraints. If the same name is specified explicitly or in another `LIKE` clause, an error is signaled.
The optional *`like_option`* clauses specify which additional properties of the original table to copy. Specifying `INCLUDING` copies the property, specifying `EXCLUDING` omits the property. `EXCLUDING` is the default. If multiple specifications are made for the same kind of object, the last one is used.
We will want to exclude all constraints so that when our trigger fires, it can write any data to the columns without worrying if those columns are valid. The resulting table definition looks like the following:
https://gist.github.com/QiMata/32546c1d481fa8f3c04f5976614e1e9d
## Logging Function
Next, there needs to be a trigger that logs the data. To create a new trigger in PostgreSQL, you follow these steps:
- First, create a trigger function using the `CREATE FUNCTION` statement.
- Second, bind the trigger function to a table by using `CREATE TRIGGER` statement.
A trigger function is similar to an ordinary function. However, a trigger function does not take any argument and has a return value with the type of `trigger`. Inside this trigger function, insert the old data into the logging table. This makes the trigger function as follows:
https://gist.github.com/QiMata/45d698713e5f703af246e8eef7c16f1a
TG\_OP is Data type text; a string of INSERT, UPDATE, DELETE, or TRUNCATE telling for which operation the trigger was fired.
## Implementing the Trigger
As we said earlier, Second, bind the trigger function to a table by using `CREATE TRIGGER` statement. This part is fairly easy.
https://gist.github.com/QiMata/7f7ea3929029bd815821bdcddf444182
Now, whenever you insert, update, or delete a record in the address table, the operation is logged in the logging address table.
---
# TrueNAS NFS for Proxmox
https://jaredrhodes.com/blog/truenas-nfs-for-proxmox/
The first thing I set up in the server closet was a TrueNAS Core server. If you are looking for a guide on installing TrueNAS core, a good one can be found [here](https://www.ixsystems.com/blog/how-to-install-truenas-core/). With it already in place, it can be used to create an NFS share.
One of the major benefits of NFS is being able to easily migrate a container from one environment to another. By using the NFS, the container or VM is pulled over the network which allows any host to host ad hoc. When every Proxmox host mounts the same NFS backend, migrating VMs or containers between them takes seconds; migrations across unrelated storage take far longer.
## TrueNAS NFS support
Creating a Network File System (NFS) share on TrueNAS gives the benefit of making lots of data easily available for anyone with share access. Depending how the share is configured, users accessing the share can be restricted to read or write privileges. To create a new share, make sure a dataset is available with all the data for sharing.
### Creating an NFS Share[](https://www.truenas.com/docs/core/sharing/nfs/nfsshare/#creating-an-nfs-share)
Go to **Sharing > Unix Shares (NFS)** and click *ADD*.
Use the file browser to select the dataset to be shared. An optional *Description* can be entered to help identify the share. Clicking *SUBMIT* creates the share. At the time of creation, you can select *ENABLE SERVICE* for the service to start and to automatically start after any reboots. If you wish to create the share but not immediately enable it, select *CANCEL*.
#### NFS Share Settings[](https://www.truenas.com/docs/core/sharing/nfs/nfsshare/#nfs-share-settings)
| Setting | Value | Description |
|---|---|---|
| Path | file browser | Type or browse to the full path to the pool or dataset to share. Click **ADD** to configure multiple paths. |
| Description | string | Enter any notes or reminders about the share. |
| All dirs | checkbox | Set to allow the client to mount any subdirectory within the **Path**. Leaving disabled only allows clients to mount the **Path** endpoint. |
| Quiet | checkbox | Enabling inhibits some syslog diagnostics to avoid error messages. See [exports(5)](https://www.freebsd.org/cgi/man.cgi?query=exports) for examples. Disabling allows all syslog diagnostics, which can lead to additional cosmetic error messages. |
| Enabled | checkbox | Enable this NFS share. Unset to disable this NFS share without deleting the configuration. |
To edit an existing NFS share, go to **Sharing > Unix Shares (NFS)** and click *more\_vert* **> Edit**. The options available are identical to the share creation options.
### Configure the NFS Service[](https://www.truenas.com/docs/core/sharing/nfs/nfsshare/#configure-the-nfs-service)
To begin sharing the data, go to **Services** and click the *NFS* toggle. If you want NFS sharing to activate immediately after TrueNAS boots, set *Start Automatically*.
NFS service settings can be configured from the Services page.
| Setting | Value | Description |
|---|---|---|
| Number of servers | integer | Specify how many servers to create. Increase if NFS client responses are slow. Keep this less than or equal to the number of CPUs reported by `sysctl -n kern.smp.cpus` to limit CPU context switching. |
| Bind IP Addresses | drop down | Select IP addresses to listen to for NFS requests. Leave empty for NFS to listen to all available addresses. |
| Enable NFSv4 | checkbox | Set to switch from NFSv3 to NFSv4. |
| NFSv3 ownership model for NFSv4 | checkbox | Set when NFSv4 ACL support is needed without requiring the client and the server to sync users and groups. |
| Require Kerberos for NFSv4 | checkbox | Set to force NFS shares to fail if the Kerberos ticket is unavailable. |
| Serve UDP NFS clients | checkbox | Set if NFS clients need to use the User Datagram Protocol (UDP). |
| Allow non-root mount | checkbox | Set only if required by the NFS client. Set to allow serving non-root mount requests. |
| Support >16 groups | checkbox | Set when a user is a member of more than 16 groups. This assumes group membership is configured correctly on the NFS server. |
| Log mountd(8) requests | checkbox | Set to log [mountd](https://www.freebsd.org/cgi/man.cgi?query=mountd) syslog requests. |
| Log rpc.statd(8) and rpc.lockd(8) | checkbox | Set to log [rpc.statd](https://www.freebsd.org/cgi/man.cgi?query=rpc.statd) and [rpc.lockd](https://www.freebsd.org/cgi/man.cgi?query=rpc.lockd) syslog requests. |
| mountd(8) bind port | integer | Enter a number to bind [mountd](https://www.freebsd.org/cgi/man.cgi?query=mountd) only to that port. |
| rpc.statd(8) bind port | integer | Enter a number to bind [rpc.statd](https://www.freebsd.org/cgi/man.cgi?query=rpc.statd) only to that port. |
| rpc.lockd(8) bind port | integer | Enter a number to bind [rpc.lockd](https://www.freebsd.org/cgi/man.cgi?query=rpc.lockd) only to that port. |
Unless a specific setting is needed, it is recommended to use the default settings for the NFS service. When TrueNAS is already connected to [Active Directory](https://www.truenas.com/docs/core/directoryservices/activedirectory/), setting *NFSv4* and *Require Kerberos for NFSv4* also requires a [Kerberos Keytab](https://www.truenas.com/docs/core/directoryservices/kerberos/#kerberos-keytabs).
## Proxmox NFS storage pool
On the Proxmox side, the NFS share gets added as a storage pool. In the Proxmox web UI, go to **Datacenter > Storage > Add > NFS**. Proxmox mounts the share for you, so there is nothing to add to /etc/fstab, and it can probe whether the server is online and list the exports it offers.
The fields that matter:
- **ID** - the name Proxmox will use for this storage.
- **Server** - the TrueNAS IP or DNS name. Prefer an IP address unless you have reliable DNS, to avoid mount-time lookup delays.
- **Export** - the NFS export path (you can list what the server offers with `pvesm nfsscan`).
- **Content** - pick what this storage holds; VM disks and containers are the usual choices for a shared backend.
- **Nodes** - leave as all nodes if every host should mount the same share.
Because the share is mounted by every host in the cluster, a VM or container living on this storage can be migrated between hosts without copying its disk. That is the payoff from the first half of this post.
---
# TrueNAS Azure Sync for Proxmox
https://jaredrhodes.com/blog/truenas-azure-sync-for-proxmox/
Last month I wrote about [TrueNAS NFS for Proxmox](/blog/truenas-nfs-for-proxmox/). Now that Proxmox is using TrueNAS for storage, a Cloud Sync Task can be used to copy the TrueNAS NFS data to Azure Blob Storage as a backup. The following steps are required:
- Create Azure Blob Storage Account
- Create TrueNAS Cloud Credentials
- Create Cloud Sync Tasks
### Create Azure Blob Storage Account
The Azure portal changes often, and the steps below were written against the 2021 portal. The general flow still holds, but defaults have moved on; in particular, the default redundancy option for a new account is no longer *Read-access geo-redundant storage (RA-GRS)*, so pick the redundancy level that fits your budget rather than accepting the default. For current guidance, see [Azure Storage redundancy](https://docs.microsoft.com/en-us/azure/storage/common/storage-redundancy).
#### Create a storage account
Every storage account must belong to an Azure resource group. A resource group is a logical container for grouping your Azure services. When you create a storage account, you have the option to either create a new resource group, or use an existing resource group. This article shows how to create a new resource group.
A **general-purpose v2** storage account provides access to all of the Azure Storage services: blobs, files, queues, tables, and disks. The steps outlined here create a general-purpose v2 storage account, but the steps to create any type of storage account are similar. For more information about types of storage accounts and other storage account settings, see [Azure storage account overview](https://docs.microsoft.com/en-us/azure/storage/common/storage-account-overview).
#### Portal
To create a general-purpose v2 storage account in the Azure portal, follow these steps:
1. On the Azure portal menu, select **All services**. In the list of resources, type **Storage Accounts**. As you begin typing, the list filters based on your input. Select **Storage Accounts**.
2. On the **Storage Accounts** window that appears, choose **Add**.
3. On the **Basics** tab, select the subscription in which to create the storage account.
4. Under the **Resource group** field, select your desired resource group, or create a new resource group. For more information on Azure resource groups, see [Azure Resource Manager overview](https://docs.microsoft.com/en-us/azure/azure-resource-manager/management/overview).
5. Next, enter a name for your storage account. The name you choose must be unique across Azure. The name also must be between 3 and 24 characters in length, and may include only numbers and lowercase letters.
6. Select a location for your storage account, or use the default location.
7. Select a performance tier. The default tier is *Standard*.
8. Set the **Account kind** field to *Storage V2 (general-purpose v2)*.
9. Specify how the storage account will be replicated. The default when this was written was *Read-access geo-redundant storage (RA-GRS)*; pick the redundancy level that fits your budget instead of assuming the default. For more information about available replication options, see [Azure Storage redundancy](https://docs.microsoft.com/en-us/azure/storage/common/storage-redundancy).
10. Additional options are available on the **Networking**, **Data protection**, **Advanced**, and **Tags** tabs. To use Azure Data Lake Storage, choose the **Advanced** tab, and then set **Hierarchical namespace** to **Enabled**. For more information, see [Azure Data Lake Storage Gen2 Introduction](https://docs.microsoft.com/en-us/azure/storage/blobs/data-lake-storage-introduction).
11. Select **Review + Create** to review your storage account settings and create the account.
12. Select **Create**.
The following image shows the settings on the **Basics** tab for a new storage account:
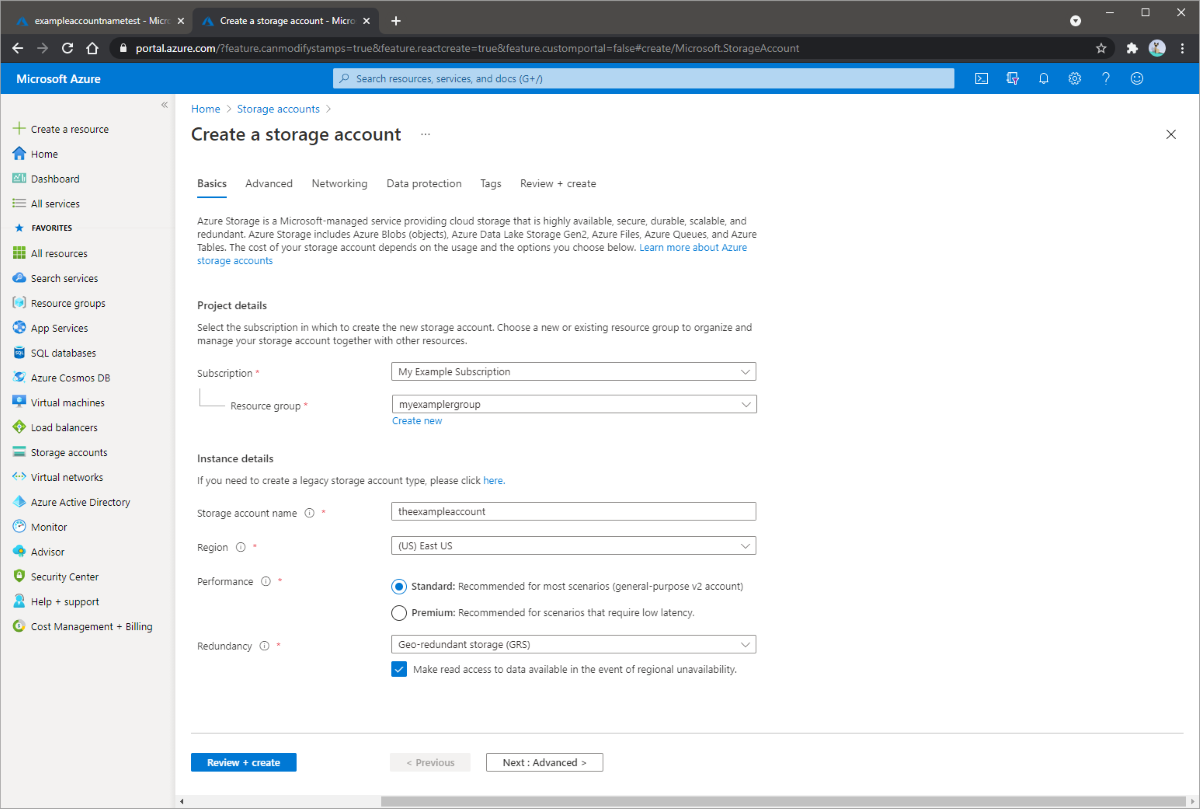
#### Create a container
To create a container in the Azure portal, follow these steps:
1. Navigate to your new storage account in the Azure portal.
2. In the left menu for the storage account, scroll to the **Blob service** section, then select **Containers**.
3. Select the **+ Container** button.
4. Type a name for your new container. The container name must be lowercase, must start with a letter or number, and can include only letters, numbers, and the dash (-) character. For more information about container and blob names, see [Naming and referencing containers, blobs, and metadata](https://docs.microsoft.com/en-us/rest/api/storageservices/naming-and-referencing-containers--blobs--and-metadata).
5. Set the level of public access to the container. The default level is **Private (no anonymous access)**.
6. Select **OK** to create the container.
{: loading="lazy" }
### Create TrueNAS Cloud Credentials
To begin integrating TrueNAS with a Cloud Storage provider, register the account credentials on the system. After saving any credentials, a [Cloud Sync Task](https://www.truenas.com/docs/core/tasks/cloudsynctasks/) allows sending or receiving data from that Cloud Storage Provider.
#### Saving a Cloud Storage Credential[](https://www.truenas.com/docs/core/system/cloudcredentials/#saving-a-cloud-storage-credential)
Transferring data from TrueNAS to the Cloud requires saving Cloud Storage Provider credentials on the system.
It is recommended to have another browser tab open and logged in to the Cloud Storage Provider account you intend to link with TrueNAS. Some providers require additional information that is generated on the storage provider account page. For example, saving an Amazon S3 credential on TrueNAS could require logging in to the S3 account and generating an access key pair on the *Security Credentials > Access Keys* page.
To save cloud storage provider credentials, go to **System > Cloud Credentials** and click *Add*.
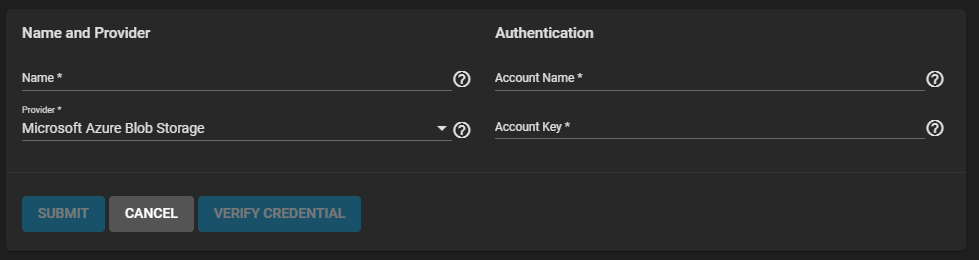{: width="979" height="260" loading="lazy" }
Using the Azure Portal we can retrieve our access keys.
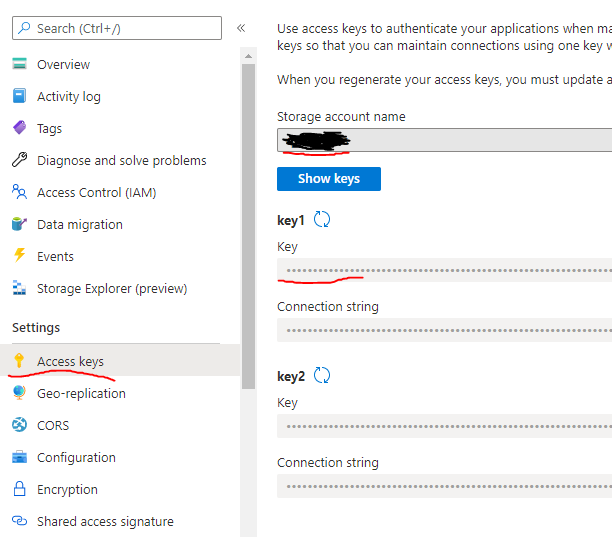{: width="612" height="537" loading="lazy" }
### Create Cloud Sync Tasks
TrueNAS can send, receive, or synchronize data with a Cloud Storage provider. Cloud Sync tasks allow for single time transfers or recurring transfers on a schedule, and are an effective method to back up data to a remote location.
Go to **Tasks > Cloud Sync Tasks** and click *Add*.
Give the task a memorable *Description* and select an existing cloud *Credential*. TrueNAS connects to the chosen Cloud Storage Provider and shows the available storage locations. Decide if data is transferring to (*PUSH*) or from (*PULL*) the Cloud Storage location (**Remote**). Choose a *Transfer Mode*:
Next, **Control** when the task runs by defining a *Schedule*. When a specific *Schedule* is required, choose *Custom*, which opens the **Advanced Scheduler** editor.
Unsetting *Enable* makes the configuration available without allowing the *Schedule* to run the task. To manually activate a saved task, go to **Tasks > Cloud Sync Tasks**, click to expand a task, and click *RUN NOW*.
The remaining options, grouped under *Specific Options*, allow tuning the task to your specific requirements.
**Transfer**
| Name | Description |
|---|---|
| Description | Enter a description of the Cloud Sync Task. |
| Direction | PUSH sends data to cloud storage. PULL receives data from cloud storage. Changing the direction resets the Transfer Mode to COPY. |
| Transfer Mode | SYNC: Files on the destination are changed to match those on the source. If a file does not exist on the source, it is also deleted from the destination. COPY: Files from the source are copied to the destination. If files with the same names are present on the destination, they are overwritten. MOVE: After files are copied from the source to the destination, they are deleted from the source. Files with the same names on the destination are overwritten. |
| Directory/Files | Select the directories or files to be sent to the cloud for Push syncs, or the destination to be written for Pull syncs. Be cautious about the destination of Pull jobs to avoid overwriting existing files. |
**Remote**
| Name | Description |
|---|---|
| Credential | Select the cloud storage provider credentials from the list of available Cloud Credentials. |
**Control**
| Name | Description |
|---|---|
| Schedule | Select a schedule preset or choose Custom to open the advanced scheduler. |
| Enabled | Enable this Cloud Sync Task. Unset to disable this Cloud Sync Task without deleting it. |
**Advanced Options**
| Name | Description |
|---|---|
| Follow Symlinks | Follow symlinks and copy the items to which they link. |
| Pre-Script | Script to execute before running sync. |
| Post-Script | Script to execute after running sync. |
| Exclude | List of files and directories to exclude from sync. Separate entries by pressing Enter. See [rclone filtering](https://rclone.org/filtering/) for more details about the `--exclude` option. |
**Advanced Remote Options**
| Name | Description |
|---|---|
| Remote Encryption | *PUSH*: Encrypt files before transfer and store the encrypted files on the remote system. Files are encrypted using the Encryption Password and Encryption Salt values. *PULL*: Decrypt files that are being stored on the remote system before the transfer. Transferring the encrypted files requires entering the same Encryption Password and Encryption Salt that was used to encrypt the files. Additional details about the encryption algorithm and key derivation are available in the [rclone crypt File formats documentation](https://rclone.org/crypt/#file-formats). |
| Transfers | Number of simultaneous file transfers. Enter a number based on the available bandwidth and destination system performance. See [rclone -transfers](https://rclone.org/docs/#transfers-n). |
| Bandwidth limit | A single bandwidth limit or bandwidth limit schedule in rclone format. Separate entries by pressing Enter. Example: `08:00,512 12:00,10MB 13:00,512 18:00,30MB 23:00,off`. Units can be specified with the beginning letter: b, k (default), M, or G. See [rclone -bwlimit](https://rclone.org/docs/#bwlimit-bandwidth-spec). |
## Choosing What to Sync
In [TrueNAS NFS for Proxmox](/blog/truenas-nfs-for-proxmox/), the Proxmox hosts mount an NFS share from TrueNAS for VM storage. That share is what ties this backup task back to Proxmox, and it shapes where the *Directory/Files* field should point:
- Pointing at the dataset holding scheduled Proxmox backups (`vzdump` output) is the safest target. Those files are written once per backup run and never modified, so *SYNC* mode only uploads new archives.
- Pointing at the live VM image dataset also works, but a file copied mid-write is not a restorable image. If you sync live images, quiesce or snapshot first.
For cost and schedule: VM images are large but change incrementally, so a nightly off-peak *PUSH* with a bandwidth limit is usually enough. Blob ingress is free; the running cost is the storage itself, so for restore-only data consider cool tier access on the container side rather than hot storage pricing.
### Scripting and Environment Variables
Advanced users can write scripts that run immediately *before* or *after* the Cloud Sync task. The **Post-script** field is only run when the Cloud Sync task successfully completes. You can pass a variety of task environment variables into the **Pre-** and **Post-** script fields:
- CLOUD\_SYNC\_ID
- CLOUD\_SYNC\_DESCRIPTION
- CLOUD\_SYNC\_DIRECTION
- CLOUD\_SYNC\_TRANSFER\_MODE
- CLOUD\_SYNC\_ENCRYPTION
- CLOUD\_SYNC\_FILENAME\_ENCRYPTION
- CLOUD\_SYNC\_ENCRYPTION\_PASSWORD
- CLOUD\_SYNC\_ENCRYPTION\_SALT
- CLOUD\_SYNC\_SNAPSHOT
There also are provider-specific variables like CLOUD\_SYNC\_CLIENT\_ID or CLOUD\_SYNC\_TOKEN or CLOUD\_SYNC\_CHUNK\_SIZE
Remote storage settings:
- CLOUD\_SYNC\_BUCKET
- CLOUD\_SYNC\_FOLDER
Local storage settings:
- CLOUD\_SYNC\_PATH
### Testing Settings[](https://www.truenas.com/docs/core/tasks/cloudsynctasks/#testing-settings)
Test the settings before saving by clicking *DRY RUN*. TrueNAS connects to the Cloud Storage Provider and simulates a file transfer. No data is actually sent or received. A dialog shows the test status and allows downloading the task logs.
## Cloud Sync Behavior[](https://www.truenas.com/docs/core/tasks/cloudsynctasks/#cloud-sync-behavior)
Saved tasks are activated according to their schedule or by clicking **RUN NOW**. An in-progress cloud sync must finish before another can begin. Stopping an in-progress task cancels the file transfer and requires starting the file transfer over.
To view logs about a running or the most recent run of a task, click the task status.
## Cloud Sync Restore[](https://www.truenas.com/docs/core/tasks/cloudsynctasks/#cloud-sync-restore)
To quickly create a new Cloud Sync that uses the same options but reverses the data transfer, expand an existing Cloud Sync entry and click *RESTORE*.
Enter a new *Description* for this reversed task and define the path to a storage location for the transferred data.
The restored cloud sync is saved as another entry in **Tasks > Cloud Sync Tasks**.
---
# Error: mkisofs not found in $PATH
https://jaredrhodes.com/blog/error-mkisofs-not-found-in-path/
Using the [KVM terraform provider](https://registry.terraform.io/providers/dmacvicar/libvirt/latest), I ran into the following error - Error: mkisofs not found in $PATH. After hours of trying to install it on a Debian based server, the realization that the executable was missing from the **CLIENT** and not the **SERVER** dawned on me.
If this error is currently blocking progress, be sure to INSTALL MKISOFS ON THE CLIENT and don't worry about the server!
---
# Home Lab - a lie I tell myself
https://jaredrhodes.com/blog/home-lab-a-lie-i-tell-myself/
Since March of 2020 I've been working on building out a homelab. Something about being inside a little more drove me to want to work with the computers at home. Normally that free time would be spent at community events or with presentations. Something had to fill the void and a homelab was it.
At first, the goal was simple; learn about different server technologies and edge computing by building a "data center" in a closet. The "data center" part of it is where most at home sysadmins fall into a bottomless pit of self-hosted technologies and I am no different. First it is a home media server, then a dashboard, then a database, then a data system, then a clustered set of systems, then there is suddenly a need for documentation for a lab you built yourself as it becomes too much to handle at once.
This will, hopefully, be the first of many posts about home labs that is written from personal and professional experience. Throughout the series there should be a showcase of how to use home labs for:
- Home Media
- Automation
- Edge Computing
- Archiving
- Game Servers
- Development Servers
- Access and Control
- Dynamic Public Cloud Integration
- Redundancy and Disaster Recovery
- and... more
The first and foremost discussion to have is price control. Enterprise server contracts can start at seven figures. If this is what you are looking for, then this is not the blog you seek. What this blog will focus on is how to keep a relatively low budget. Lets see how far we can make the homelab budget go!
At this point, you may be wondering why the title is "Home Lab - a lie I tell myself". When this journey started, this was a 1-2 tower server adventure. Over time this has exploded, both in scope and in price. At this point, the name "homelab" no longer describes the system I've built. Not just in size but also due to the fact that it is no longer at my home. Hopefully, this series can serve as both enablement and deterrent to an ever expanding homelab.
Some helpful resources I used when I got started:
-
-
- [https://github.com/awesome-foss/awesome-sysadmin](https://github.com/awesome-foss/awesome-sysadmin#awesome-sysadmin)
-
-
-
-
---
# Home Lab - Keeping Costs Down
https://jaredrhodes.com/blog/home-lab-keeping-costs-down/
## Understand the Use Case
If you're considering building a lab, chances are you've got a good idea of what you want to do with it. If not, then let me give you one piece of advice: **THINK CAREFULLY BEFOREHAND ABOUT WHAT YOU WANT TO ACHIEVE**. [10 GPU "super computers"](https://www.supermicro.com/en/products/system/GPU/4U/SYS-420GP-TNR) can be great fun but are woefully unnecessary if you want a web development server. Likewise, a petabyte of redundant storage truly lives up to its name if you're planning to use it to host a Doom multiplayer server. I know it sounds obvious, but it's too easy to get distracted by a good deal and end up with a power-hungry machine that does nothing useful.
The pull of eBay is real; it is also a really good way to spend a whole lot of money on a stack of stuff that is worth more to a scrapyard than your homelab. There's a **ton** of enterprise gear out there ready for the taking, but do your due diligence or you won't get the good stuff. Instead, you'll end up with a server with only one ethernet management port and no network card. It's a bad scene when that happens, so let's try to preclude it.
### Common Use Cases
{: width="1920" height="1280" loading="lazy" }
Open tower PC computers. Depicts computer repair, maintenance, service or upgrade
Most home lab users get started for very specific use cases. The starter use cases are usually:
- Game Servers
- Media Servers
- Storage and Archiving
- Web Hosting
- Certification Study
- Remote Access
- Development Servers
- Home Automation
- Crypto Currency and other Electric Waste
It is important to understand that your homelab project is not the first of its kind. There are an innumerable number of self hosted game servers, media servers, and self hosted web sites. Before breaking out the credit card, use (at-least) a google search to find a similar project which describes their setup to understand how the underlying hardware is being used. Understanding hardware is key to understanding what you will need instead of what you want or think you may need.
For example, a home media server doesn't need a 24 port 10 G switch. It also doesn't need an AMD Ryzen Threadripper 3990X. Both of those items will add expense and power usage, without providing a better media server. What is most important is overall disk space and making sure the disks are redundant (note disk speed is not of the utmost importance). With this in mind, you can search for a single server setup that can handle an appropriate amount of disk space for your needs.
### Larger Use Cases
{: width="1920" height="1080" loading="lazy" }
In the Modern Data Center: IT Engineer Installs New HDD Hard Drive and Other Hardware into Server Rack Equipment. IT Specialist Doing Maintenance, Running Diagnostics and Updating Hardware.
Larger use cases (or enterprise use cases) will combine multiple use cases from above along with new use cases, monitoring, multiple environments, additional access & control mechanisms, and more. An example of a larger use case can be an edge computing solution for home automation combined with a home security system. Another use case could be a web crawler, archiver, and data processor to create a custom search engine. A personal use case of my home lab is snapshotting/archiving documentation of older products and software so that if said documentation were no longer hosted by a third party, I'd still have access to it.
When diving into larger/enterprise use cases you often run into a different level of concerns. This particular blog post wont dive into such details; just understand there are additional costs that comes with enterprise setups. Backup power, layers of redundancy, DR & backup strategies, mitigating for natural and manmade disasters, and more. Each of these will increase cost and slowly transform a home lab into a datacenter.
## Find a Deal
### Buy nothing
{: width="1920" height="1280" loading="lazy" }
Keep in mind that this post is meant for someone who's already started labbing, but wants to up their gear to do more and doesn't know where to begin.
The vast majority of us all started with an old PC or leftover parts from a previous upgrade or, maybe, from that box your parents didn't need anymore after that they got a new present. Maybe you volunteer to take it and clean it for them and begin to use what they left behind. Personally, this is exactly how I got my original NAS.
I'd be very surprised if you're not already sitting on a pile of old parts in some way, shape, or form. If you weren't the kind to collect parts, you probably wouldn't be labbing. Even if not, if all you have is one PC, use it. These days we have VirtualBox, which does a fine job of running just about everything you might want to try out. It might be a bit slow, but you can get started while you wait for your tax return/birthday money/lottery winnings to get here.
The key point is that nothing about learning the basics of homelab setup requires enterprise hardware, except, of course, for learning how enterprise hardware itself is laid out. That has its merits, but most of it can still be learned from building your own PC. Coding, Linux, FreeBSD, Win 2012 R2, containers, hypervisors, networking, storage; all of it can be done with a fairly recent laptop or desktop.
### Understanding Hardware
{: width="1920" height="1280" loading="lazy" }
Male computer technician repairing broken silver rack mount server while opening its parts and analyzing and understanding problem
Let's discuss the different types of hardware options you'll encounter; hopefully, this will save you from traveling an expensive learning curve. You don't want to end up with a server that is so old it doesn't support virtualization. Older servers can be power hungry and scream every time you turn them on. A little research is usually the difference between a machine that earns its shelf space and a $150 mistake.
I care about this because I have watched people new to homelab lose their enthusiasm after buying first-generation or Pentium 4-era Xeons that are worth next to nothing today. I am not bringing it up to dunk on beginners; the point is that if you don't research, ask around, and make sure of what you're getting, you can end up with worthless hardware without even knowing it. And, trust me, it's not always easy to see when you might be headed down this path. I speak from experience.
### Ask Questions
{: width="1920" height="1280" loading="lazy" }
Young woman asking questions to the speaker during the briefing.
There are a number of guides on the internet to help with buying of used/refurbished/old servers. Using your search engine of choice will lead you on many adventures. It cannot be stressed enough that you should understand your use case before you purchase a machine. Here are a list of questions to ask yourself:
- What kind of connections does the motherboard provide for hard drives?
- Does the server have a raid card?
- If the raid card fails, how hard will it be to replace?
- If a drive fails, how hard will it be to recreate the raid cluster?
- What is the maximum memory supported by the raid card?
- Is this server primarily reading or writing data?
- Is that read or write activity the central focus of this server?
- What level of redundancy is needed for this data?
- Can this server use a NAS instead of local hard drives for the non-OS (or all) data?
- Will this server need to "trust" the hard drives attached to it? (A server may not be able to read the temperature of a hard drive and consider it to be overheating. The fans will then go full blast driving up the energy consumption and noise generation of the machine. This is a problem in servers like Dells, where there is an expectation of a Dell Certified hard drive)
- What are the network throughput needs of this project?
- Is the network card fast enough for this project's needs? Is the switch/router it is connected to fast enough for this project's needs?
- Does the card provide enough ports for the considered management setup?
- Does it provide redundancy at the card or port level?
- If the network card fails, how hard will it be to replace?
- What are the memory needs for the project and what are the memory options provided by the motherboard?
- Not a question, but a note - use ECC RAM. Servers are not personal use computers and with multiple workloads running on them, ECC RAM can prevent a systemic crash that destroys all the workloads on the server.
- Another note, don't use DDR2 memory. Its a power hog and getting harder and harder to replace.
- Does the motherboard accept UDIMM, RDIMM, or LDIMM and in what configurations?
- What RAM is currently available from other projects to reuse?
- Are any processes or workloads memory intensive or is RAM general use?
- What level of compute power is needed?
- Does the motherboard for this project support the expected CPU?
- Does the CPU support the RAM for this server?
- Does the CPU support virtual machine passthrough (Intel VT-d or AMD-Vi)?
- Are vendors readily stocking this CPU?
### Places to purchase
{: width="1920" height="1280" loading="lazy" }
Shopping basket with computer device and accessories, 3D rendering isolated on white background
The primary place to find "deals" on retired server equipment would be eBay. eBay serves as a single point where recyclers, repurchasers, and refurbishers can sell IT equipment. In fact, most shops will have multiple "stores" that they use so that they can have a single location with different store fronts. Some shops will have a brand name that is its own web store. eBay is the place that I personally go to first when I am bored and want to look at stuff I will never buy.
There are a number of different categories to check that are not eBay: (It should be noted that this section is from an American perspective. If you searching elsewhere this guide may not be perfectly applicable to buying in your region)
#### Local Electronic Recyclers
Electronic recyclers are sometimes tasked to clean out old data centers. This leaves the recycler with enterprise servers and networking equipment that will need to be sold. Some items are best to pick up in person. Renting moving equipment and moving server racks to a house or office space from an electronic recycler can save thousands on such a purchase (from personal experience). Personally, I have built/purchased both my mobile testing platform and my server racks from a local electronics recycler. It's as simple as setting up an appointment with the recycler and taking a tour of their warehouse. There may be more than just the equipment for the project being planned in there for purchase.
The major benefit of visiting an electronic recycler is that they may be willing to make a deal NOW. You are there, you have money, and they do not need to ship out the product. This can reduce their costs and in turn pass that savings on to you. However, make sure that you can move and transport the items that you bought. Server racks can weigh upwards of 400lbs and not fit in a standard rental box truck standing up. Make sure you can transport whatever you buy and that it will fit, not only in the room you purchase it for, but through the doorways to the room in question.
#### Government Surplus
In the US, federal and state agencies auction off used, or purchased but unused, surplus property through sites like [GovDeals](https://www.govdeals.com/) and [Bid4Assets](https://www.bid4assets.com/), and some amazing deals can be found. Note, these amazing deals are sought after by many personal and professional hobbyists, so don't expect too much of an amazing deal. (The same idea exists across the Commonwealth of Nations: a surplus store there sells items that are used, or purchased but unused and no longer needed, and some are past their use by date.)
#### Online Sales
All that can be said for online sales in this article has been stated. Anything not said should be known from your own online shopping experience. For the sake of being somewhat useful, here is a list sourced from the reddit homelab wiki buying guide. Vendors come and go in this space; several shops from the original list have already shut down, so treat any link here as worth verifying before you rely on it:
- [http://ebay.com](http://ebay.com/) - the best place to get used servers
- [https://www.orangecomputers.com](https://www.orangecomputers.com/) - Refurbished Servers, Storage, Networking, and Parts
- - Refurbished Servers, Desktop, Networking, and Parts
- [https://www.ispsupplies.com](https://www.ispsupplies.com/) - WaveGuard WG-UB-RM1 Rackmount kit for Ubiquiti EdgeRouter Lite and similar models.
- - Racks, rack accessories, and hard-to-find or otherwise niche tools.
- - Racks, rack accessories, and general office equipment
## Using the Cloud
{: width="1920" height="1229" loading="lazy" }
Private cloud left connected to Public cloud right with Hybrid cloud placed between
The cloud can be utilized to keep costs down. You read that last sentence correctly, it can be used to keep costs down. From a business perspective, it can be utilized to shift capital expenses to operational expenses. For a home lab, it can be used so that $10,000 in equipment cost can instead be spread out month to month over the course of years. As a [Microsoft MVP for Azure](https://mvp.microsoft.com/en-us/PublicProfile/5002468?fullName=Jared%20Rhodes), I have a good sense of when to use the public cloud vs when to invest in the private cloud. Hopefully, this section can provide a quick guide to when and where your project can benefit from either.
A thought that should be shared is that the entire integration with the public cloud can be dynamic, if you so choose. From the VPN components to the different offerings being consumed (unless there is a need for persistent state), the items can all be created on demand. This is said with the understanding that certain items require physical components and long term contracts. If your project requires those parameters, then the project may fall outside the definition of "home lab" being used here. Also, some items, like a VPN Gateway in Azure, may take a half hour to an hour to provision on demand. For a home lab, some pre-planning may be required due to those time constraints (as compared to an enterprise environment, where all those items will be persistent).
For a home lab, the primary purpose is to own and house the equipment running your projects. That being the primary purpose, does not mean there are no other benefits to using the public cloud in a hybrid scenario. The following are a few scenarios where using the public cloud could help reduce costs:
### Scaling Out
From the above listed options for projects, some could benefit from being able to scale out due to demand. Web servers, game servers, development servers, and more may have inconsistent demand. If your project involves a forever online game server and suddenly one thousand of your closest friends plan to play together one night, then there may be a need to scale out beyond the capacity of your home lab.
Assuming the project is set up for this scenario, hosting it in the public cloud may be as simple as changing a public DNS entry and uploading your virtualization configuration of the server to a public cloud provider. An example would be Minecraft server running inside of a container. It can be quickly uploaded to something like [Azure Container Instances](https://azure.microsoft.com/en-us/services/container-instances/#documentation) for the evening and cost a fistful of dollars. Compared to the thousands in hardware costs that would be needed for that one evening, the public cloud can provide the required infrastructure for a fraction of the cost.
Another example could be a public web server for a one day conference. For ~360 days out of the year, the site will receive one or two hits a day. When the week of the conference arrives, it may suddenly get hundreds or thousands of hits per day. Instead of running the site in the cloud the entire year or spending capital enough to host it in your lab for the week of the conference, use the cloud the week of and the rest of the year use the home lab (private cloud).
### Disaster Recovery
Some of the key tenets to a proper disaster recovery protocol is secondary location, offsite storage, or any other type of physical separation of the recovery environment. This acts as a hedge to a physical disaster in the private cloud region. This multi-locality is a primary tenet of any cloud hosting but in the home lab scenario is mostly not feasible. A public cloud offering can be a cheap disaster recovery option for the home lab. Having encrypted backups of configuration and servers paired with separately located media backups of sensitive data can be combined to form a DR strategy for the home lab.
Not everything will be cheaply hosted in a public cloud for DR purposes. If the project is a media server or data lab, then the storage fees on any media not hosted within the lab may prove to be too costly. The DR scenario that the cloud can help with, on a home lab budget, is one where the underlying data set is small enough that the cloud running costs stay low.
### Core Infrastructure
The recovery strategy used in my personal lab starts with core infrastructure. First, the physical hosts are configured for virtualization and then a mix of VMs and containers are deployed to start:
- Certificate Authority (with root certs being loaded from backup physical media)
- apt-mirror & docker-registry
- DNS
- LDAP
- Data Systems
- Web Servers
By using cloud offerings for some core infrastructure, both costs and restart time are minimized. For each of the following, an option could be:
- CA - Let's Encrypt
- apt-mirror & docker-registry - use public free apt repos and docker hub
- DNS - use the name servers provided by the registrar
- LDAP - use Azure Active Directory where it can replace LDAP (don't write me an essay about how AAD is not LDAP! I know its not but for something like an internal website or gitlab it can make a suitable replacement.)
### PAAS/SAAS
Some services in the public cloud can easily out scale a home lab configured version for a lower cost point (even over the long run). Also, some offerings in the public cloud can make the completion of specific portions of the home lab project much faster. If you are building a machine learning setup, utilizing the dynamic compute capabilities of something like [Azure Machine Learning](https://azure.microsoft.com/en-us/services/machine-learning/) to host notebooks or add compute power for the models will have a drastically lower price point than configuring the same in a home lab setup.
Another example could be adding a text messaging feature for two factor authentication. Adding in a [twilio ](https://www.twilio.com/messaging)messaging account will be much lower than trying to add an entire phone. Similarly, using Office 365 or Zoho mail could be cheaper than any self hosted alternative. Moreover, the free tiers offered by Github are so fully featured now that self hosting is purely for the hobby and not for any feature benefit.
---
# Can't access TrueNAS/FreeNAS over VPN
https://jaredrhodes.com/blog/cant-access-truenas-freenas-over-vpn/
There was an issue accessing a TrueNAS device over the VPN. The VPN was assigning an Ip Address outside the network available to the TrueNAS host. In my case:
1. VPN assigned IP address is in range 172.16.0.0/24
2. Network for TrueNAS is in range 10.0.0.0/16
Since the VPN address is outside the range of the CIDR block for the TrueNAS ip address subnet, TrueNAS sends any reply through its default gateway, which has no route back to the VPN client range. The request arrives, but the response never finds its way back. To fix this, tell TrueNAS to route VPN traffic through the LAN gateway by adding a Static Route. To add a Static Route, expand the Network tab in the left hand menu and select Static Routes in the menu.
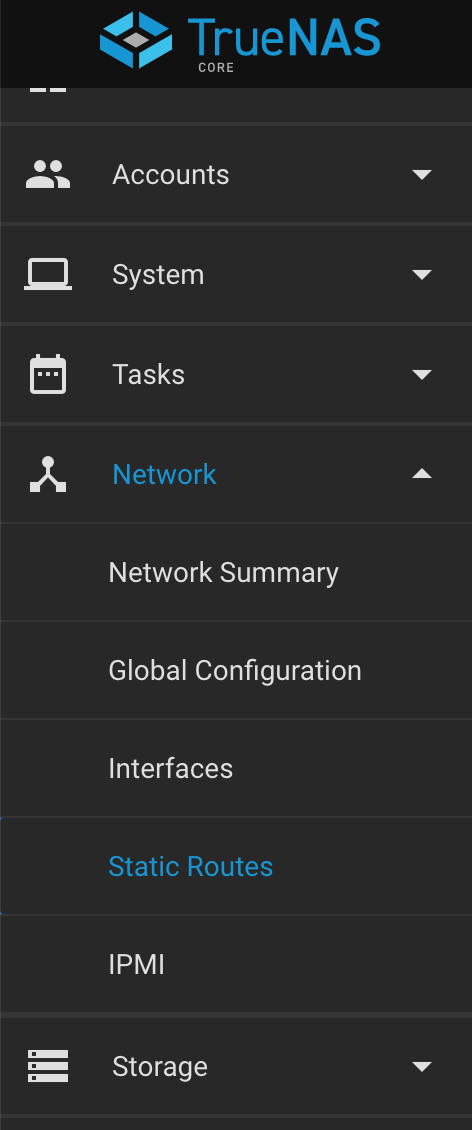{: width="472" height="1130" loading="lazy" }
The left main menu in TrueNAS core with the Network tab expanded and the Static Routes tab within Network selected
From the Static Routes screen, click Add in the top right of the new screen. After that the following form will appear:
| Setting | Value | Description |
|---|---|---|
| Destination | string | Use the format *A.B.C.D/E* where *E* is the CIDR mask. In the example above it would be 172.16.0.0/24 |
| Gateway | string | Enter the IP address of the LAN gateway that holds the route to the VPN clients. In the example above it would be 10.0.0.150 (.150 is my gateway) |
| Description | string | Notes or identifiers describing the route. |
After the fields are populated correctly, click "Submit" and the VPN connections should now be able to reach the TrueNAS core device.
---
# Home Lab - Utilizing the Cloud - Dynamic VPN
https://jaredrhodes.com/blog/home-lab-utilizing-the-cloud-dynamic-vpn/
## Overview
In a previous post, we discussed [how to save money on a home lab](/blog/home-lab-keeping-costs-down/). One section was cloud utilization. Let's expand on that section and have a more in-depth conversation about how to create dynamic resources in Azure. This article will focus on creating a VPN dynamically.
Azure networking is not the most noticeable part of an enterprise bill. In the homelab scenario, it can be a running cost [that adds up when not needed](https://azure.microsoft.com/en-us/pricing/details/vpn-gateway/). Remember the entire purpose of a homelab is to run most, if not all, items... well in your home, at least. To alleviate this running cost, the components needed in an Azure Site-to-Site VPN can instead be created dynamically to utilize whenever it is required.
Due to the time involved in creating a VPN Gateway in Azure, this won't be something that can be created and destroyed the same way a virtual machine or container could be. For the VPN Gateway, there should be at least one hour to guarantee that the VPN Gateway and other components can be created in time to meet demand load.
Let's imagine a scenario where ad-hoc processing power is needed for an upcoming marketing campaign where traffic is expected to exceed our current capacity. In this scenario, our servers will be replicated in Azure Virtual Machines and allow for increased traffic. (This is a basic setup; in later posts, we'll discuss more advanced scenarios.) To accomplish this, we need to set up a Site-to-Site VPN in Azure from our homelab.
{: width="696" height="222" loading="lazy" }
Diagram showing an on-premises network on the left which consists of three computer screens and a gateway. A double sided arrow connecting the on-premises to a cloud labeled internet with "Site-to-site VPN tunnel" above the double sided arrow. Another double sided arrow connects the internet cloud to its right through a dotted rectangle labeled "Azure Virtual Network". The arrow connects to an item labeled VPN gateway. That gateway has a single arrow leaving it to the right pointing to a load balancer which is pointing to three identical virtual machines.
The steps to accomplish this are:
1. Supported Routers
2. Creating a Site-to-Site Connection
3. Replicating Virtual Machines / Containers
4. Tear Down
## Supported Routers ([official docs](https://docs.microsoft.com/en-us/azure/vpn-gateway/vpn-gateway-about-vpn-devices))
A VPN device is required to configure a Site-to-Site (S2S) cross-premises VPN connection using a VPN gateway. Site-to-Site connections can be used to create a hybrid solution, or whenever you want secure connections between your on-premises networks and your virtual networks.
Important - if you are experiencing connectivity issues between your on-premises VPN devices and VPN gateways, refer to [Known device compatibility issues](https://docs.microsoft.com/en-us/azure/vpn-gateway/vpn-gateway-about-vpn-devices#known).
Microsoft maintains the list of validated devices and configuration guides in its documentation, and that list stays current as vendors ship firmware; rather than reproduce it here (and watch it rot), check [Validated VPN devices and device configuration guides](https://docs.microsoft.com/en-us/azure/vpn-gateway/vpn-gateway-about-vpn-devices#devicetable) for your device. For reference, a few rows that matter for a home lab, with the minimum versions noted when this post was written in 2021:
| **Vendor** | **Device family** | **Minimum OS version** | **RouteBased configuration instructions** |
|---|---|---|---|
| Sentrium (Developer) | VyOS | VyOS 1.2.2 | [Configuration guide](https://docs.vyos.io/en/latest/configexamples/azure-vpn-bgp.html) |
| Ubiquiti | EdgeRouter | EdgeOS v1.10 | [BGP over IKEv2/IPsec](https://help.ubnt.com/hc/en-us/articles/115012374708) [VTI over IKEv2/IPsec](https://help.ubnt.com/hc/en-us/articles/115012305347) |
| Synology | MR2200ac RT2600ac RT1900ac | SRM1.1.5/VpnPlusServer-1.2.0 | [Configuration guide](https://www.synology.com/en-global/knowledgebase/SRM/tutorial/VPN/How_to_set_up_Site_to_Site_VPN_between_Synology_Router_and_MS_Azure) |
Other common homelab gear, such as MikroTik routers running RouterOS, speaks standard IPsec/IKEv2 and can usually terminate the tunnel; look for Azure-specific samples in the vendor documentation. If your device is not on the validated list at all, it may still work with a Site-to-Site connection - contact the manufacturer for guidance.
For certain devices, you can also download configuration scripts directly from Azure; see [Download VPN device configuration scripts](https://docs.microsoft.com/en-us/azure/vpn-gateway/vpn-gateway-download-vpndevicescript). After downloading a sample, replace the placeholder values with the settings for your environment.
For the default IPsec/IKE parameters Azure VPN gateways use, see [About VPN devices and IPsec/IKE parameters for Site-to-Site VPN gateway connections](https://docs.microsoft.com/en-us/azure/vpn-gateway/vpn-gateway-about-vpn-devices#ipsec). One requirement worth knowing up front: you must clamp TCP MSS at 1350, or set the MTU on the tunnel interface to 1400 bytes if your device does not support MSS clamping.
## Creating a VPN Gateway ([official docs](https://docs.microsoft.com/en-us/azure/vpn-gateway/vpn-gateway-howto-site-to-site-resource-manager-cli))
{: loading="lazy" }
A Site-to-Site VPN gateway connection is used to connect your on-premises network to an Azure virtual network over an IPsec/IKE (IKEv1 or IKEv2) VPN tunnel. This type of connection requires a VPN device located on-premises that has an externally facing public IP address assigned to it. For more information about VPN gateways, see [About VPN gateway](https://docs.microsoft.com/en-us/azure/vpn-gateway/vpn-gateway-about-vpngateways).
### [](https://docs.microsoft.com/en-us/azure/vpn-gateway/vpn-gateway-howto-site-to-site-resource-manager-cli#before-you-begin)Before you begin
Verify that you have met the following criteria before beginning configuration:
- Make sure you have a compatible VPN device and someone who is able to configure it. For more information about compatible VPN devices and device configuration, see [About VPN Devices](https://docs.microsoft.com/en-us/azure/vpn-gateway/vpn-gateway-about-vpn-devices).
- Verify that you have an externally facing public IPv4 address for your VPN device.
- If you are unfamiliar with the IP address ranges located in your on-premises network configuration, you need to coordinate with someone who can provide those details for you. When you create this configuration, you must specify the IP address range prefixes that Azure will route to your on-premises location. None of the subnets of your on-premises network can over lap with the virtual network subnets that you want to connect to.
- Use the Bash environment in [Azure Cloud Shell](https://docs.microsoft.com/en-us/azure/cloud-shell/quickstart).[](https://shell.azure.com/)
- If you prefer, [install](https://docs.microsoft.com/en-us/cli/azure/install-azure-cli) the Azure CLI to run CLI reference commands.
- If you're using a local installation, sign in to the Azure CLI by using the [az login](https://docs.microsoft.com/en-us/cli/azure/reference-index#az_login) command. To finish the authentication process, follow the steps displayed in your terminal. For additional sign-in options, see [Sign in with the Azure CLI](https://docs.microsoft.com/en-us/cli/azure/authenticate-azure-cli).
- When you're prompted, install Azure CLI extensions on first use. For more information about extensions, see [Use extensions with the Azure CLI](https://docs.microsoft.com/en-us/cli/azure/azure-cli-extensions-overview).
- Run [az version](https://docs.microsoft.com/en-us/cli/azure/reference-index?#az_version) to find the version and dependent libraries that are installed. To upgrade to the latest version, run [az upgrade](https://docs.microsoft.com/en-us/cli/azure/reference-index?#az_upgrade).
- This article requires version 2.0 or later of the Azure CLI. If using Azure Cloud Shell, the latest version is already installed.
#### [](https://docs.microsoft.com/en-us/azure/vpn-gateway/vpn-gateway-howto-site-to-site-resource-manager-cli#example)Example values
You can use the following values to create a test environment, or refer to these values to better understand the examples in this article:
```
#Example values
VnetName = TestVNet1?
ResourceGroup = TestRG1?
Location = eastus?
AddressSpace = 10.11.0.0/16?
SubnetName = Subnet1?
Subnet = 10.11.0.0/24?
GatewaySubnet = 10.11.255.0/27?
LocalNetworkGatewayName = Site2?
LNG Public IP =
LocalAddrPrefix1 = 10.0.0.0/24
LocalAddrPrefix2 = 20.0.0.0/24 ?
GatewayName = VNet1GW?
PublicIP = VNet1GWIP?
VPNType = RouteBased?
GatewayType = Vpn?
ConnectionName = VNet1toSite2
```
### [](https://docs.microsoft.com/en-us/azure/vpn-gateway/vpn-gateway-howto-site-to-site-resource-manager-cli#Login)1. Connect to your subscription
If you choose to run CLI locally, connect to your subscription. If you are using Azure Cloud Shell in the browser, you don't need to connect to your subscription. You will connect automatically in Azure Cloud Shell. However, you may want to verify that you are using the correct subscription after you connect.
Sign in to your Azure subscription with the [az login](https://docs.microsoft.com/en-us/cli/azure/) command and follow the on-screen directions. For more information about signing in, see [Get Started with Azure CLI](https://docs.microsoft.com/en-us/cli/azure/get-started-with-azure-cli).
```
az login
```
If you have more than one Azure subscription, list the subscriptions for the account.
```
az account list --all
```
Specify the subscription that you want to use.
```
az account set --subscription
```
### [](https://docs.microsoft.com/en-us/azure/vpn-gateway/vpn-gateway-howto-site-to-site-resource-manager-cli#rg)2. Create a resource group
The following example creates a resource group named 'TestRG1' in the 'eastus' location. If you already have a resource group in the region that you want to create your VNet, you can use that one instead.
```
az group create --name TestRG1 --location eastus
```
### [](https://docs.microsoft.com/en-us/azure/vpn-gateway/vpn-gateway-howto-site-to-site-resource-manager-cli#VNet)3. Create a virtual network
If you don't already have a virtual network, create one using the [az network vnet create](https://docs.microsoft.com/en-us/cli/azure/network/vnet) command. When creating a virtual network, make sure that the address spaces you specify don't overlap any of the address spaces that you have on your on-premises network.
Note - In order for this VNet to connect to an on-premises location, you need to coordinate with your on-premises network administrator to carve out an IP address range that you can use specifically for this virtual network. If a duplicate address range exists on both sides of the VPN connection, traffic does not route the way you may expect it to. Additionally, if you want to connect this VNet to another VNet, the address space cannot overlap with other VNet. Take care to plan your network configuration accordingly.
The following example creates a virtual network named 'TestVNet1' and a subnet, 'Subnet1'.
```
az network vnet create --name TestVNet1 --resource-group TestRG1 --address-prefix 10.11.0.0/16 --location eastus --subnet-name Subnet1 --subnet-prefix 10.11.0.0/24
```
### [](https://docs.microsoft.com/en-us/azure/vpn-gateway/vpn-gateway-howto-site-to-site-resource-manager-cli#4-create-the-gateway-subnet)4. Create the gateway subnet
The virtual network gateway uses specific subnet called the gateway subnet. The gateway subnet is part of the virtual network IP address range that you specify when configuring your virtual network. It contains the IP addresses that the virtual network gateway resources and services use. The subnet must be named 'GatewaySubnet' in order for Azure to deploy the gateway resources. You can't specify a different subnet to deploy the gateway resources to. If you don't have a subnet named 'GatewaySubnet', when you create your VPN gateway, it will fail.
When you create the gateway subnet, you specify the number of IP addresses that the subnet contains. The number of IP addresses needed depends on the VPN gateway configuration that you want to create. Some configurations require more IP addresses than others. We recommend that you create a gateway subnet that uses a /27 or /28.
If you see an error that specifies that the address space overlaps with a subnet, or that the subnet is not contained within the address space for your virtual network, check your VNet address range. You may not have enough IP addresses available in the address range you created for your virtual network. For example, if your default subnet encompasses the entire address range, there are no IP addresses left to create additional subnets. You can either adjust your subnets within the existing address space to free up IP addresses, or specify an additional address range and create the gateway subnet there.
Use the [az network vnet subnet create](https://docs.microsoft.com/en-us/cli/azure/network/vnet/subnet) command to create the gateway subnet.
```
az network vnet subnet create --address-prefix 10.11.255.0/27 --name GatewaySubnet --resource-group TestRG1 --vnet-name TestVNet1
```
Important - When working with gateway subnets, avoid associating a network security group (NSG) to the gateway subnet. Associating a network security group to this subnet may cause your virtual network gateway (VPN and Express Route gateways) to stop functioning as expected. For more information about network security groups, see [What is a network security group?](https://docs.microsoft.com/en-us/azure/virtual-network/network-security-groups-overview).
### [](https://docs.microsoft.com/en-us/azure/vpn-gateway/vpn-gateway-howto-site-to-site-resource-manager-cli#localnet)5. Create the local network gateway
The local network gateway typically refers to your on-premises location. You give the site a name by which Azure can refer to it, then specify the IP address of the on-premises VPN device to which you will create a connection. You also specify the IP address prefixes that will be routed through the VPN gateway to the VPN device. The address prefixes you specify are the prefixes located on your on-premises network. If your on-premises network changes, you can easily update the prefixes.
Use the following values:
- The *--gateway-ip-address* is the IP address of your on-premises VPN device.
- The *--local-address-prefixes* are your on-premises address spaces.
Use the [az network local-gateway create](https://docs.microsoft.com/en-us/cli/azure/network/local-gateway) command to add a local network gateway with multiple address prefixes:
```
az network local-gateway create --gateway-ip-address 23.99.221.164 --name Site2 --resource-group TestRG1 --local-address-prefixes 10.0.0.0/24 20.0.0.0/24
```
### [](https://docs.microsoft.com/en-us/azure/vpn-gateway/vpn-gateway-howto-site-to-site-resource-manager-cli#PublicIP)6. Request a Public IP address
A VPN gateway must have a Public IP address. You first request the IP address resource, and then refer to it when creating your virtual network gateway. The IP address is dynamically assigned to the resource when the VPN gateway is created. VPN Gateway currently only supports *Dynamic* Public IP address allocation. You cannot request a Static Public IP address assignment. However, this does not mean that the IP address changes after it has been assigned to your VPN gateway. The only time the Public IP address changes is when the gateway is deleted and re-created. It doesn't change across resizing, resetting, or other internal maintenance/upgrades of your VPN gateway.
Use the [az network public-ip create](https://docs.microsoft.com/en-us/cli/azure/network/public-ip) command to request a Dynamic Public IP address.
```
az network public-ip create --name VNet1GWIP --resource-group TestRG1 --allocation-method Dynamic
```
### [](https://docs.microsoft.com/en-us/azure/vpn-gateway/vpn-gateway-howto-site-to-site-resource-manager-cli#CreateGateway)7. Create the VPN gateway
Create the virtual network VPN gateway. Creating a gateway can often take 45 minutes or more, depending on the selected gateway SKU.
Use the following values:
- The *--gateway-type* for a Site-to-Site configuration is *Vpn*. The gateway type is always specific to the configuration that you are implementing. For more information, see [Gateway types](https://docs.microsoft.com/en-us/azure/vpn-gateway/vpn-gateway-about-vpn-gateway-settings#gwtype).
- The *--vpn-type* can be *RouteBased* (referred to as a Dynamic Gateway in some documentation), or *PolicyBased* (referred to as a Static Gateway in some documentation). The setting is specific to requirements of the device that you are connecting to. For more information about VPN gateway types, see [About VPN Gateway configuration settings](https://docs.microsoft.com/en-us/azure/vpn-gateway/vpn-gateway-about-vpn-gateway-settings#vpntype).
- Select the Gateway SKU that you want to use. There are configuration limitations for certain SKUs. For more information, see [Gateway SKUs](https://docs.microsoft.com/en-us/azure/vpn-gateway/vpn-gateway-about-vpn-gateway-settings#gwsku).
Create the VPN gateway using the [az network vnet-gateway create](https://docs.microsoft.com/en-us/cli/azure/network/vnet-gateway) command. If you run this command using the '--no-wait' parameter, you don't see any feedback or output. This parameter allows the gateway to create in the background. It takes 45 minutes or more to create a gateway.
```
az network vnet-gateway create --name VNet1GW --public-ip-address VNet1GWIP --resource-group TestRG1 --vnet TestVNet1 --gateway-type Vpn --vpn-type RouteBased --sku VpnGw1 --no-wait?
```
### [](https://docs.microsoft.com/en-us/azure/vpn-gateway/vpn-gateway-howto-site-to-site-resource-manager-cli#VPNDevice)8. Configure your VPN device
Site-to-Site connections to an on-premises network require a VPN device. In this step, you configure your VPN device. When configuring your VPN device, you need the following:
- A shared key. This is the same shared key that you specify when creating your Site-to-Site VPN connection. In our examples, we use a basic shared key. We recommend that you generate a more complex key to use.
- The Public IP address of your virtual network gateway. You can view the public IP address by using the Azure portal, PowerShell, or CLI. To find the public IP address of your virtual network gateway, use the [az network public-ip list](https://docs.microsoft.com/en-us/cli/azure/network/public-ip) command. For easy reading, the output is formatted to display the list of public IPs in table format.
```
az network public-ip list --resource-group TestRG1 --output table
```
**To download VPN device configuration scripts:**
Depending on the VPN device that you have, you may be able to download a VPN device configuration script. For more information, see [Download VPN device configuration scripts](https://docs.microsoft.com/en-us/azure/vpn-gateway/vpn-gateway-download-vpndevicescript).
**See the following links for additional configuration information:**
- For information about compatible VPN devices, see [VPN Devices](https://docs.microsoft.com/en-us/azure/vpn-gateway/vpn-gateway-about-vpn-devices).
- Before configuring your VPN device, check for any [Known device compatibility issues](https://docs.microsoft.com/en-us/azure/vpn-gateway/vpn-gateway-about-vpn-devices#known) for the VPN device that you want to use.
- For links to device configuration settings, see [Validated VPN Devices](https://docs.microsoft.com/en-us/azure/vpn-gateway/vpn-gateway-about-vpn-devices#devicetable). The device configuration links are provided on a best-effort basis. It's always best to check with your device manufacturer for the latest configuration information. The list shows the versions we have tested. If your OS is not on that list, it is still possible that the version is compatible. Check with your device manufacturer to verify that OS version for your VPN device is compatible.
- For an overview of VPN device configuration, see [VPN device configuration overview](https://docs.microsoft.com/en-us/azure/vpn-gateway/vpn-gateway-3rdparty-device-config-overview).
- For information about editing device configuration samples, see [Editing samples](https://docs.microsoft.com/en-us/azure/vpn-gateway/vpn-gateway-about-vpn-devices#editing).
- For cryptographic requirements, see [About cryptographic requirements and Azure VPN gateways](https://docs.microsoft.com/en-us/azure/vpn-gateway/vpn-gateway-about-compliance-crypto).
- For information about IPsec/IKE parameters, see [About VPN devices and IPsec/IKE parameters for Site-to-Site VPN gateway connections](https://docs.microsoft.com/en-us/azure/vpn-gateway/vpn-gateway-about-vpn-devices#ipsec). This link shows information about IKE version, Diffie-Hellman Group, Authentication method, encryption and hashing algorithms, SA lifetime, PFS, and DPD, in addition to other parameter information that you need to complete your configuration.
- For IPsec/IKE policy configuration steps, see [Configure IPsec/IKE policy for S2S VPN or VNet-to-VNet connections](https://docs.microsoft.com/en-us/azure/vpn-gateway/vpn-gateway-ipsecikepolicy-rm-powershell).
- To connect multiple policy-based VPN devices, see [Connect Azure VPN gateways to multiple on-premises policy-based VPN devices using PowerShell](https://docs.microsoft.com/en-us/azure/vpn-gateway/vpn-gateway-connect-multiple-policybased-rm-ps).
### [](https://docs.microsoft.com/en-us/azure/vpn-gateway/vpn-gateway-howto-site-to-site-resource-manager-cli#CreateConnection)9. Create the VPN connection
Create the Site-to-Site VPN connection between your virtual network gateway and your on-premises VPN device. Pay particular attention to the shared key value, which must match the configured shared key value for your VPN device.
Create the connection using the [az network vpn-connection create](https://docs.microsoft.com/en-us/cli/azure/network/vpn-connection) command.
```
az network vpn-connection create --name VNet1toSite2 --resource-group TestRG1 --vnet-gateway1 VNet1GW -l eastus --shared-key abc123 --local-gateway2 Site2
```
After a short while, the connection will be established.
### [](https://docs.microsoft.com/en-us/azure/vpn-gateway/vpn-gateway-howto-site-to-site-resource-manager-cli#toverify)10. Verify the VPN connection
You can verify that your connection succeeded by using the [az network vpn-connection show](https://docs.microsoft.com/en-us/cli/azure/network/vpn-connection) command. In the example, '--name' refers to the name of the connection that you want to test. When the connection is in the process of being established, its connection status shows 'Connecting'. Once the connection is established, the status changes to 'Connected'.
```
az network vpn-connection show --name VNet1toSite2 --resource-group TestRG1
```
If you want to use another method to verify your connection, see [Verify a VPN Gateway connection](https://docs.microsoft.com/en-us/azure/vpn-gateway/vpn-gateway-verify-connection-resource-manager).
### [](https://docs.microsoft.com/en-us/azure/vpn-gateway/vpn-gateway-howto-site-to-site-resource-manager-cli#connectVM)To connect to a virtual machine
You can connect to a VM that is deployed to your VNet by creating a Remote Desktop Connection to your VM. The best way to initially verify that you can connect to your VM is to connect by using its private IP address, rather than computer name. That way, you are testing to see if you can connect, not whether name resolution is configured properly.
1. Locate the private IP address. You can find the private IP address of a VM by either looking at the properties for the VM in the Azure portal, or by using PowerShell.
- Azure portal - Locate your virtual machine in the Azure portal. View the properties for the VM. The private IP address is listed.
- PowerShell - Use the following example to view a list of VMs and private IP addresses from your resource groups:
```powershell
$VMs = Get-AzVM
$Nics = Get-AzNetworkInterface | Where VirtualMachine -ne $null
foreach($Nic in $Nics) {
$VM = $VMs | Where-Object -Property Id -eq $Nic.VirtualMachine.Id
$Prv = $Nic.IpConfigurations | Select-Object -ExpandProperty PrivateIpAddress
$Alloc = $Nic.IpConfigurations | Select-Object -ExpandProperty PrivateIpAllocationMethod
Write-Output "$($VM.Name): $Prv,$Alloc"
}
```
2. Verify that you are connected to your VNet using the Point-to-Site VPN connection.
3. Open **Remote Desktop Connection** by typing "RDP" or "Remote Desktop Connection" in the search box on the taskbar, then select Remote Desktop Connection. You can also open Remote Desktop Connection using the 'mstsc' command in PowerShell.
4. In Remote Desktop Connection, enter the private IP address of the VM. You can click "Show Options" to adjust additional settings, then connect.
**Troubleshoot a connection**
If you are having trouble connecting to a virtual machine over your VPN connection, check the following:
- Verify that your VPN connection is successful.
- Verify that you are connecting to the private IP address for the VM.
- If you can connect to the VM using the private IP address, but not the computer name, verify that you have configured DNS properly. For more information about how name resolution works for VMs, see [Name Resolution for VMs](https://docs.microsoft.com/en-us/azure/virtual-network/virtual-networks-name-resolution-for-vms-and-role-instances).
- For more information about RDP connections, see [Troubleshoot Remote Desktop connections to a VM](https://docs.microsoft.com/en-us/troubleshoot/azure/virtual-machines/troubleshoot-rdp-connection).
### [](https://docs.microsoft.com/en-us/azure/vpn-gateway/vpn-gateway-howto-site-to-site-resource-manager-cli#tasks)Common tasks
This section contains common commands that are helpful when working with site-to-site configurations. For the full list of CLI networking commands, see [Azure CLI - Networking](https://docs.microsoft.com/en-us/cli/azure/network).
#### [](https://docs.microsoft.com/en-us/azure/vpn-gateway/vpn-gateway-howto-site-to-site-resource-manager-cli#to-view-local-network-gateways)To view local network gateways
To view a list of the local network gateways, use the [az network local-gateway list](https://docs.microsoft.com/en-us/cli/azure/network/local-gateway) command.
```
az network local-gateway list --resource-group TestRG1
```
#### [](https://docs.microsoft.com/en-us/azure/vpn-gateway/vpn-gateway-howto-site-to-site-resource-manager-cli#noconnection)To modify local network gateway IP address prefixes - no gateway connection
If you don't have a gateway connection and you want to add or remove IP address prefixes, you use the same command that you use to create the local network gateway, [az network local-gateway create](https://docs.microsoft.com/en-us/cli/azure/network/local-gateway). You can also use this command to update the gateway IP address for the VPN device. To overwrite the current settings, use the existing name of your local network gateway. If you use a different name, you create a new local network gateway, instead of overwriting the existing one.
Each time you make a change, the entire list of prefixes must be specified, not just the prefixes that you want to change. Specify only the prefixes that you want to keep. In this case, 10.0.0.0/24 and 20.0.0.0/24
```
az network local-gateway create --gateway-ip-address 23.99.221.164 --name Site2 -g TestRG1 --local-address-prefixes 10.0.0.0/24 20.0.0.0/24
```
#### [](https://docs.microsoft.com/en-us/azure/vpn-gateway/vpn-gateway-howto-site-to-site-resource-manager-cli#withconnection)To modify local network gateway IP address prefixes - existing gateway connection
If you have a gateway connection and want to add or remove IP address prefixes, you can update the prefixes using [az network local-gateway update](https://docs.microsoft.com/en-us/cli/azure/network/local-gateway). This results in some downtime for your VPN connection. When modifying the IP address prefixes, you don't need to delete the VPN gateway.
Each time you make a change, the entire list of prefixes must be specified, not just the prefixes that you want to change. In this example, 10.0.0.0/24 and 20.0.0.0/24 are already present. We add the prefixes 30.0.0.0/24 and 40.0.0.0/24 and specify all 4 of the prefixes when updating.
```
az network local-gateway update --local-address-prefixes 10.0.0.0/24 20.0.0.0/24 30.0.0.0/24 40.0.0.0/24 --name VNet1toSite2 -g TestRG1
```
#### [](https://docs.microsoft.com/en-us/azure/vpn-gateway/vpn-gateway-howto-site-to-site-resource-manager-cli#to-modify-the-local-network-gateway-gatewayipaddress)To modify the local network gateway 'gatewayIpAddress'
If the VPN device that you want to connect to has changed its public IP address, you need to modify the local network gateway to reflect that change. The gateway IP address can be changed without removing an existing VPN gateway connection (if you have one). To modify the gateway IP address, replace the values 'Site2' and 'TestRG1' with your own using the [az network local-gateway update](https://docs.microsoft.com/en-us/cli/azure/network/local-gateway) command.
```
az network local-gateway update --gateway-ip-address 23.99.222.170 --name Site2 --resource-group TestRG1
```
Verify that the IP address is correct in the output:
```
"gatewayIpAddress": "23.99.222.170",
```
#### [](https://docs.microsoft.com/en-us/azure/vpn-gateway/vpn-gateway-howto-site-to-site-resource-manager-cli#to-verify-the-shared-key-values)To verify the shared key values
Verify that the shared key value is the same value that you used for your VPN device configuration. If it is not, either run the connection again using the value from the device, or update the device with the value from the return. The values must match. To view the shared key, use the [az network vpn-connection-list](https://docs.microsoft.com/en-us/cli/azure/network/vpn-connection).
```
az network vpn-connection shared-key show --connection-name VNet1toSite2 --resource-group TestRG1
```
#### [](https://docs.microsoft.com/en-us/azure/vpn-gateway/vpn-gateway-howto-site-to-site-resource-manager-cli#to-view-the-vpn-gateway-public-ip-address)To view the VPN gateway Public IP address
To find the public IP address of your virtual network gateway, use the [az network public-ip list](https://docs.microsoft.com/en-us/cli/azure/network/public-ip) command. For easy reading, the output for this example is formatted to display the list of public IPs in table format.
```
az network public-ip list --resource-group TestRG1 --output table
```
With the gateway and router setup complete, the next step is replicating the virtual machines
## Replicating Virtual Machines / Containers
Due to the number of different ways to migrate Virtual Machines into Azure from the private cloud, we will not cover migration in depth this time. How much applies depends on the source platform: [Microsoft's migration guides](https://docs.microsoft.com/en-us/azure/migrate/create-manage-projects) cover established paths for VMware, Hyper-V, and physical machines, while KVM or Proxmox hosts, Docker deployments, and Kubernetes clusters generally need a different route, such as exporting disks, converting formats, or rebuilding the workload on Azure services. Leave questions on this article, if there is information you can't find.
There are a few items to keep in mind when migrating Virtual Machines / Containers from a homelab to Azure. A major one is that the migration is likely not permanent and likely not one way. Azure has a number of tools and technologies for migrating infrastructure into Azure; it does not, however, have many tools for migrating instances out of Azure. This means that your migration strategy will need to be able to synchronize back to the homelab. Prepare for a bi-directional migration process, if migration is required for entire machines.
### Bi-Directional Migrations
#### Virtual Machines
Bi-directional migration options will differ depending on the hosting technology you use for your homelab. The most basic case, Virtual Machines (KVM, VMWare, Hyper-V, Xen, etc.), has two options based on deployment type:
- Immutable - [Due to the stateless nature of immutable instances](https://docs.microsoft.com/en-us/azure/architecture/solution-ideas/articles/immutable-infrastructure-cicd-using-jenkins-and-terraform-on-azure-virtual-architecture-overview), the synchronization mechanism would target the underlying state storage mechanism if there is one. In the case of a blob or file store, the data can be easily copied between Azure and homelab using any number of tools.
- Mutable - Mutable instances will most likely need to have the (virtual) machine disks copied between each host. Use appropriate disk conversion technology so that the disk type is appropriate the host (Azure VHD vs KVM qcow2, etc).
It should be noted that migrations of certain products, like SQL Server, have more advanced migration and synchronization methods. These products are outside the scope of this discussion. For an example, a PostgreSQL cluster has the option to [migrate via replication](https://docs.microsoft.com/en-us/azure/postgresql/howto-read-replicas-portal).
#### Containers
Container workloads are the easiest to move because the image is the artifact. On the Proxmox side that means LXC templates and any registry-backed deployments (Docker Compose files, Kubernetes manifests); on the Azure side the landing zones are [Azure Container Instances](https://docs.microsoft.com/en-us/azure/container-instances/) for single containers and [AKS](https://docs.microsoft.com/en-us/azure/aks/intro-kubernetes) when the workload already assumes Kubernetes.
The mechanics per source:
- **LXC containers** - rebuild rather than migrate. Export the container's filesystem if you must (`vzdump` works for LXC too), but the cleaner path is to capture the package list and volumes, then `docker build`/recreate against a supported base image. LXC is not a Docker image format, so there is no direct lift-and-shift.
- **Docker hosts** - push images to a registry (Docker Hub or Azure Container Registry), then redeploy with the same Compose file or manifest pointed at the new registry. Volumes ride along as Azure Files shares or managed disks.
- **Kubernetes clusters** - `kubectl apply` your manifests against AKS after retargeting image references and storage classes. StatefulSets need their persistent volumes recreated or migrated first; see the disk-copy notes above.
#### Data Sync
Azure has a number of different options to sync blobs between the home lab and Azure:
- [AzCopy](https://docs.microsoft.com/en-us/azure/storage/common/storage-use-azcopy-v10?toc=/azure/storage/blobs/toc.json)
- [Azure Data Factory](https://docs.microsoft.com/en-us/azure/data-factory/connector-azure-blob-storage?toc=/azure/storage/blobs/toc.json)
- [Mount storage by using NFS](https://docs.microsoft.com/en-us/azure/storage/blobs/network-file-system-protocol-support-how-to)
- [Mount storage from Linux using blobfuse](https://docs.microsoft.com/en-us/azure/storage/blobs/storage-how-to-mount-container-linux)
- [Transfer data with the Data Movement library](https://docs.microsoft.com/en-us/azure/storage/common/storage-use-data-movement-library?toc=/azure/storage/blobs/toc.json)
### Ingress
#### Direct Entry
Another item to consider is ingress: what will be the front door into your homelab. The usage of front door here describes how the applications are accessed over the internet - it is not a reference to the Azure Front Door product specifically. If the homelab will still use its internet as the front door for application access, then will the available bandwidth be enough for the migration increase? If Azure is to be the front door, then how do you simultaneously handle having two front doors as the DNS update propagates?
{: width="696" height="312" loading="lazy" }
Diagram showing an on-premises network on the left, which consists of three computer screens and a gateway. A double-sided arrow connecting the on-premises to a cloud labeled internet with "Site-to-site VPN tunnel" above the double-sided arrow. Another double-sided arrow connects the internet cloud to its right, through a dotted rectangle labeled "Azure Virtual Network". The arrow connects to an item labeled VPN gateway. That gateway has a single-arrow leaving it to the right pointing to a load balancer which is pointing to three identical virtual machines. At the bottom, there is a computer monitor labeled user. Between the computer monitor labeled user and the cloud labeled internet is two doors. The left door is labeled on-premises front door. The right door is labeled Azure Front Door. There is a blue arrow for each door pointing from the computer labeled user. There is a blue arrow from each door pointing to the cloud labeled internet.
If you wish to use both as a front door, make sure you have an ingress option available that can properly route between the different subnets and servers. In the case of a basic web server, use something like Nginx or HA Proxy for ingress and basic routing, so that it can be mirrored between homelab and Azure.
Once our event is complete, it's time to synchronize our systems and tear down our gateway.
## Tear Down ([official docs](https://docs.microsoft.com/en-us/azure/architecture/solution-ideas/articles/backup-archive-on-premises-applications))
A note on tooling before this section: the creation half above uses the Azure CLI, while the teardown walkthrough below is written for Azure PowerShell. Either install the Az PowerShell module and follow along as written, or translate the same deletion order into `az` CLI commands - the sequence of resources to remove is identical either way.
There are a couple of different approaches you can take when you want to delete a virtual network gateway for a VPN gateway configuration.
- If you want to delete everything and start over, as in the case of a test environment, you can delete the resource group. When you delete a resource group, it deletes all the resources within the group. This method is only recommended if you don't want to keep any of the resources in the resource group. You can't selectively delete only a few resources using this approach.
- If you want to keep some of the resources in your resource group, deleting a virtual network gateway becomes slightly more complicated. Before you can delete the virtual network gateway, you must first delete any resources that are dependent on the gateway. The steps you follow depend on the type of connections that you created and the dependent resources for each connection.
### [](https://docs.microsoft.com/en-us/azure/vpn-gateway/vpn-gateway-delete-vnet-gateway-powershell#before-beginning)Before beginning
#### [](https://docs.microsoft.com/en-us/azure/vpn-gateway/vpn-gateway-delete-vnet-gateway-powershell#1-download-the-latest-azure-resource-manager-powershell-cmdlets)1. Download the latest Azure Resource Manager PowerShell cmdlets.
Download and install the latest version of the Azure Resource Manager PowerShell cmdlets. For more information about downloading and installing PowerShell cmdlets, see [How to install and configure Azure PowerShell](https://docs.microsoft.com/en-us/powershell/azure/).
#### [](https://docs.microsoft.com/en-us/azure/vpn-gateway/vpn-gateway-delete-vnet-gateway-powershell#2-connect-to-your-azure-account)2. Connect to your Azure account.
Open your PowerShell console and connect to your account. Use the following example to help you connect:
```
Connect-AzAccount
```
Check the subscriptions for the account.
```
Get-AzSubscription
```
If you have more than one subscription, specify the subscription that you want to use.
```
Select-AzSubscription -SubscriptionName "Replace_with_your_subscription_name"
```
## [](https://docs.microsoft.com/en-us/azure/vpn-gateway/vpn-gateway-delete-vnet-gateway-powershell#S2S)Delete a Site-to-Site VPN gateway
To delete a virtual network gateway for a S2S configuration, you must first delete each resource that pertains to the virtual network gateway. Resources must be deleted in a certain order due to dependencies. When working with the examples below, some of the values must be specified, while other values are an output result. We use the following specific values in the examples for demonstration purposes:
VNet name: VNet1
Resource Group name: RG1
Virtual network gateway name: GW1
The following steps apply to the [Resource Manager deployment model](https://docs.microsoft.com/en-us/azure/azure-resource-manager/management/deployment-models).
### [](https://docs.microsoft.com/en-us/azure/vpn-gateway/vpn-gateway-delete-vnet-gateway-powershell#1-get-the-virtual-network-gateway-that-you-want-to-delete)1. Get the virtual network gateway that you want to delete.
```
$GW=get-Azvirtualnetworkgateway -Name "GW1" -ResourceGroupName "RG1"
```
### [](https://docs.microsoft.com/en-us/azure/vpn-gateway/vpn-gateway-delete-vnet-gateway-powershell#2-check-to-see-if-the-virtual-network-gateway-has-any-connections)2. Check to see if the virtual network gateway has any connections.
```
get-Azvirtualnetworkgatewayconnection -ResourceGroupName "RG1" | where-object {$_.VirtualNetworkGateway1.Id -eq $GW.Id}
$Conns=get-Azvirtualnetworkgatewayconnection -ResourceGroupName "RG1" | where-object {$_.VirtualNetworkGateway1.Id -eq $GW.Id}
```
### [](https://docs.microsoft.com/en-us/azure/vpn-gateway/vpn-gateway-delete-vnet-gateway-powershell#3-delete-all-connections)3. Delete all connections.
You may be prompted to confirm the deletion of each of the connections.
```
$Conns | ForEach-Object {Remove-AzVirtualNetworkGatewayConnection -Name $_.name -ResourceGroupName $_.ResourceGroupName}
```
### [](https://docs.microsoft.com/en-us/azure/vpn-gateway/vpn-gateway-delete-vnet-gateway-powershell#4-delete-the-virtual-network-gateway)4. Delete the virtual network gateway.
You may be prompted to confirm the deletion of the gateway. If you have a P2S configuration to this VNet in addition to your S2S configuration, deleting the virtual network gateway will automatically disconnect all P2S clients without warning.
```
Remove-AzVirtualNetworkGateway -Name "GW1" -ResourceGroupName "RG1"
```
At this point, your virtual network gateway has been deleted. You can use the next steps to delete any resources that are no longer being used.
### [](https://docs.microsoft.com/en-us/azure/vpn-gateway/vpn-gateway-delete-vnet-gateway-powershell#5-delete-the-local-network-gateways)5 Delete the local network gateways.
Get the list of the corresponding local network gateways.
```
$LNG=Get-AzLocalNetworkGateway -ResourceGroupName "RG1" | where-object {$_.Id -In $Conns.LocalNetworkGateway2.Id}
```
Delete the local network gateways. You may be prompted to confirm the deletion of each of the local network gateway.
```
$LNG | ForEach-Object {Remove-AzLocalNetworkGateway -Name $_.Name -ResourceGroupName $_.ResourceGroupName}
```
### [](https://docs.microsoft.com/en-us/azure/vpn-gateway/vpn-gateway-delete-vnet-gateway-powershell#6-delete-the-public-ip-address-resources)6. Delete the Public IP address resources.
Get the IP configurations of the virtual network gateway.
```
$GWIpConfigs = $Gateway.IpConfigurations
```
Get the list of Public IP address resources used for this virtual network gateway. If the virtual network gateway was active-active, you will see two Public IP addresses.
```
$PubIP=Get-AzPublicIpAddress | where-object {$_.Id -In $GWIpConfigs.PublicIpAddress.Id}
```
Delete the Public IP resources.
```
$PubIP | foreach-object {remove-AzpublicIpAddress -Name $_.Name -ResourceGroupName "RG1"}
```
### [](https://docs.microsoft.com/en-us/azure/vpn-gateway/vpn-gateway-delete-vnet-gateway-powershell#7-delete-the-gateway-subnet-and-set-the-configuration)7. Delete the gateway subnet and set the configuration.
```
$GWSub = Get-AzVirtualNetwork -ResourceGroupName "RG1" -Name "VNet1" | Remove-AzVirtualNetworkSubnetConfig -Name "GatewaySubnet"
Set-AzVirtualNetwork -VirtualNetwork $GWSub
```
## [](https://docs.microsoft.com/en-us/azure/vpn-gateway/vpn-gateway-delete-vnet-gateway-powershell#delete)Delete a VPN gateway by deleting the resource group
If you are not concerned about keeping any of your resources in the resource group and you just want to start over, you can delete an entire resource group. This is a quick way to remove everything. The following steps apply only to the [Resource Manager deployment model](https://docs.microsoft.com/en-us/azure/azure-resource-manager/management/deployment-models).
### [](https://docs.microsoft.com/en-us/azure/vpn-gateway/vpn-gateway-delete-vnet-gateway-powershell#1-get-a-list-of-all-the-resource-groups-in-your-subscription)1. Get a list of all the resource groups in your subscription.
```
Get-AzResourceGroup
```
### [](https://docs.microsoft.com/en-us/azure/vpn-gateway/vpn-gateway-delete-vnet-gateway-powershell#2-locate-the-resource-group-that-you-want-to-delete)2. Locate the resource group that you want to delete.
Locate the resource group that you want to delete and view the list of resources in that resource group. In the example, the name of the resource group is RG1. Modify the example to retrieve a list of all the resources.
```
Find-AzResource -ResourceGroupNameContains RG1
```
### [](https://docs.microsoft.com/en-us/azure/vpn-gateway/vpn-gateway-delete-vnet-gateway-powershell#3-verify-the-resources-in-the-list)3. Verify the resources in the list.
When the list is returned, review it to verify that you want to delete all the resources in the resource group, as well as the resource group itself. If you want to keep some of the resources in the resource group, use the steps in the earlier sections of this article to delete your gateway.
### [](https://docs.microsoft.com/en-us/azure/vpn-gateway/vpn-gateway-delete-vnet-gateway-powershell#4-delete-the-resource-group-and-resources)4. Delete the resource group and resources.
To delete the resource group and all the resource contained in the resource group, modify the example and run.
```
Remove-AzResourceGroup -Name RG1
```
### [](https://docs.microsoft.com/en-us/azure/vpn-gateway/vpn-gateway-delete-vnet-gateway-powershell#5-check-the-status)5. Check the status.
It takes some time for Azure to delete all the resources. You can check the status of your resource group by using this cmdlet.
```
Get-AzResourceGroup -ResourceGroupName RG1
```
The result that is returned shows 'Succeeded'.
```
ResourceGroupName : RG1
Location : eastus
ProvisioningState : Succeeded
```
---
# Home Lab - Tenstorrent Buildout for Multi-Cloud Edge Demos
https://jaredrhodes.com/blog/home-lab-tenstorrent-buildout-multi-cloud-edge/
## Buildout Overview
The basement is now doing two jobs at once: studio and server host. The studio is intentionally simple, just a green screen wall and a demo table, because the focus is repeatable technical demonstrations across multiple industry verticals. Right behind that space is the local compute footprint that powers the demos.
This buildout adds two custom Tenstorrent server paths to my existing NVIDIA-enabled and general-purpose server stack. I wanted one lab I could re-point at a different demo scenario in an afternoon, rather than standing up a fresh one-off rig every time a new vertical came up.
The broader architecture is hybrid by design. I want the same local inference flow to run against multiple cloud providers, plus a purely local mode when connectivity is not there. That gives me a practical way to show customers and internal teams what edge-first compute can do, and where cloud orchestration actually earns its place.
Two terms do a lot of work below: `Private Cloud` means the self-hosted infrastructure in my server room, and `Local` means execution paths that never leave it, including the equivalent services running in Kubernetes.
### Private Cloud Topology
That is the whole lab in one frame: studio cameras and a Windows RTSP host on the left, the Kubernetes edge cluster in the middle (K3s, the lightweight single-binary Kubernetes distribution) with Tenstorrent and NVIDIA workers under it, and TrueNAS holding models and media. Every diagram after this one is the same picture with a different control plane bolted onto it.
### Azure Integration View
Same edge, Azure on the right. What is new here is IoT Operations splitting traffic into a hot path for alerting and a cold path into the medallion lakehouse, with Fabric Real-Time Intelligence (RTI) as the streaming ingestion surface and a verify worker calling a Microsoft Foundry endpoint. The arrow I actually care about is the one coming back: verification and threshold feedback into the edge runtime.
### Control Plane Overlay (Azure + Private Cloud)
This one drops the data path entirely and shows only who configures whom: Arc and Flux applying policy and config baselines to the same cluster the previous two diagrams route messages through. I draw them separately because they fail separately - a broken GitOps reconcile and a broken frame topic are different pages of a runbook.
The card below is the legend for all of these: solid arrows are the data plane, dashed arrows the control plane, and the three transports are RTSP, MQTT, and Kafka over HTTPS.
### AWS Integration View
Swap the cloud and the shape survives. Greengrass stands where the AIO edge runtime stood, IoT Core takes over the broker's cloud-facing half, SiteWise takes the analytics, and the edge inference box in the middle is the same box it was two diagrams ago. That is the claim this whole buildout exists to test.
### Local-Only Implementation (Specific Self-Hosted Tools)
Now the same pipeline with no cloud at all: MediaMTX for RTSP, EMQX for the message bus, and TT-Forge (Tenstorrent's compiler front end for getting a model onto the cards) and Triton workers on K3s. Each stage is concrete and self-hosted, and still interchangeable by contract. The handoff boundaries are what stay fixed: RTSP ingest, MQTT frame topics, event stream topics, and packaged artifact output.
## Physical Lab and Studio Layout
The studio side is optimized for fast context switching. I can record walkthroughs, run live demos, and pivot from one vertical scenario to another without rebuilding the room. The server side is optimized for shared hardware utilization across those same scenarios.
This setup makes it easier to:
- Reuse the same edge hardware for multiple business demos.
- Keep model and telemetry pipelines consistent across environments.
- Demonstrate cloud-assisted operations without requiring cloud-only inference.
- Keep local fallback paths available when connectivity is constrained.
## Current Lab Inventory
Model numbers matter here, because "Tenstorrent server" and "GPU box" tell you nothing about what will actually fit:
| Host | Hardware | Role |
|---|---|---|
| Wormhole worker | one Tenstorrent Wormhole n150 | active Kubernetes worker for Tenstorrent inference |
| Blackhole host | one Tenstorrent Blackhole p150a | staged, not fully onboarded yet |
| TrueNAS SCALE box | two NVIDIA Tesla P40 (24 GB each), passed through to a Linux VM | Ollama and other model workloads, plus model and media storage |
| Windows RTSP host | commodity desktop | relays the studio cameras as RTSP |
| Studio cameras | two webcams, a high shot and a low shot | the live video source for every demo |
| Proxmox hosts | two general-purpose servers | private-cloud VMs and supporting services |
Twenty-four gigabytes a card is plenty of room for the models I run locally. What the Pascal generation costs me is throughput, not model size: the P40s will load a model the newer cards would run several times faster.
The practical goal is a mixed accelerator lab where workload placement can be tuned by use case, latency target, and cost profile.
{: width="1920" height="1446" loading="lazy" }
## Azure Path: IoT Operations, Arc, and Edge Feedback Loops
On Azure, the control pattern is centered around [Azure IoT Operations](https://learn.microsoft.com/en-us/azure/iot-operations/overview-iot-operations) on [Azure Arc-enabled Kubernetes](https://learn.microsoft.com/en-us/azure/azure-arc/kubernetes/overview). The same pattern drives the private demo environment behind this buildout.
The local flow is:
1. Cameras publish RTSP to the Windows RTSP host.
2. The AIO media connector ingests RTSP and publishes frames to the local MQTT frame topic. That connector was still in preview when I checked the Learn docs in September 2026, so check its status before you build on it.
3. Edge inference services consume those frame topics and publish detections, traffic, and enriched messages.
4. AIO Data Flows process, normalize, and extract delta events.
5. Data Flows push upstream to Fabric RTI and forward the verify topic to the cloud. Data flows have a fixed set of destinations - broker, Kafka and Event Hubs, lake and warehouse targets - so this step is routing, not a call.
6. A separate verify worker consumes that forwarded stream, calls the Foundry endpoint, and publishes the answer back on the verify-result topic.
7. Results flow into cloud analytics and operations dashboards, with feedback updates pushed back to edge.
The topic patterns those hops use look like this. The code behind them is part of my private reference implementation and is not published, so read these as documentation of the design rather than pointers to a repo you can clone:
- `tt/edge/{site}/{camera_id}/detections`
- `tt/cloud/{site}/{device_id}/verify`
- `tt/cloud/{site}/{device_id}/verify-result`
The camera fleet in the [Azure IoT Operations series](/blog/azure-iot-operations-camera-control-plane/) is a separate system on its own `cameras/#` tree; this lab keeps `tt/`, and nothing bridges the two.
Operationally, Arc gives me a consistent management surface for local Kubernetes resources and policy. I am also treating [GitOps with Flux on Arc-enabled Kubernetes](https://learn.microsoft.com/en-us/azure/azure-arc/kubernetes/conceptual-gitops-flux2) as the default deployment and configuration strategy for repeatability.
One reason this fits the basement buildout well is that Azure IoT Operations is designed as a unified edge data plane with an industrial MQTT broker and supports routing/normalization before cloud fan-out. That maps directly to how I want to keep high-volume inference local while still enabling cloud-side verification, model lifecycle workflows, and cross-site analytics.
For the Fabric path, I am modeling Data Flows publishing straight into Fabric Real-Time Intelligence through the documented Fabric endpoint configuration, with the eventstream as the ingestion surface. No Event Hub bridge is required on that hop.
The card below is the terminology legend for that sequence: what RTSP, MQTT, the Kafka endpoint, a delta event, and an enriched message each mean in these diagrams.
## AWS Path: Greengrass, IoT Core, SiteWise, Systems Manager, and Bedrock
On AWS, the equivalent pattern uses:
- [AWS IoT Greengrass](https://docs.aws.amazon.com/greengrass/v2/developerguide/what-is-iot-greengrass.html) for edge runtime orchestration.
- [AWS IoT Core](https://docs.aws.amazon.com/iot/latest/developerguide/what-is-aws-iot.html) for secure bi-directional cloud messaging and device state.
- [AWS IoT SiteWise](https://docs.aws.amazon.com/iot-sitewise/latest/userguide/what-is-sitewise.html) for industrial telemetry modeling, transforms, and monitoring.
- [AWS Systems Manager](https://docs.aws.amazon.com/systems-manager/latest/userguide/what-is-systems-manager.html) for hybrid fleet operations, patching, and command execution.
- [Amazon Bedrock](https://docs.aws.amazon.com/bedrock/latest/userguide/what-is-bedrock.html) as part of the cloud-side model specialization and distillation path.
The AWS side is organized to mirror the Azure demo shape where possible, including shared vertical scenarios and analytics assets. The intent is to keep edge behavior portable while changing only cloud control-plane integrations.
At a high level:
1. Local inference continues at the edge.
2. Edge messaging bridges into AWS IoT Core patterns.
3. Industrial telemetry and KPI modeling feed SiteWise analytics.
4. Operations and lifecycle tasks route through Systems Manager.
5. Distilled cloud-side model workflows can feed edge deployment artifacts.
That gets me enough AWS parity that a fixed cloud preference stays a conversation about integrations instead of turning into a rebuild of the edge.
## Cross-Provider Pattern
The architecture pattern stays the same even when control planes differ:
| Layer | Azure | AWS |
|---|---|---|
| Edge inference runtime | Tenstorrent edge service on local K8s | Tenstorrent workloads under Greengrass-managed edge runtime |
| Edge messaging | IoT Operations MQTT broker | IoT Core and Greengrass local messaging patterns |
| Fleet and policy | Arc-enabled infrastructure and GitOps | Systems Manager + IoT fleet operations |
| Industrial analytics | Event flow to cloud analytics services | SiteWise asset model and telemetry analytics |
| Model lifecycle | Cloud verification + model workflows | Bedrock-assisted distillation workflows |
This is the core reason for the buildout: one local edge core, multiple cloud orchestration options, and a purely local fallback.
## First Milestone
The Azure flow above is the design. The milestone is the half of it I have not closed yet.
Ingest, local inference on the Wormhole host, and publishing structured detections into IoT Operations topics are the tractable part; each is a service with an obvious contract on both sides. The return path is the hard one: verification outcomes and updated thresholds coming back down and changing what the edge does on the next frame, without a human copying a number between two dashboards. Until that runs end to end, what I have is edge inference and cloud analytics sitting next to each other, and a loop only on paper. The loop is the only part of this anyone should be impressed by, so it is what I am building first.
## Next Steps
1. Complete Blackhole onboarding and benchmark against current Wormhole and NVIDIA paths.
2. Harden deployment automation across Azure and AWS for faster scenario switching.
3. Build out more scenario configurations so the same hardware can stand in for another vertical without a rebuild.
4. Add stronger runbook-level operational checks for edge health, topic flow integrity, and model rollout safety.
## References
- [Azure IoT Operations overview](https://learn.microsoft.com/en-us/azure/iot-operations/overview-iot-operations)
- [Send data to Microsoft Fabric Real-Time Intelligence](https://learn.microsoft.com/azure/iot-operations/connect-to-cloud/howto-configure-fabric-real-time-intelligence-endpoint)
- [Media connector (preview)](https://learn.microsoft.com/azure/iot-operations/discover-manage-assets/howto-use-media-connector)
- [Azure Arc overview](https://learn.microsoft.com/en-us/azure/azure-arc/overview)
- [Azure Arc-enabled Kubernetes overview](https://learn.microsoft.com/en-us/azure/azure-arc/kubernetes/overview)
- [GitOps with Flux v2 on Azure Arc-enabled Kubernetes](https://learn.microsoft.com/en-us/azure/azure-arc/kubernetes/conceptual-gitops-flux2)
- [AWS IoT Greengrass overview](https://docs.aws.amazon.com/greengrass/v2/developerguide/what-is-iot-greengrass.html)
- [AWS IoT Core overview](https://docs.aws.amazon.com/iot/latest/developerguide/what-is-aws-iot.html)
- [AWS IoT SiteWise overview](https://docs.aws.amazon.com/iot-sitewise/latest/userguide/what-is-sitewise.html)
- [AWS Systems Manager overview](https://docs.aws.amazon.com/systems-manager/latest/userguide/what-is-systems-manager.html)
- [Amazon Bedrock overview](https://docs.aws.amazon.com/bedrock/latest/userguide/what-is-bedrock.html)
- [Tenstorrent documentation home](https://docs.tenstorrent.com/)
- [Tenstorrent TT-Forge documentation](https://docs.tenstorrent.com/forge/index.html)
- [Tenstorrent Wormhole hardware](https://tenstorrent.com/hardware/wormhole)
- [Tenstorrent Blackhole hardware](https://tenstorrent.com/hardware/blackhole)
---
# Cameras on Azure IoT Operations, Part 1: The Control Plane and Network Model
https://jaredrhodes.com/blog/azure-iot-operations-camera-control-plane/
This is **Part 1 of a three-part series** on running a real camera fleet on [Azure IoT Operations](https://learn.microsoft.com/azure/iot-operations/) (AIO):
- **Part 1 (this post): the control plane and network model** - what the system is, how the cameras work, and how the networks work.
- [Part 2: swapping in the Azure IoT Operations MQTT broker](/blog/azure-iot-operations-mqtt-broker-camera-fleet/) - TLS, X.509 camera identity, and topic authorization on Arc-enabled Kubernetes.
- [Part 3: data flows, connectors, and the cloud](/blog/azure-iot-operations-dataflows-onvif-connector/) - forwarding telemetry to Event Hubs and onboarding ONVIF cameras as AIO assets.
I built a central camera control plane in .NET 10, then made **Azure IoT Operations an opt-in broker and edge data plane** for it. The interesting part of that story is that AIO does not replace the design - it slots into an existing, opinionated one. So before the AIO specifics in Parts 2 and 3, this post covers the foundation AIO plugs into: the control plane, the two camera integration classes, the MQTT wire contract, and the network model.
## Why a Control Plane Beats a Pile of Cameras
The usual way people "network" cameras is to put a pile of cheap IP cameras on a LAN, port-forward an NVR, and hope. That model rots: every camera is a little server with a web UI, a Telnet port, and firmware from 2017, and every one is an inbound attack surface.
The control-plane model inverts that. A camera is treated like a managed IoT node:
- It connects **outbound** to an MQTT broker.
- It **publishes** its status, inventory, and events.
- It **subscribes** for commands from a central server.
There is **no inbound SSH or Telnet to a camera** in normal operation. The central server owns identity, configuration, status, commands, updates, health, and stream registration. The camera (or a per-site gateway) owns capture, health checks, watchdog behavior, and safe command execution. What a camera exposes to the network, in the end, is a fixed set of messages.
The .NET solution behind this is a standard clean-architecture layout (`.NET 10 + Aspire`): `CameraNetwork.Contracts` holds the wire types, `CameraNetwork.Controller` is the Blazor Server dashboard + REST API + `/metrics`, and two lightweight Worker services run at the edge - `CameraNetwork.Agent` and `CameraNetwork.SiteGateway`. Those two are how the fleet splits into two integration classes. The solution is part of my private reference implementation and is not published, so treat these project names as documentation of the design rather than pointers to a cloneable repo.
## Two Kinds of Cameras, One Control Plane
Real fleets are never homogeneous. Some cameras can run our code; most cannot. The design absorbs that with two classes that look **identical to the control plane**:
- **Class B - agent-managed.** The camera runs our sidecar, the *izon-agent* (`CameraNetwork.Agent`), and speaks MQTT directly. This is for cameras you can get a process onto: iZON, Axis ACAP, OpenIPC, Thingino. The agent reports health, accepts the closed command set, watches the RTSP stream, and updates itself.
- **Class A - gateway-managed.** A plain RTSP/ONVIF PoE camera (Amcrest, Reolink, TP-Link VIGI, and similar) that cannot run our code. A per-site `CameraNetwork.SiteGateway` speaks for it: it probes the camera and publishes availability, inventory, and status on the camera's behalf, so a "dumb" camera shows up in the dashboard like any other.
The Class A probe does real network work. It runs an ICMP reachability check, an RTSP `OPTIONS` handshake, an ONVIF query (make, model, firmware, MAC, stream and snapshot URLs, plus WS-Discovery), and a validated JPEG snapshot pull. That probing sits behind an `ICameraProbe` seam, with a `NetworkCameraProbe` for real cameras and a `SimulatedCameraProbe` for dev and CI.
The payoff: the controller code, the dashboard, the API, and the metrics never branch on camera class. A Class A camera fronted by a gateway and a Class B camera running the agent produce the same records. That uniformity is exactly what lets Part 3 add a **third** producer - an Azure IoT Operations connector - without the controller noticing.
## The Wire Contract: One MQTT Topic Tree
Everything rides on one topic tree, rooted at `cameras` and shaped `cameras///`. The controller subscribes to `cameras/#`; an agent publishes its own channels and subscribes only to its own `cmd` topic. The contract lives in code in `CameraNetwork.Contracts`, so the controller and the agents cannot drift apart.
Each row below is the `` at the end of that tree:
| Channel | Direction | Notes |
| --- | --- | --- |
| `availability` | agent to controller | retained, mirrors the Last-Will |
| `inventory` | agent to controller | retained |
| `status` | agent to controller | heartbeat (the reported state) |
| `event` | agent to controller | motion, tamper, RTSP loss, etc. |
| `metrics` | agent to controller | optional |
| `cmd` | controller to agent | the only topic the agent subscribes to |
| `cmd_ack` | agent to controller | command result |
| `log` | agent to controller | on demand |
Two design choices matter here. First, **availability is retained and backed by an MQTT Last-Will**: the agent sets a retained Last-Will of `{"state":"offline"}` on connect, so an unexpected drop flips the camera offline with no active reporting. Second, **the command set is closed**. An agent rejects anything outside this list, so the channel can never become arbitrary remote code execution across the fleet:
```text
restart_rtsp restart_network reboot identify
privacy_on privacy_off snapshot get_status
get_logs apply_config update_agent rollback_agent
```
Acks come back as `accepted` (non-terminal), `succeeded`, `failed`, or `unsupported`. The closed set is the security model for the command channel - it is the reason a compromised broker session cannot tell a camera to do something arbitrary.
The controller reasons in terms of **desired state** versus **reported state**. An operator sets a desired agent version and config; the controller hashes the config into a stable 16-character `DesiredConfigHash`. Pushing `apply_config` carries that config and hash to the agent, which applies it and echoes the hash back in its status as `ReportedConfigHash`. Config drift is then just `DesiredConfigHash != ReportedConfigHash`, and an outdated agent is `DesiredAgentVersion != ReportedAgentVersion`. Both surface on the dashboard and in `/metrics`.
This contract is the seam that makes the rest of the series possible. Because it is single-sourced and broker-agnostic, the **broker underneath it can change without touching either end** - which is exactly what Part 2 does.
## The Network Model
The control plane assumes **unique routed subnets per property** over a **site-to-site routed VPN** (WireGuard, or IPsec on pfSense), not client NAT. You do not overlap `192.168.1.0/24` everywhere; each property gets its own space and the central peer holds routes to each remote camera subnet.
```text
Central property
LAN 10.10.0.0/16
Server VLAN 10.10.10.0/24
Camera VLAN 10.10.30.0/24
Remote property 1
LAN 10.20.0.0/16
Camera VLAN 10.20.30.0/24
Remote property 2
LAN 10.30.0.0/16
Camera VLAN 10.30.30.0/24
VPN transit 10.255.0.0/24
camera-control.internal 10.10.10.20
mqtt.camera.internal 10.10.10.20
```
The camera VLANs are **default-deny**. Treat every old camera as compromised until proven otherwise, and only allow what is required:
| Source | Destination and port | Purpose |
| --- | --- | --- |
| Camera VLANs | controller, TCP 1883 or 8883 | MQTT control/status |
| Camera VLANs | controller, TCP 443 | config/update API |
| Camera VLANs | DNS resolver, TCP/UDP 53 | name resolution |
| Camera VLANs | NTP resolver, UDP 123 | time sync |
| Camera VLANs | Internet, **deny** | no cloud callbacks |
| Camera VLANs | normal LANs, **deny** | camera isolation |
| NVR | Camera VLANs, TCP 554 | RTSP pull (central-only) |
DNS is only skippable if every agent is pinned to an IP address. The moment a config says `mqtt.camera.internal` instead of `10.10.10.20`, that row is load-bearing.
The important property falls out of this directly: **control commands never require inbound SSH or Telnet to a camera.** The agent (or gateway) holds an outbound MQTT connection, and the controller publishes commands the camera receives over that already-open connection. Cameras get no Internet, no camera-to-camera traffic, and no path to the normal LAN. Vendor cloud domains stay blocked; old web and Telnet services stay firewalled.
> **Procurement note.** For client-, business-, or government-adjacent work, avoid Hikvision and Dahua (FCC Covered List) and prefer Axis, Hanwha, Bosch, i-PRO, Amcrest, Reolink, or UniFi. TP-Link VIGI is in my own fleet and is not on the Covered List, but TP-Link has been under active US supply-chain review, which makes it a poor choice to write into that kind of bid.
## Where Azure IoT Operations Comes In
Notice what the broker actually is in all of this: a trusted MQTT bus on a private routed VPN. The default deployment uses Eclipse Mosquitto, hardened with per-camera username/password and ACLs, and reachable only from the camera VLANs and the controller - never from the Internet or the normal LANs. That works, and the rest of the series leaves it as the byte-identical default.
But the broker is also a **seam**. The agents, the gateway, and the controller all connect through one shared set of connection options, and the topics and JSON payloads are defined once in `CameraNetwork.Contracts`. That means the broker can be swapped for something with a richer edge story without changing a single line of camera or controller logic - and **Azure IoT Operations** is exactly that something:
- AIO ships an enterprise-grade **MQTT broker** that runs on Arc-enabled Kubernetes at the edge. Part 2 swaps Mosquitto for it, with TLS and per-camera X.509 identity, and replaces the Mosquitto ACL file with attribute-based authorization rules.
- AIO ships **data flows** that route from that broker to the cloud. Part 3 forwards the same `cameras/#` tree to Azure Event Hubs with no application change, then onboards ONVIF cameras as **AIO assets** through a connector and a small bridge.
The key idea, and the reason this is worth three posts: **AIO is introduced as an opt-in parallel path.** The control plane, the two camera classes, the wire contract, and the network model in this post all stay exactly as described. AIO changes what sits under the contract and what happens after the message reaches the broker - not the contract itself.
[Continue to Part 2: swapping in the Azure IoT Operations MQTT broker.](/blog/azure-iot-operations-mqtt-broker-camera-fleet/)
## References
- [Azure IoT Operations overview](https://learn.microsoft.com/azure/iot-operations/overview-iot-operations)
- [Azure IoT Operations MQTT broker overview](https://learn.microsoft.com/azure/iot-operations/manage-mqtt-broker/overview-broker)
- [Azure Arc-enabled Kubernetes overview](https://learn.microsoft.com/azure/azure-arc/kubernetes/overview)
- [MQTT v5 specification](https://docs.oasis-open.org/mqtt/mqtt/v5.0/mqtt-v5.0.html)
- [ONVIF specifications](https://www.onvif.org/profiles/)
- [FCC Covered List](https://www.fcc.gov/supplychain/coveredlist)
---
# Cameras on Azure IoT Operations, Part 2: Swapping in the AIO MQTT Broker
https://jaredrhodes.com/blog/azure-iot-operations-mqtt-broker-camera-fleet/
This is **Part 2 of a three-part series** on running a real camera fleet on [Azure IoT Operations](https://learn.microsoft.com/azure/iot-operations/) (AIO):
- [Part 1: the control plane and network model](/blog/azure-iot-operations-camera-control-plane/) - what the system is and how the cameras and networks work.
- **Part 2 (this post): swapping in the Azure IoT Operations MQTT broker** - TLS, X.509 camera identity, and topic authorization.
- [Part 3: data flows, connectors, and the cloud](/blog/azure-iot-operations-dataflows-onvif-connector/) - forwarding telemetry to Event Hubs and onboarding ONVIF cameras as AIO assets.
In [Part 1](/blog/azure-iot-operations-camera-control-plane/) the broker was just "a trusted MQTT bus" - Eclipse Mosquitto by default. This post replaces it with the **Azure IoT Operations MQTT broker** without touching a single line of camera or controller logic, and gets stronger security for free in the process. The whole point of AIO here is that it gives you an enterprise MQTT broker that runs on Kubernetes at the edge, with cloud-managed identity, authorization, and (in Part 3) data flows - while the application keeps speaking the exact same topics and payloads.
## The Seam That Makes the Swap Possible
The control plane has three MQTT clients: the controller's ingest service, the Class B agent, and the Class A site gateway. All three connect through one shared project, `CameraNetwork.Mqtt`, which exposes a `MqttConnectionOptions` record and a single extension method:
```csharp
// Every client builds its options the same way:
var options = new MqttClientOptionsBuilder()
.WithClientId(clientId)
.Apply(connection) // profile -> TLS / MQTT v5 / auth
.Build();
```
`MqttConnectionOptions` carries a **profile**, an **auth** mode, and the TLS and credential details. There are two profiles:
- `Mosquitto` (the default) - plain TCP on 1883, username/password, MQTT 3.1.1. Nothing in Part 1 changes.
- `AzureIotOperations` - turns on **TLS and MQTT v5** automatically, with `Auth=X509` for clients outside the cluster or `Auth=Sat` (Kubernetes service-account token) for in-cluster components.
Because the profile resolves the transport details, swapping brokers happens in configuration. The MQTT library already speaks v5, TLS, and X.509 client certificates, so there is no new client dependency to put a fleet on AIO.
## Standing Up Azure IoT Operations
AIO runs on an **Azure Arc-enabled Kubernetes** cluster. For a sandbox that is a single-node k3s box; in production it is whatever Arc-enabled cluster you run at the edge. The bring-up is a sequence of `az` commands (wrapped in a setup script in the private repo behind this series, not published here), and it is deliberately a **parallel sandbox** - it never touches the existing Docker Compose or TrueNAS deployment, which keep using Mosquitto.
The command shapes below match the AIO CLI as of June 2026. The schema-registry prerequisite in particular is version-sensitive, so re-check the deployment doc if `az iot ops create` rejects any arguments. That registry is an instance-level requirement; the camera data flow in Part 3 never references a schema, which is why Part 3 can say no schema registry is needed and mean something different.
```bash
# Arc-connect the cluster and enable the features AIO needs
az connectedk8s connect \
--name cameranetwork-k3s --resource-group cameranetwork-aio \
--location eastus
az connectedk8s enable-features \
--name cameranetwork-k3s --resource-group cameranetwork-aio \
--custom-locations-oid "$CL_OID" \
--features cluster-connect custom-locations
# A storage account + schema registry are required before 'az iot ops create'
az iot ops schema registry create \
--name cameranetwork-sr --resource-group cameranetwork-aio \
--registry-namespace cameranetwork-sr-ns --sa-resource-id "$SA_ID"
# Initialize and create the AIO instance (broker, dataflows, and the rest)
az iot ops init \
--cluster cameranetwork-k3s --resource-group cameranetwork-aio
az iot ops create \
--cluster cameranetwork-k3s --resource-group cameranetwork-aio \
--name cameranetwork-aio --sr-resource-id "$SR_ID"
```
When this finishes you have an AIO instance with an MQTT broker. AIO installs a **default in-cluster listener** (`aio-broker:18883`, TLS + service-account-token auth) for its own components. We leave that one alone and add a **second listener** for the cameras, which live outside the cluster.
## A Listener for Cameras Outside the Cluster
Cameras connect from remote properties over the VPN, so they need a listener exposed off the cluster. On k3s, a `LoadBalancer` service picks up the node IP out of the box. The listener terminates TLS and references the X.509 authentication and authorization policies we define next.
```yaml
apiVersion: mqttbroker.iotoperations.azure.com/v1
kind: BrokerListener
metadata:
name: camera-external
namespace: azure-iot-operations
spec:
brokerRef: default
serviceType: LoadBalancer
# do not clash with the default 'aio-broker' service
serviceName: aio-broker-external
ports:
- port: 8883
protocol: Mqtt
authenticationRef: camera-x509-authn
authorizationRef: camera-authz
tls:
mode: Automatic
certManagerCertificateSpec:
issuerRef:
# the issuer AIO installs by default
name: azure-iot-operations-aio-certificate-issuer
kind: ClusterIssuer
group: cert-manager.io
```
`tls.mode: Automatic` lets cert-manager mint the listener's server certificate from AIO's default cluster issuer. That detail decides what your clients have to trust: the server certificate chains to **AIO's own CA**, and not to the camera CA. Cameras validate the broker against the AIO CA trust bundle (the `azure-iot-operations-aio-ca-trust-bundle` ConfigMap in the `azure-iot-operations` namespace), and the camera CA below is only for the other direction - the client certificates the broker checks. Two CAs, two directions, and mixing them up produces a TLS failure that looks like a broker problem. To tighten further, add the external IP or DNS name as a SAN so clients can pin the hostname as well as the chain.
## Per-Camera Identity With X.509
This is where AIO earns its keep over plain Mosquitto. Each camera presents a **client certificate**, and the broker validates it against a CA we control. The repo's cert helper generates a CA and a per-camera client cert whose **common name equals the MQTT client id**:
```bash
./make-camera-cert.sh izon-remote1-garage-east # Class B agent
./make-camera-cert.sh site-gateway-remote2 # Class A gateway
```
The CA certificate is imported into the cluster as a ConfigMap, and a `BrokerAuthentication` resource trusts it. The clever bit is the **root-subject mapping**: every certificate signed by our CA inherits the attribute `role: camera`, so the entire fleet shares one identity policy with no per-device wiring.
```yaml
apiVersion: mqttbroker.iotoperations.azure.com/v1
kind: BrokerAuthentication
metadata:
name: camera-x509-authn
namespace: azure-iot-operations
spec:
authenticationMethods:
- method: X509
x509Settings:
trustedClientCaCert: camera-client-ca
authorizationAttributes:
cameras:
# must match the CA subject exactly
subject: CN = CameraNetwork Camera CA
attributes:
role: camera
```
## One Rule for the Whole Fleet
With every camera certificate carrying `role: camera`, authorization is a single allow rule. AIO authorization policies are allow-only - anything not granted is denied - so this one rule lets the whole fleet connect and use the `cameras/#` topic tree, which is exactly the wire contract from Part 1.
```yaml
apiVersion: mqttbroker.iotoperations.azure.com/v1
kind: BrokerAuthorization
metadata:
name: camera-authz
namespace: azure-iot-operations
spec:
authorizationPolicies:
cache: Enabled
rules:
- principals:
attributes:
- role: camera
brokerResources:
- method: Connect
- method: Publish
topics: [ "cameras/#" ]
- method: Subscribe
topics: [ "cameras/#" ]
```
On Mosquitto you hand every camera a username/password and an ACL file entry; here you hand every camera a certificate from one CA and write one attribute-based rule. The trust anchor moves from a shared secret to a certificate authority, which is a real upgrade: revoking a camera is a CRL or re-issue operation instead of a password edit pushed out to config files.
Be honest about what the single rule gives up, though. It grants the whole fleet the whole `cameras/#` tree, so any camera's certificate can publish to any other camera's topics - including another camera's `cmd`. The per-camera Mosquitto ACL did not allow that, so what you have here is a simplification of it. On a sandbox where every certificate is one you minted an hour ago, it is a reasonable trade for a single YAML file.
Anywhere past a sandbox, scope the rule per camera. Give each certificate `site` and `camera` attributes in the authentication resource, then substitute those attributes into the authorization topics: `cameras/{principal.attributes.site}/{principal.attributes.camera}/+`. That restores the per-camera isolation Part 1 relies on and keeps the one-rule shape. Start with the fleet-wide version if you want to see traffic flow on day one; do not leave it running.
## Pointing a Component at AIO
You flip the profile and point at the external listener. A Class B agent's settings:
```json
{
"Agent": {
"SiteId": "remote1",
"CameraId": "garage-east",
"MqttProfile": "AzureIotOperations",
"MqttHost": "",
"MqttPort": 8883,
"MqttAuth": "X509",
"MqttClientCertPfxPath": "/certs/izon-remote1-garage-east.pfx",
"MqttCaCertPath": "/certs/aio-ca.crt"
}
}
```
The controller is the same idea with its own config prefix (environment variables shown):
```bash
Mqtt__Profile=AzureIotOperations
Mqtt__Host=
Mqtt__Port=8883
Mqtt__Auth=X509
Mqtt__ClientCertPfxPath=/certs/camera-controller.pfx
Mqtt__CaCertPath=/certs/aio-ca.crt
```
`MqttProfile=AzureIotOperations` turns on TLS and MQTT v5 automatically. The CA path is the AIO trust bundle, exported from the cluster as shown below; the camera CA never appears in these files, because it only signs the client certificate the broker checks. There is also a `MqttAllowUntrustedCertificates` flag that skips server-cert validation outright. It exists for the case where the listener's certificate has no SAN for the address you are dialing, it is a **sandbox-only** escape hatch, and the fix is to add the SAN rather than to ship the flag. The controller can also run inside the cluster with `Auth=Sat` and `Host=aio-broker`, using the default internal listener.
## Verify the Fleet Landed on the Broker
Check the broker resources, then watch a real camera connect over TLS with its client certificate:
```bash
# Broker resources are healthy
kubectl get brokerlistener,brokerauthentication,brokerauthorization \
-n azure-iot-operations
az iot ops check
# Export the AIO CA the listener's server cert chains to
# (confirm the ConfigMap key on your install)
kubectl get configmap azure-iot-operations-aio-ca-trust-bundle \
-n azure-iot-operations \
-o jsonpath='{.data.ca\.crt}' > certs/aio-ca.crt
# Subscribe with that CA for the server and a camera cert/key for the client
mosquitto_sub -h -p 8883 -V mqttv5 -t 'cameras/#' -v \
--cafile certs/aio-ca.crt \
--cert certs/izon-remote1-garage-east.crt \
--key certs/izon-remote1-garage-east.key
```
Start the agent with the AIO config and you see its retained `availability` and `inventory`, then periodic `status`. Point the controller at the same listener and the camera appears on the dashboard exactly as it did on Mosquitto. Kill the agent and its `availability` flips to `offline` through the Last-Will - the retained-message and Last-Will-Testament behavior carries across brokers, which is the real test that the swap is transparent.
## Why This Matters
The Mosquitto deployment trusts the private VPN and VLAN: the broker is never exposed to untrusted networks, hardening is per-camera username/password plus ACLs, and the firewall makes port 1883 reachable only from the camera VLANs and the controller. That is a perfectly good model on a trusted segment.
Moving to the AIO broker upgrades the trust model **without changing the application**:
- Identity is a certificate from a CA you control, not a shared secret.
- TLS is on by the profile, so cameras can cross less-trusted segments.
- Authorization is attribute-based and cloud-managed, and token substitution scopes it per camera without adding a rule per device.
- The broker is now a managed Kubernetes workload with health you can query (`az iot ops check`), not a single container.
And critically, the message contract from Part 1 is untouched. That is what sets up Part 3: once the fleet is publishing to the AIO broker, AIO can route that traffic to the cloud and onboard new kinds of cameras as assets - again with no application change.
[Continue to Part 3: data flows, connectors, and the cloud.](/blog/azure-iot-operations-dataflows-onvif-connector/)
## References
- [Azure IoT Operations MQTT broker overview](https://learn.microsoft.com/azure/iot-operations/manage-mqtt-broker/overview-broker)
- [Configure broker listeners in Azure IoT Operations](https://learn.microsoft.com/azure/iot-operations/manage-mqtt-broker/howto-configure-brokerlistener)
- [Configure broker authentication (X.509)](https://learn.microsoft.com/azure/iot-operations/manage-mqtt-broker/howto-configure-authentication)
- [Configure broker authorization](https://learn.microsoft.com/azure/iot-operations/manage-mqtt-broker/howto-configure-authorization)
- [Deploy Azure IoT Operations to an Arc-enabled Kubernetes cluster](https://learn.microsoft.com/azure/iot-operations/deploy-iot-ops/howto-deploy-iot-operations)
- [Azure Arc-enabled Kubernetes overview](https://learn.microsoft.com/azure/azure-arc/kubernetes/overview)
---
# Cameras on Azure IoT Operations, Part 3: Data Flows, Connectors, and the Cloud
https://jaredrhodes.com/blog/azure-iot-operations-dataflows-onvif-connector/
This is **Part 3 of a three-part series** on running a real camera fleet on [Azure IoT Operations](https://learn.microsoft.com/azure/iot-operations/) (AIO):
- [Part 1: the control plane and network model](/blog/azure-iot-operations-camera-control-plane/) - what the system is and how the cameras and networks work.
- [Part 2: swapping in the Azure IoT Operations MQTT broker](/blog/azure-iot-operations-mqtt-broker-camera-fleet/) - TLS, X.509 camera identity, and topic authorization.
- **Part 3 (this post): data flows, connectors, and the cloud** - forwarding telemetry to Event Hubs and onboarding ONVIF cameras as AIO assets.
[Part 2](/blog/azure-iot-operations-mqtt-broker-camera-fleet/) put the fleet on the Azure IoT Operations MQTT broker. Now the broker is no longer just a message bus - it is an **edge data plane**, and two AIO features turn that into real leverage: **data flows** route telemetry to the cloud, and **connectors** bring in cameras that cannot speak our protocol at all. Both land without changing the control plane, which is the recurring theme of this series.
## Forwarding Telemetry to the Cloud, for Free
In [Part 1](/blog/azure-iot-operations-camera-control-plane/), every producer publishes to one topic tree: `cameras///`. That single fact makes cloud egress almost trivial. An AIO **data flow** has a source and a destination; point the source at the local broker on the `cameras/#` tree - the exact tree everything already uses - and point the destination at Azure.
The destination here is **Azure Event Hubs**, addressed through its Kafka surface, authenticated with the AIO instance's **managed identity** (no connection strings on disk):
```yaml
apiVersion: connectivity.iotoperations.azure.com/v1
kind: DataflowEndpoint
metadata:
name: cameranetwork-eventhub
namespace: azure-iot-operations
spec:
endpointType: Kafka
kafkaSettings:
host: ".servicebus.windows.net:9093"
authentication:
method: SystemAssignedManagedIdentity
systemAssignedManagedIdentitySettings: {}
tls:
mode: Enabled
```
The data flow itself wires the local broker to that endpoint. The source `endpointRef: default` is AIO's built-in local MQTT broker (`aio-broker`), and one side of every data flow must be that local broker:
```yaml
apiVersion: connectivity.iotoperations.azure.com/v1
kind: Dataflow
metadata:
name: cameras-to-eventhub
namespace: azure-iot-operations
spec:
profileRef: default
mode: Enabled
operations:
- operationType: Source
sourceSettings:
endpointRef: default # the local broker (host aio-broker)
dataSources: [ "cameras/#" ] # the same tree from Part 1
- operationType: Destination
destinationSettings:
endpointRef: cameranetwork-eventhub
dataDestination: camera-telemetry # the Event Hub / Kafka topic name
```
Before applying it, you create the Event Hubs namespace and hub and grant the AIO managed identity the **Azure Event Hubs Data Sender** role - that role grant is what the managed-identity auth above relies on. Telemetry is forwarded as **JSON pass-through**, so no schema registry is needed here; the payloads landing in Event Hubs are the unchanged `CameraNetwork.Contracts` JSON from Part 1. The instance-level schema registry from Part 2 is still sitting there; it is a prerequisite of `az iot ops create` rather than of every data flow, and this flow simply does not reference a schema.
As agents heartbeat, the Event Hubs "incoming messages" graph rises, carrying availability, inventory, status, and events for the whole fleet. From there, **Fabric Real-Time Intelligence** or **Azure Data Explorer** are the natural next stops for dashboards and historical analytics; those destinations add a schema-registry reference, but the edge side stays exactly as shown. The reason this is so cheap is structural. Part 1 single-sourced the topic tree, so cloud egress costs one data flow over `cameras/#` no matter how many producers publish into it.
## Bringing In Cameras That Cannot Speak the Protocol
Data flows handle the outbound story. The inbound story is connectors. AIO ships an **ONVIF connector** and a **media connector** that can talk to standards-based cameras directly - discover them, model them as assets, and publish their telemetry into the broker. That is a different path from the Class A site gateway in Part 1, and it is interesting precisely because it lets AIO itself onboard a camera.
The connectors are **preview** (per the Microsoft Learn docs linked at the bottom of this post, as retrieved in June 2026) and their custom resources are version- and install-specific, so they are deployed through the supported tooling rather than checked-in YAML. The flow is:
1. Register the camera as an **Azure Device Registry device** (its ONVIF endpoint plus credentials).
2. Let discovery enumerate the camera's capabilities and profiles.
3. Create **assets** for the streams and snapshots you care about.
At that point the connector is publishing asset telemetry into the AIO broker - but on *its* topic and in *its* shape, not on the `cameras///...` contract the controller understands. Something has to translate. That something is a small bridge.
## The AioBridge: A Gateway Whose Probe Is a Connector
`CameraNetwork.AioBridge` is an in-cluster Worker service. Conceptually it is **a site gateway whose probe is the AIO connector** instead of a direct ONVIF query. It subscribes to the connector's telemetry, maps each asset to a `(site, camera)` pair, and **republishes onto `cameras///...` using the same `CameraJson` serializer the rest of the fleet uses**. To the controller, the result is indistinguishable from a Class A camera behind a gateway - which is the whole reason Part 1 insisted the controller never branch on camera class.
The bridge connects to AIO's **internal** listener (`aio-broker:18883`, TLS plus a Kubernetes service-account token), so it never leaves the cluster. It gets its SAT through a projected volume and trusts the broker via the AIO CA bundle:
```yaml
# 50-aiobridge-deployment.yaml (trimmed)
containers:
- name: aio-bridge
# image lives in a private registry; substitute your own build of the bridge
image: /cameranetwork-aiobridge:0.1.0
env:
- name: AioBridge__Host
value: "aio-broker"
- name: AioBridge__Port
value: "18883"
- name: AioBridge__UseTls
value: "true"
- name: AioBridge__CaFile
value: "/var/run/certs/ca.crt"
- name: AioBridge__SatAuthFile
value: "/var/run/secrets/tokens/broker-sat"
- name: AioBridge__ConnectorTelemetryTopic
value: "azure-iot-operations/data/#"
- name: AioBridge__DefaultSiteId
value: "aio-edge"
volumes:
- name: broker-sat
projected:
sources:
- serviceAccountToken:
path: broker-sat
audience: aio-internal
expirationSeconds: 86400
```
That `expirationSeconds: 86400` sits right at the Kubernetes default ceiling for projected service-account tokens. A cluster whose API server is configured with a lower maximum shortens it silently, and you meet that as a reconnect every few hours rather than as an error, so check the bound before you blame the broker.
Asset-to-camera identity is explicit so cameras do not collide: the preferred path is custom attributes on each asset (`cameraNetwork.site` and `cameraNetwork.camera`), with a fallback of a default site id plus a slug of the asset name. Connectors are preview, so the two things most likely to differ between installs - the connector's telemetry topic and its payload field names - are isolated in one class, `ConfigurableAssetTelemetryMapper`, and covered by tests in the private reference implementation. Like the rest of the camera solution, the bridge itself is not published, so treat that class and its tests as design detail rather than downloadable code. If your connector publishes elsewhere or names fields differently, you adjust that single mapper, not the controller.
## Commands Back to Connector-Fronted Cameras
A camera that only reports is half a control plane. The bridge also answers commands, behind a toggle (`AioBridge:HandleCommands`, on by default). It subscribes to `cameras/+/+/cmd` and answers **only for cameras it has actually seen**. That wildcard does mean the broker hands the bridge every command on the tree, including ones addressed to Class B agents: MQTT delivers to every matching subscriber, so a subscription is never exclusive. The bridge keeps a set of the assets it has observed and drops anything outside it, which is what keeps two subscribers on the same topic from both answering.
Command handling sits behind an `IBridgeCommandExecutor` seam, mirroring the site gateway's policy. The default executor acks `get_status` as `succeeded` and acks everything else - including `snapshot` - as `unsupported`, until you plug in a real executor backed by media-connector capture or ONVIF control. The ack comes back on `cameras///cmd_ack`, the same channel from Part 1. In the dashboard, you click get-status on an AIO camera and watch the `cmd_ack` arrive, exactly as you would for an agent-managed camera.
This is the closed command set from Part 1 doing its job again: the bridge cannot be told to do anything arbitrary, only to attempt actions from the fixed vocabulary, and it honestly reports `unsupported` for the ones it cannot yet perform.
## The Whole Picture
Put the three posts together and the shape is a single contract with interchangeable parts underneath it:
Three kinds of cameras, one wire contract, one broker, one data flow to the cloud, and a controller that treats all of them identically. Azure IoT Operations went in underneath the contract as the broker in Part 2, and beside it as connectors and data flows in Part 3, and the contract itself never moved. That is the argument for AIO in a camera control plane: it is an enterprise-grade edge MQTT broker and cloud data plane that you can adopt **incrementally**, behind a seam, without rewriting the system that already works.
Start at [Part 1](/blog/azure-iot-operations-camera-control-plane/) if you came in here first - the contract and the network model are what make all of this hold together.
## References
- [Azure IoT Operations data flows overview](https://learn.microsoft.com/azure/iot-operations/connect-to-cloud/overview-dataflow)
- [Configure a data flow endpoint for Azure Event Hubs](https://learn.microsoft.com/azure/iot-operations/connect-to-cloud/howto-configure-kafka-endpoint)
- [Connector for ONVIF (preview)](https://learn.microsoft.com/azure/iot-operations/discover-manage-assets/howto-use-onvif-connector)
- [Media connector (preview)](https://learn.microsoft.com/azure/iot-operations/discover-manage-assets/howto-use-media-connector)
- [Azure Device Registry overview](https://learn.microsoft.com/azure/iot-operations/discover-manage-assets/overview-manage-assets)
- [Send data to Microsoft Fabric Real-Time Intelligence](https://learn.microsoft.com/azure/iot-operations/connect-to-cloud/howto-configure-fabric-real-time-intelligence-endpoint)
---
# AI on the Edge: Local AI Without Local Chaos
https://jaredrhodes.com/blog/ai-on-the-edge-local-ai-without-local-chaos/
Years ago a vendor shut down the cloud service behind my home security cameras and left me holding hardware I owned but could no longer use. I salvaged what I could and kept the lesson: anything I actually depend on should run where I can reach it. That instinct is most of why local AI appeals to me - privacy, latency, cost control, disconnected operation, and the simple fact that some data already lives at the edge. The hard part was never getting one model to answer one prompt on one box. The hard part is making local AI behave like a platform instead of a pile of model servers hiding under desks.
That is the point of **AI on the Edge**. The project is a governable edge AI system where applications call one API, policy decides where inference is allowed to run, Azure provides the management plane, and the local environment keeps working when the network is not perfect.
The tagline is not decoration. It is the operating model:
> Cloud-governed, locally executed.
## Why Local AI Goes Sideways
Model sprawl never announces itself. A developer points an app at a local runtime. An operations team deploys a different endpoint on a Kubernetes node. A hardware experiment bolts on an accelerator-specific API. A cloud team wants a managed endpoint for approved workloads. Every one of those decisions is reasonable on its own. Stacked together, they become an unmanaged surface:
- Applications hardcode model endpoints.
- Sensitive prompts can fall back to cloud by accident.
- Local model failures are invisible to operations teams.
- Hardware-specific demos turn into one-off branches.
- Edge environments have no consistent reset, smoke test, or dashboard story.
AI on the Edge treats those as platform problems. The model runtime matters, but the project is really about routing, policy, observability, secrets, fallback, repeatability, and deployment.
## One Gateway, Every Backend
The center of the system is a reusable .NET gateway that exposes an OpenAI-compatible API to the application. Behind that gateway sit a backend registry and a policy-driven router. Depending on the request, inference can land on a laptop-local runtime, an Azure Local deployment, an Azure AI Foundry model endpoint, a Tenstorrent-backed endpoint, or a deterministic mock backend that exists purely for conference safety.
The important part is that the application never picks the backend directly. It sends the request with metadata, and that metadata is the contract: the workload (chat, embeddings, RAG answer, incident summary), the classification (public, internal, restricted, secret), the policy (local only, prefer local, cloud allowed, accelerator preferred), and the operational context (latency target, streaming requirement, fallback rules).
For every request, the gateway emits a route decision event. That event records the selected backend, the denied backends, the policy, the classification, the fallback behavior, latency, token counts, and whether prompt bodies were logged, redacted, or suppressed. When somebody asks why an answer came from where it did, the answer lives in the telemetry, not in my memory.
Azure provides the control plane wrapped around that local execution:
- Azure Arc brings the edge Kubernetes cluster into Azure management.
- GitOps applies the desired state.
- Azure Monitor, Managed Prometheus, and Grafana make behavior visible.
- Key Vault handles secrets and certificates where the Azure-governed path is active.
- Azure Policy and application policy events make denied routes explicit.
- Azure IoT Operations gives the camera workload a real edge data plane.
## How the Demos Stack Up
The series maps straight onto how I am building the talk:
| Post | Milestone | Audience moment |
| --- | --- | --- |
| Demo 1: One App, Many Places to Run AI | Gateway routing | One prompt routes to different backends without app changes. |
| Demo 2: Private RAG That Cannot Leave the Edge | Private RAG | Restricted data fails closed instead of falling back to cloud. |
| Demo 3: From Camera Events to Operator Guidance | Camera operations | Raw camera events become an incident summary and first actions. |
| Demo 4: Edge AI You Can Actually Operate | Azure governance | Routing, failures, and policy decisions show up in Azure-backed dashboards. |
| Demo 5: When the Edge Has to Stand Alone | Failure lab | Backend failures and cloud blocks produce visible, correct behavior. |
| Demo 6: Specialized Hardware Without an App Rewrite | Accelerator lane | Tenstorrent or mock accelerator is just another governed backend. |
The final two posts turn the demo system into an implementation guide and an evergreen reference architecture.
## Standing on Work I Already Published
The private cloud and physical lab are already covered in [Home Lab - Tenstorrent Buildout for Multi-Cloud Edge Demos](/blog/home-lab-tenstorrent-buildout-multi-cloud-edge/). That post owns the hardware story: basement studio, private cloud, Tenstorrent paths, NVIDIA systems, Proxmox, TrueNAS, Kubernetes, and multi-cloud demo intent.
The camera control plane is already covered in the three-part Azure IoT Operations series. Those posts own the camera details: outbound MQTT, the `cameras///` topic tree, TLS and X.509 on the AIO MQTT broker, data flows to Event Hubs, and the ONVIF connector bridge.
AI on the Edge builds on both instead of repeating either. The lab is the environment, the cameras are the workload, and the new thing is the AI platform that sits between them.
## What I Am Actually Building Here
The demo system is the new work:
- `AiOnTheEdge.Gateway` for the OpenAI-compatible facade.
- `AiOnTheEdge.Routing` for backend selection, fallback, and policy.
- `AiOnTheEdge.KnowledgeAssistant` for private RAG over local documents.
- `AiOnTheEdge.OperationsAssistant` for camera event triage.
- `AiOnTheEdge.ControlDashboard` for health, route traces, privacy posture, and failure controls.
- `AiOnTheEdge.Telemetry` for route decision events, metrics, and log export.
- `AiOnTheEdge.DemoScenarios` for deterministic seed, reset, replay, and smoke tests.
- Azure and Kubernetes deployment assets for the governed edge path.
One status note, stated here once so the whole series inherits it: these components are part of my private reference implementation for the talk. The build is in progress and the repo is not published, so the posts that follow present API surfaces, registries, and acceptance criteria as the design the demos target - not as downloadable software. Nobody will be cloning their way into this series, and pretending otherwise would just waste your afternoon.
The first version has to run in laptop mode on mock or local backends. Azure-governed mode is the richer path, and I am deliberately keeping it off the critical path for a live session.
## Quiet Policy Drift
Quiet policy drift is the failure mode this whole project is arranged against. A local backend goes down, a cloud endpoint happens to be healthy, and a restricted prompt leaves the edge because retry is the only trick the application knows.
So restricted data fails closed here. Cloud fallback happens because a policy allowed it, and the audience gets to watch the denial, the reason, and the telemetry rather than take my word for any of it.
## What the Series Has to Earn
By the last post, a few claims have to hold up on stage rather than on paper. One application should reach several kinds of backend through one gateway with no code change, and restricted content should stay on the edge even when a healthy cloud endpoint is sitting right there waiting to answer. Camera telemetry should drive an operator assistant on top of the MQTT contract the camera series already published, without renegotiating that contract to make the AI work.
The operations half matters just as much. Azure has to be able to see routing, failures, policy denials, and backend health from outside the cluster, because a system nobody can observe is a system nobody can run. And all of it has to come up in laptop mode with no cloud dependency, then reset, seed, and smoke-test itself before a session starts, since a conference network is the one piece of infrastructure I never get to choose.
## Related Posts
Start with [Home Lab - Tenstorrent Buildout for Multi-Cloud Edge Demos](/blog/home-lab-tenstorrent-buildout-multi-cloud-edge/) if you want the hardware context. Start with the Azure IoT Operations camera series - [the camera control plane](/blog/azure-iot-operations-camera-control-plane/), [the MQTT broker and camera fleet](/blog/azure-iot-operations-mqtt-broker-camera-fleet/), and [data flows with the ONVIF connector](/blog/azure-iot-operations-dataflows-onvif-connector/) - if you want the workload context. Start here if you want the AI platform and the presentation system, then go straight to [One App, Many Places to Run AI](/blog/one-app-many-places-to-run-ai/) for the gateway and the router. Everything after this post either goes through that gateway or fails because of it.
## References
- [What is Foundry Local?](https://learn.microsoft.com/en-us/azure/foundry-local/what-is-foundry-local)
- [Best practices and troubleshooting guide for Foundry Local CLI](https://learn.microsoft.com/en-us/azure/foundry-local/reference/reference-best-practice)
- [What is Foundry Local on Azure Local?](https://learn.microsoft.com/en-us/azure/azure-sovereign-clouds/private/foundry-local/overview)
- [Azure Arc-enabled Kubernetes overview](https://learn.microsoft.com/en-us/azure/azure-arc/kubernetes/overview)
- [Azure IoT Operations overview](https://learn.microsoft.com/en-us/azure/iot-operations/overview-iot-operations)
- [Tenstorrent tools documentation](https://docs.tenstorrent.com/tools/index.html)
---
# One App, Many Places to Run AI
https://jaredrhodes.com/blog/one-app-many-places-to-run-ai/
One application asks one question and gets one useful answer. Where the model actually ran - the laptop, an edge cluster, a cloud endpoint, a Tenstorrent-backed server, or a mock backend - is none of the application's business. Keeping that placement choice invisible to the app is the entire job of the **AI on the Edge Gateway**, and this first demo exists to make that abstraction obvious end to end.
## Why Hardcoded Endpoints Stop Scaling
Hardcoding model endpoints is fine for a prototype and bad for a platform. Once an application knows too much about the model runtime, every placement decision turns into an app change:
- Moving from a laptop runtime to an edge server changes code.
- Adding a cloud fallback changes code.
- Testing a specialized accelerator changes code.
- Denying cloud fallback for restricted data becomes app-specific retry logic.
The app should express what it needs. The platform should decide where that request is allowed to run.
## What the Gateway Looks Like
On the outside, the API surface is deliberately boring - it is the surface applications already speak:
```text
POST /v1/chat/completions
POST /v1/embeddings
GET /v1/models
GET /healthz
GET /readyz
GET /metrics
POST /admin/route/explain
POST /admin/backends/{backendId}/enable
POST /admin/backends/{backendId}/disable
POST /admin/demo/faults
```
Routing those endpoints is a backend registry. Two entries carry the argument:
```json
{
"Backends": [
{
"id": "foundry-local",
"kind": "FoundryLocal",
"baseUrl": "http://localhost:5273/v1",
"families": ["chat", "embeddings"],
"models": ["local-chat", "local-embed"],
"location": "device",
"capabilities": ["chat", "embeddings", "streaming"],
"tags": ["local", "offline", "private"],
"priority": 10
},
{
"id": "mock-accelerator",
"kind": "OpenAICompatible",
"baseUrl": "http://localhost:5199/v1",
"families": ["chat"],
"models": ["accelerator-chat"],
"location": "edge",
"capabilities": ["chat", "streaming"],
"tags": ["local", "accelerator", "specialized-hardware"],
"priority": 20
}
]
}
```
The two cloud entries follow the same shape and are omitted for length. `azure-foundry` is an Azure AI Foundry endpoint at priority 50 with an `apiKeySecretName` instead of an open port; `mock-cloud` is a deterministic stand-in on `http://localhost:5188/v1` at priority 40. Both are tagged `"location": "cloud"`, both advertise the `chat` family, and both serve a model called `cloud-chat`.
Two fields there keep applications out of the model-naming business. `families` is what an application asks for - `chat` or `embeddings` - and `models` is what this particular backend calls the thing that serves that family. The app requests a family, the router picks an eligible backend, and the router maps the family onto that backend's model name. Nobody writing an app needs to know that `local-chat` and `cloud-chat` are the same request with different hosting.
`priority` breaks ties among the backends that survive policy, capability, and health filtering, and lower wins. `foundry-local` at 10 is tried before `mock-accelerator` at 20, which is tried before the cloud entries at 40 and 50.
One caveat on that `baseUrl`: 5273 is the port Microsoft's examples show, but the Foundry Local service port is assigned dynamically, so anything real discovers it through `foundry service status` or the SDK manager rather than pinning it in a registry file.
Every backend gets normalized into the same internal shape: health, advertised families and their model names, capabilities, location, tags, priority, observed latency, and current fault state. From there on, the router does not care whether a backend is a laptop runtime or a rack in the basement.
Then comes the rule I kept coming back to: the router evaluates policy before it evaluates convenience.
The policies are small enough to keep in your head:
| Policy | Behavior |
| --- | --- |
| `LocalOnly` | Only device or edge backends are eligible. Cloud fallback is denied. |
| `PreferLocal` | Prefer local, then Azure Local or edge, then cloud if allowed. |
| `CloudAllowed` | Any healthy backend is eligible. |
| `AcceleratorPreferred` | Prefer a backend tagged `accelerator` when the model family is supported. |
| `FallbackDisabled` | Fail closed if the selected backend is unavailable. |
| `NoPromptLogging` | Emit metadata only and suppress prompt and response bodies. |
Foundry Local belongs in this first demo as the device-local runtime. Microsoft positions it as an on-device AI runtime and SDK, with an optional local server aimed at development and integration scenarios - which is a different job from being the shared multi-user server inference layer for the whole edge estate. For server-style edge inference, the demo keeps Azure Local, other OpenAI-compatible services, and accelerator endpoints behind the same registry.
## Walking Through the Demo
Route explanation carries this demo. This is the sequence I rehearse until it gets boring:
1. Open the Control Dashboard.
2. Ask: `Summarize the current edge site health and recommend the next action.`
3. Show the response streaming through the gateway.
4. Open the route trace and show `selectedBackend: foundry-local`.
5. Disable `foundry-local`.
6. Ask again with `CloudAllowed` and show the fallback to `azure-foundry` or `mock-cloud`.
7. Disable `mock-accelerator` too, so nothing local or edge-located is left eligible.
8. Ask again with `LocalOnly`.
9. Show the denial and its reason, where a quiet cloud trip would otherwise have happened.
10. Re-enable both local backends and show the metrics panel.
The line I want the audience walking out with is simple: **same app, same API, different placement decision.**
## Borrowing the Lab Instead of Rebuilding It
The private cloud lab already supplies the edge environment and the Tenstorrent hardware lane, and the camera series already supplies an operational workload. Neither one needs rebuilding just to prove a gateway. Demo 1 can run entirely with a local runtime and deterministic mock backends.
The new implementation is the gateway foundation:
- OpenAI-compatible request and response normalization.
- Backend registry and health checks.
- Route explanation endpoint.
- Policy evaluation before fallback.
- Prometheus metrics.
- Route decision events.
- Admin controls for enable, disable, and fault injection.
- A dashboard panel for backend health, latency, selected backend, and denial reasons.
Before any of this depends on real cloud or real hardware, the implementation should include a mock local backend, the `mock-cloud` backend from the registry above, and a mock accelerator. Deterministic mocks are what make a conference demo survive a conference network.
## When the Local Box Dies
The first failure worth showing is local backend loss:
| Situation | Correct behavior |
| --- | --- |
| Local backend down, policy `CloudAllowed` | Route to an allowed cloud or mock-cloud backend. |
| Local backend down, `LocalOnly`, no other eligible edge backend | Deny with a clear reason. |
| Accelerator saturated, local backend healthy | Route to another eligible edge backend. |
| Backend returns malformed OpenAI-compatible payload | Record adapter error and fallback only before streaming begins. |
And the rule underneath every row of that table: the gateway must never treat "cloud is healthy" as permission to send restricted content there.
## Calling Demo 1 Done
Demo 1 earns its number when one application can call `/v1/chat/completions` and reach device, edge, and cloud backends through the same request shape, and the Control Dashboard can say which backend answered, under which policy, with which fallback reason and latency. Disabling a backend has to change the routing decision live, and `LocalOnly` has to stop cloud fallback rather than merely delay it. The metrics carry request count, latency, selected backend, fallback count, and denied count, because the dashboard is a summary and the metrics are the evidence behind it.
The criterion I care most about is the dullest one. `make demo-laptop` brings the whole thing up with no cloud dependency at all, which is the difference between a demo and a hope. As the opening post said, this is a private build in progress, so that target is the bar the work is aimed at rather than something you can run today.
## Related Posts
This post is the platform foundation for the private RAG demo, the camera operations assistant, the failure lab, and the accelerator lane that follow. The existing [Tenstorrent buildout](/blog/home-lab-tenstorrent-buildout-multi-cloud-edge/) is the hardware background; the existing [camera control-plane post](/blog/azure-iot-operations-camera-control-plane/) is the workload background. Neither is required reading, but both are why this post stayed short.
## References
- [What is Foundry Local?](https://learn.microsoft.com/en-us/azure/foundry-local/what-is-foundry-local)
- [Best practices and troubleshooting guide for Foundry Local CLI](https://learn.microsoft.com/en-us/azure/foundry-local/reference/reference-best-practice)
- [What is Foundry Local on Azure Local?](https://learn.microsoft.com/en-us/azure/azure-sovereign-clouds/private/foundry-local/overview)
- [Endpoints for Microsoft Foundry Models](https://learn.microsoft.com/en-us/azure/foundry/foundry-models/concepts/endpoints)
- [Understanding deployment types in Microsoft Foundry Models](https://learn.microsoft.com/en-us/azure/foundry/foundry-models/concepts/deployment-types)
---
# Private RAG That Cannot Leave the Edge
https://jaredrhodes.com/blog/private-rag-that-cannot-leave-the-edge/
Private data is the easiest reason to care about edge AI. If the data cannot leave the site, then the answer cannot depend on a cloud fallback that nobody noticed.
Demo 2 extends the platform with a **Knowledge Assistant**. In the design, it ingests local documents, builds embeddings locally when available, retrieves relevant chunks, generates grounded answers, and sends every generation request through the same routing policy engine from Demo 1. The RAG part is nearly conventional. The part I actually care about is that the privacy promise gets enforced by routing instead of by hope.
## Where Most RAG Demos Leak
RAG demos tend to blur the privacy boundary in the same comfortable way: the documents are local, but answer generation quietly calls a cloud model. For public docs, nobody gets hurt. For camera runbooks, incident notes, network diagrams, customer data, or site-specific operational history, that silent hop is the whole ballgame.
So the privacy promise has to be testable:
- What classification was assigned to the document?
- Which chunks were retrieved?
- Was the prompt body logged?
- Which backend generated the answer?
- What would happen if the local backend failed?
Each of those answers has to be visible in the demo itself, or the demo is proving nothing.
## Four Jobs and a Deliberately Boring Vector Store
`AiOnTheEdge.KnowledgeAssistant` has four jobs:
1. Ingest documents with metadata and classification.
2. Chunk and embed the documents.
3. Retrieve relevant context for a question.
4. Ask the gateway for an answer under an explicit policy.
The first version should keep storage boring: one local vector store, wrapped behind an interface, with the retrieval trace visible. The citations come from retrieval metadata, not from model-generated prose - if the model is writing its own bibliography, the citations are fiction with good formatting.
A seeded document looks like this:
```json
{
"documentId": "garage-camera-runbook",
"title": "Garage Camera Runbook, Remote Property 1",
"sourcePath": "samples/documents/garage-camera-runbook.md",
"classification": "Restricted",
"tags": ["iot", "cameras", "runbook"],
"createdUtc": "2026-05-11T09:00:00Z"
}
```
One honesty note before anyone asks for the dataset: the documents, queries, and responses in this post are synthetic samples rather than captured traffic. Site ids follow the camera series naming - `remote1` and `remote2` are the remote properties in the Part 1 network model, and `garage-east` is the Class B agent camera configured on `remote1` in Part 2.
The query shape makes policy explicit:
```json
{
"question": "What should I check first if the remote1 garage camera is offline?",
"classification": "Restricted",
"policy": "LocalOnly",
"topK": 5,
"includeCitations": true
}
```
The response carries everything those five testability questions need: the answer, citations, route decision, privacy decision, and retrieval trace:
```json
{
"answer": "Check the remote1 site network path before rebooting cameras...",
"citations": [
{
"documentId": "garage-camera-runbook",
"heading": "Offline camera checklist",
"score": 0.86
}
],
"routeDecision": {
"policy": "LocalOnly",
"selectedBackend": "foundry-local",
"fallbackUsed": false
},
"privacyDecision": {
"promptBodyLogged": false,
"reason": "Restricted content suppresses prompt body logging."
}
}
```
Foundry Local is a good fit for the laptop version because Microsoft documents local embedding generation and RAG-style workflows that run on device. The implementation still supports mock embeddings, because the demo has to run even before every model is cached.
## Running the Denial on Purpose
What the audience watches for is a denied fallback.
1. Show the document library: runbooks, deployment notes, and incident notes classified `Restricted`, plus the published architecture posts sitting alongside them as background.
2. Ask: `Which cameras are offline, what probably caused it, and what should the operator check first?`
3. Show retrieved chunks and citation metadata, all of them from the restricted set.
4. Show the grounded answer.
5. Open the route trace: classification `Restricted`, policy `LocalOnly`, selected local backend.
6. Disable `foundry-local` and `mock-accelerator`, so no device or edge backend is left eligible.
7. Ask again.
8. Show the request fail closed, because the only healthy backends left are cloud.
9. Change the classification to `Internal`.
10. Ask again with a policy that allows fallback.
11. Show cloud or mock-cloud fallback arriving only after the policy changed.
That last step carries the demo. The privacy boundary moved because somebody changed a policy on stage, which is the only way it is ever supposed to move.
## Seed Documents I Already Own
The existing posts pull double duty as seed documents:
- The Tenstorrent private cloud buildout gives hardware and environment context.
- The Azure IoT Operations camera posts give camera topology, MQTT topics, broker security, data-flow routing, and connector notes.
Those posts get ingested as samples, but this demo does not retell them. It proves that private operational knowledge can be queried locally with citations.
The new build is `AiOnTheEdge.KnowledgeAssistant`:
```text
POST /documents/ingest
GET /documents
POST /query
POST /query/explain
POST /admin/reindex
```
Those are additions. Underneath them the service exposes the same operational endpoints every service in the system exposes - `/healthz`, `/readyz`, `/metrics`, `/admin/demo/reset`, `/admin/demo/seed`, and `/admin/demo/faults` - so seeding the corpus goes through the shared `/admin/demo/seed`, and `/admin/reindex` is the only genuinely RAG-specific control.
Implementation requirements:
- Ingest Markdown, PDF text, JSON, CSV, and plain text.
- Chunk by heading, paragraph, and token budget.
- Preserve source filename, heading path, and classification.
- Use Foundry Local embeddings where available.
- Support local or mock embeddings for fallback.
- Generate citations from retrieval metadata.
- Send answer generation through the AI on the Edge Gateway.
- Evaluate known questions with expected citations.
## The Outage That Proves the Boundary
Everything above assumes the local model answers. The case worth rehearsing is the one where it does not and the data is still restricted.
Cloud fallback is not a recovery path for restricted RAG. The system returns a clear denial instead:
```json
{
"decision": "Denied",
"policy": "LocalOnly",
"reason": "Restricted content stays on edge; no eligible edge backend."
}
```
The UI shows the retrieval trace and the route denial side by side, which makes the behavior legible: the system found useful context and correctly refused to send it to an ineligible backend.
## The Bar for Demo 2
The demo works when sample documents ingest with their metadata and classification intact, queries come back grounded with citations that point at real chunks, and restricted content only ever reaches a device or edge backend. The denial has to be visible rather than inferred: `LocalOnly` with nothing local left standing produces a refusal on screen, with the retrieval trace beside it showing the context it declined to send anywhere.
Two supporting pieces make the claim checkable rather than theatrical. An evaluation pass runs ten known questions against expected citations and produces pass or fail, which is the only way I can tell whether a chunking change made retrieval worse. And once the models and packages are cached, the whole thing runs with the network unplugged, which is the shortest possible proof that nothing was quietly reaching out.
## Related Posts
This demo ingests the existing camera and lab posts as background context around a restricted corpus, and it depends on the gateway from [One App, Many Places to Run AI](/blog/one-app-many-places-to-run-ai/), because the RAG assistant should not own fallback policy itself. The moment a component owns fallback policy, it starts making exceptions.
## References
- [Tutorial: Build a RAG application with Foundry Local](https://learn.microsoft.com/en-us/azure/foundry-local/tutorials/tutorial-build-rag-app)
- [Generate text embeddings with Foundry Local](https://learn.microsoft.com/en-us/azure/foundry-local/how-to/how-to-generate-embeddings)
- [What is Foundry Local?](https://learn.microsoft.com/en-us/azure/foundry-local/what-is-foundry-local)
---
# From Camera Events to Operator Guidance
https://jaredrhodes.com/blog/from-camera-events-to-operator-guidance/
Back in 2019 a vendor shut down the cloud behind my cameras and bricked them; I repurposed what was left instead of throwing the hardware out, and the fleet never left. So when this series needed a real workload instead of a generic AI sample, the camera fleet was the obvious pick. Availability, RTSP loss, stale heartbeats, motion bursts, command acknowledgements, config drift, and connector-fronted cameras all flow through the existing `cameras/#` contract already.
The goal is not asking a model to read random logs. The goal is turning structured edge events into operator guidance without changing the camera control plane. Those are two very different projects, and I only signed up for one of them.
## What an Operator Actually Needs
Edge operators do not need another dashboard full of raw events. I have stared at enough of those to know they mostly teach you where to look next. What an operator wants when a site goes quiet is simple: what happened, what is impacted, what evidence supports that conclusion, and what action should happen first.
The camera control plane already has the right shape for this:
- Cameras or gateways connect outbound.
- They publish status, inventory, availability, events, metrics, command acknowledgements, and logs.
- The topic tree is consistent: `cameras///`.
- Azure IoT Operations can sit under that topic contract as the MQTT broker and edge data plane.
- A data flow can forward the same `cameras/#` stream northbound without changing producers.
So the operations assistant builds on that contract. It does not create a second camera model. One camera model in this house is plenty.
## Three Ways In, One Event Shape
In the design, `AiOnTheEdge.OperationsAssistant` takes input three ways. Simulated mode replays JSON from `samples/camera-events`, which is the reliable presentation path. MQTT mode subscribes to `cameras/#`, which is the local edge path. Event Hubs mode consumes forwarded camera telemetry, which is the cloud analytics path.
Every input mode normalizes events into one shape. The sample below is synthetic, and so is the fleet around it: `garage-east` is the Class B agent camera the camera series describes on `remote1`, while `driveway-west` and `front-door` are invented siblings on the same site so the incident grouping has something to group.
```json
{
"eventId": "evt-001",
"timestampUtc": "2026-06-30T12:00:00Z",
"siteId": "remote1",
"cameraId": "garage-east",
"channel": "event",
"eventType": "rtsp_loss",
"severity": "warning",
"payload": {
"streamUrl": "rtsp://camera/stream1",
"durationSeconds": 90,
"lastFrameUtc": "2026-06-30T11:58:30Z"
}
}
```
From there the service builds incidents from facts. Six pieces split the work:
- `CameraEventIngestWorker` reads replay files, MQTT, or Event Hubs.
- `FleetStateStore` tracks latest status, inventory, availability, version, config hash, and recent events.
- `IncidentBuilder` groups related events by site, camera, event type, time window, and severity.
- `RunbookRetriever` pulls relevant local runbook chunks from the Knowledge Assistant.
- `OperatorPromptBuilder` creates a compact prompt from structured facts and runbook snippets.
- `OperationsAssistantController` exposes incident summaries and fleet questions.
And whatever the assistant answers, evidence rides along with it:
```json
{
"summary": "Remote property 1 likely has a site-level network issue.",
"impact": [
"garage-east offline",
"driveway-west offline",
"front-door heartbeat stale"
],
"evidence": [
{
"timestampUtc": "2026-06-30T11:58:30Z",
"cameraId": "garage-east",
"eventType": "rtsp_loss"
}
],
"recommendedActions": [
"Check the remote1 camera VLAN gateway and VPN tunnel.",
"Verify NTP and DNS availability for the camera VLAN.",
"Avoid rebooting individual cameras until site connectivity is confirmed."
],
"routeDecision": {
"policy": "LocalOnly",
"selectedBackend": "foundry-local"
}
}
```
## How the Talk Actually Runs
The moment worth staging takes a raw event through incident grouping to a first action. Here is the run order I actually use:
1. Start replay: `site-network-partition`.
2. Show raw events arriving, each one displayed under the `cameras///` topic composed from its site, camera, and channel.
3. Show normalized events updating fleet state.
4. Ask: `What happened at remote1 in the last 15 minutes?`
5. Show the assistant summary, impacted cameras, evidence, runbook citations, and first actions.
6. Open the route trace and show local-only inference due to operational camera telemetry.
7. Trigger `config-drift`.
8. Ask: `Which cameras need config remediation?`
9. Show desired versus reported config hash and the `apply_config` recommendation.
10. Show that the same raw events can also flow through Azure IoT Operations and Event Hubs in the full Azure path.
Notice what the model never does: invent cameras, sites, or causes. It summarizes only from structured incident facts and retrieved runbook text. If the facts do not name a cause, neither does the assistant.
## Standing on the Camera Series
The three camera posts already define the control plane, and this demo does not reopen it:
- Part 1 defines the topic tree, network model, command set, desired/reported state, and camera classes.
- Part 2 swaps the broker under the same contract to Azure IoT Operations.
- Part 3 forwards `cameras/#` to Event Hubs and adds the ONVIF connector bridge path.
Those posts are prerequisites here; this one adds a local AI operations layer on top and stops arguing about cameras. The new build is just the operations surface:
```text
POST /camera-events
GET /fleet/sites
GET /fleet/sites/{siteId}
GET /fleet/cameras/{siteId}/{cameraId}
GET /incidents
GET /incidents/{incidentId}
POST /incidents/{incidentId}/summarize
POST /fleet/query
POST /admin/demo/replay/{scenarioName}
```
The diagram above traces one scenario the whole way to operator guidance. The table below is the cast list - six seeded scenarios that give the demo its plot:
| Scenario | Events |
| --- | --- |
| `rtsp-loss-single-camera` | One camera reachable but RTSP failing. |
| `site-network-partition` | Multiple cameras offline at one site within 90 seconds. |
| `stale-agent-version` | Camera healthy but agent version behind desired version. |
| `config-drift` | Desired config hash differs from reported config hash. |
| `motion-burst` | Many motion events across cameras at one site. |
| `connector-fronted-camera` | AIO connector event mapped back into the camera contract. |
Each scenario lives in `AiOnTheEdge.DemoScenarios` as a deterministic script of normalized events, so the demo behaves the same way in a hotel ballroom as it did on my desk. For example, the shape of the `site-network-partition` scenario file is:
```json
{
"scenarioName": "site-network-partition",
"description": "Cameras at one site drop inside a 90-second window.",
"events": [
{
"offsetSeconds": 0,
"event": {
"eventId": "evt-partition-001",
"siteId": "remote1",
"cameraId": "garage-east",
"channel": "event",
"eventType": "rtsp_loss",
"severity": "warning"
}
},
{
"offsetSeconds": 45,
"event": {
"eventId": "evt-partition-002",
"siteId": "remote1",
"cameraId": "driveway-west",
"channel": "availability",
"eventType": "offline",
"severity": "error"
}
}
]
}
```
## The Hallucination Trap
A confident hallucinated incident is the outcome this whole design is built to avoid. An assistant that infers a site outage because it sounds plausible is worse than no assistant at all; somebody will act on that answer and start rebooting the wrong things. It should only name a cause when the structured facts and runbook snippets support it.
For a live demo, the simulator is the default. Real cameras and Azure IoT Operations are valuable, but the presentation should not depend on a camera or a VPN behaving perfectly. Talks provide enough surprises on their own.
## What Demo 3 Has to Prove
Replay has to produce the same fleet state every time, because a demo that drifts is a demo that argues with me on stage. On top of that determinism, the assistant has to summarize several seeded incident types and cite structured evidence and runbook snippets for each one, and the screen has to show the whole chain at once: original topic, normalized event, grouped incident, and the answer built from them. The hard constraint sits at the end of that chain - the answer never names a camera or a site that is not already in the event store.
The other two input modes are there to prove the shape generalizes. MQTT mode subscribes to `cameras/#` when a broker is present, Event Hubs mode consumes forwarded telemetry when Azure is connected, and neither one changes a line of the assistant's logic. All of it runs without a real camera in the room. If the demo needed real cameras, I would be doing IT support on stage instead of showing an architecture.
## Related Posts
This is the direct continuation of the Azure IoT Operations camera series. The existing [control-plane post](/blog/azure-iot-operations-camera-control-plane/) owns the `cameras/#` contract; this post uses that contract as the AI workload.
## References
- [Azure IoT Operations overview](https://learn.microsoft.com/en-us/azure/iot-operations/overview-iot-operations)
- [Azure IoT Operations built-in local MQTT broker](https://learn.microsoft.com/en-us/azure/iot-operations/manage-mqtt-broker/overview-broker)
- [Process and route data with data flows](https://learn.microsoft.com/en-us/azure/iot-operations/connect-to-cloud/overview-dataflow)
- [Configure the connector for ONVIF](https://learn.microsoft.com/en-us/azure/iot-operations/discover-manage-assets/howto-use-onvif-connector)
---
# Edge AI You Can Actually Operate
https://jaredrhodes.com/blog/edge-ai-you-can-actually-operate/
Answering prompts is not the same as operating a system, a distinction I did not fully appreciate until the demos started stacking up. Teams also have to deploy it, secure it, observe it, rotate its secrets, understand its failures, and prove policy decisions after the fact. That is what Demo 4 sets up with Azure. The model may run locally, but the estate should still be visible and governable.
## Local AI Goes Invisible
Local AI can become invisible infrastructure, and it happens without anyone deciding anything. A model server starts on a developer machine. A Kubernetes deployment gets copied to an edge node. A gateway ends up with API keys in a config file. Logs stay local. Metrics are whatever the process prints. Nobody can tell which requests went where. I have watched perfectly serious systems drift into exactly that state one shortcut at a time, and invisibility is not an operating model an enterprise can run on.
For AI on the Edge, every local execution path needs an operations path:
- How was it deployed?
- Which version is running?
- Which backends are healthy?
- Which requests fell back?
- Which requests were denied?
- Where are secrets stored?
- Which policies are being enforced?
## The Control Plane Around Local Execution
The Azure-governed mode uses Azure as the control plane around local execution. Each layer gets exactly one job:
| Layer | Role |
| --- | --- |
| Azure Arc-enabled Kubernetes | Brings the edge cluster into Azure inventory and management. |
| GitOps with Flux | Reconciles the cluster from Git. |
| Azure Monitor and Log Analytics | Centralizes routing events, incident events, and service logs. |
| Managed Prometheus | Scrapes service and Kubernetes metrics. |
| Azure Managed Grafana | Presents routing, latency, privacy, and incident dashboards. |
| Key Vault | Stores backend API keys, certificates, and demo secrets. |
| Policy | Enforces approved endpoints, local-only classifications, tags, and secret-source rules. |
The Kubernetes deployment should be conventional:
```text
infra/
azure/
kubernetes/
arc/
dashboards/
policies/
```
Cluster resources should include:
| Resource | Purpose |
| --- | --- |
| Gateway deployment | OpenAI-compatible facade and route policy. |
| Knowledge Assistant deployment | Private RAG service. |
| Operations Assistant deployment | IoT incident assistant. |
| Dashboard deployment | Control UI. |
| ServiceMonitor or PodMonitor | Prometheus scraping. |
| SecretProviderClass | Key Vault-backed secret mounting where enabled. |
| Ingress | TLS endpoint for gateway and dashboard. |
| Demo namespace | Isolated presentation environment. |
The dashboards should make the architecture measurable:
- Requests by backend.
- Fallback count.
- Denied count.
- P50/P95/P99 latency.
- Prompt body logging posture.
- Local-only request count.
- Backend health.
- Camera events by site and type.
- Active incidents and summaries.
If a number is not on a dashboard, it does not exist during an outage.
## Evidence in Three Places
Policy evidence has to land in three places at once: the app response, the dashboards, and the query history. Any one of them alone is a story; together they are proof.
So this segment starts from the outside and works in. The app is running at the edge, the cluster shows up Arc-connected in the portal, and GitOps reports what it last reconciled - three screens that establish the estate exists before anything interesting happens to it. Then requests go through the gateway, Grafana fills in with backend selection, latency, fallback and denial counts, and a KQL query over routing events shows the same activity from the log side.
The turn is a deliberate `LocalOnly` denial, and the point is watching one refusal appear in all three surfaces: the response the app got, the counter on the dashboard, and the row in Log Analytics. If a secret rotation is wired up by then, it closes the segment with a config reload or a rollout, which is the least glamorous and most reassuring thing in the talk.
One caveat before anyone pastes these into their own workspace: the queries below target the planned Log Analytics schema. `AiRoutingEvents`, `AiInferenceRequests`, and `CameraEvents` exist once the ingestion pipeline ships, so read them as the observability contract rather than as queries against a live workspace:
```kusto
AiRoutingEvents
| summarize count() by selectedBackend, policy, decision
AiRoutingEvents
| where policy == "LocalOnly" and decision == "Denied"
AiInferenceRequests
| summarize p95Latency=percentile(latencyMs, 95) by backendId, bin(timestamp, 5m)
CameraEvents
| summarize count() by siteId, cameraId, eventType, bin(timestamp, 5m)
```
## Signals That Already Exist
The earlier demos already emit the signals worth collecting: gateway routing decisions, RAG retrieval and privacy decisions, camera incident summaries, and backend health and failures. The private cloud buildout already frames Arc and GitOps as the management overlay for the local Kubernetes environment. Demo 4 turns those signals into operational evidence instead of log lines nobody reads.
## What Had to Be Built
The new work is infrastructure and observability - none of it glamorous, all of it load-bearing:
- Bicep or Terraform for the Azure resources.
- Helm or Kustomize for Kubernetes deployment.
- Managed Prometheus scrape config.
- Grafana dashboard JSON.
- KQL saved queries.
- Key Vault secret integration for the Azure-governed path.
- Application policy events that match dashboard and query fields.
Policy examples, split by the layer that actually enforces them. This split matters more than it looks, because people assume Azure Policy reaches inside applications, and it does not:
| Policy | Enforced by | Demo behavior |
| --- | --- | --- |
| Approved model endpoints only | Application | Unknown endpoint cannot be enabled. |
| Local-only classification | Application | Restricted workload cannot route to cloud. |
| No prompt body logging | Application | Restricted prompts emit metadata-only telemetry. |
| Required tags and labels | Azure Policy | Manifests carry `app`, `scenario`, `owner`, `data-classification`. |
| Required secret source | Azure Policy | Production manifests cannot use raw API keys. |
The three application rows land in three different components: the gateway admin surface refuses the unknown endpoint, the routing engine refuses the cloud hop, and the telemetry pipeline drops the prompt body. To say the split plainly: Azure Policy governs Azure resources such as tags and secret sources, and it cannot block a gateway from enabling an unknown model backend. The routing boundaries in this demo are application-level policy events, surfaced through the same evidence flow as the Azure-side rules.
## The Brittle Demo Trap
Installing cloud operations live during a talk is how this demo breaks, and the fix is to refuse the temptation. Preflight the Azure path, keep a recording or a screenshot for the portal views, and save the live running for the local dashboard.
Arc and Azure Monitor need outbound connectivity and prior setup, so a disconnected demo shows local application behavior and local telemetry with no cloud forwarding while the link is down. Pretending Azure is live while the edge is offline buys nothing: nobody in the audience can see your resource group anyway, and everybody can see a stalled terminal.
## When the Governance Demo Is Real
The governance story holds up when the Azure side is reproducible rather than hand-built: `make infra-plan` and `make infra-apply` produce the same resources twice, the gateway, assistants, and dashboard deploy through Helm or Kustomize, and the Grafana dashboards import themselves instead of being rebuilt from memory an hour before the talk. Metrics show up locally either way, and in Managed Prometheus when Azure is connected.
The claim that actually matters is the denial one. A single `LocalOnly` refusal has to be findable in the app logs, on the dashboard, and in a KQL query over Log Analytics, because governance you can only see from one angle is governance nobody will trust. And `make teardown` has to remove the demo resources afterward, since leaving resources behind is how a demo quietly becomes a bill.
## Related Posts
This post makes the prior demos operational. It depends on the gateway routing events from [One App, Many Places to Run AI](/blog/one-app-many-places-to-run-ai/) and the camera incident events from [From Camera Events to Operator Guidance](/blog/from-camera-events-to-operator-guidance/).
## References
- [Azure Arc-enabled Kubernetes overview](https://learn.microsoft.com/en-us/azure/azure-arc/kubernetes/overview)
- [Application deployments with GitOps using Flux v2](https://learn.microsoft.com/en-us/azure/azure-arc/kubernetes/conceptual-gitops-flux2)
- [Enable monitoring for Arc-enabled Kubernetes clusters](https://learn.microsoft.com/en-us/azure/azure-monitor/containers/kubernetes-monitoring-enable-arc)
- [Use Azure Key Vault Secrets Provider extension with Arc-enabled Kubernetes](https://learn.microsoft.com/en-us/azure/azure-arc/kubernetes/tutorial-akv-secrets-provider)
---
# When the Edge Has to Stand Alone
https://jaredrhodes.com/blog/when-the-edge-has-to-stand-alone/
The edge has to stand alone sometimes. Internet links fail. Cloud services throttle. A local model crashes mid-request, an accelerator endpoint saturates, and sooner or later a response adapter meets a payload that is almost, but not quite, OpenAI-compatible. None of that is hypothetical; it is just a Tuesday.
Demo 5 turns all of that into a failure lab: a controlled set of ways to break the system on demand, so the architecture can be shown failing in visible, policy-correct ways. Failure behavior is part of the product here, and I would rather show it on purpose than meet it for the first time on stage.
## Why Build a Failure Lab
Happy-path AI demos are easy to fake. The questions a real system has to answer are harder:
- What happens when the cloud is unavailable?
- What happens when the local model is unavailable?
- What happens when the best backend is slow or saturated?
- What happens when a backend returns malformed output?
- What happens when a restricted request has no eligible backend?
- Can the presenter reset the demo without debugging state live?
Every one of those has an answer in this architecture. The lab exists so the answers can be demonstrated instead of asserted.
## Inside the Failure Lab
In the design, `AiOnTheEdge.DemoScenarios` owns deterministic failures and reset controls behind the shared demo endpoints. Fault types are posted to the single faults endpoint, and reset is the shared endpoint every service exposes:
```text
POST /admin/demo/faults { "fault": "backend-down", "backendId": "" }
POST /admin/demo/faults { "fault": "backend-slow", "backendId": "" }
POST /admin/demo/faults { "fault": "backend-malformed", "backendId": "" }
POST /admin/demo/faults { "fault": "network-cloud-blocked" }
POST /admin/demo/faults { "fault": "policy-local-only" }
POST /admin/demo/reset clears active faults and restores the seeded state
```
The dashboard needs a Failure Lab page:
| Control | Result |
| --- | --- |
| Toggle backend down | Backend health changes and route decisions adapt. |
| Force restricted prompt | Policy changes to `LocalOnly`. |
| Block cloud | Cloud backends become unavailable. |
| Return malformed response | Adapter error is recorded and fallback is evaluated safely. |
| Run smoke test | Pass/fail appears for all primary demo scenarios. |
| Reset | Stable state returns without manual cleanup. |
Faults should be simple and explicit - every one maps to something boring that can actually happen:
| Fault | Implementation |
| --- | --- |
| Backend down | Disable backend or point to a dead URL. |
| Backend slow | Add delay in mock backend. |
| Malformed response | Return invalid OpenAI-compatible payload. |
| Cloud blocked | Mark cloud backends unhealthy in demo mode. |
| Local unavailable | Stop or disable local adapter. |
| Accelerator saturated | Return HTTP 429 or a configured saturation signal. |
## Staging a Fail-Closed Denial
A fail-closed denial is the moment worth staging. The sequence I use:
1. Start with all backends healthy.
2. Ask a normal public question and show a valid route.
3. Mark the prompt restricted and show `LocalOnly`.
4. Disable `foundry-local`, then `mock-accelerator`, so no device or edge backend is left.
5. Ask again and show the denial: cloud is healthy but ineligible, and nothing eligible is healthy.
6. Change policy to `CloudAllowed` for nonrestricted content.
7. Show fallback to an allowed backend.
8. Block cloud.
9. Show local RAG and camera incident summaries still work with cached models and local data.
10. Run `make demo-smoke-test`.
11. Reset the demo.
The edge does not have to answer every request. It has to answer the requests it is allowed to answer and refuse the rest clearly. That sentence is the whole design review, and everything else in this post is machinery for proving it.
## Parts That Can Already Break
The earlier demos already provide the components that can fail: gateway route selection, RAG retrieval and generation, camera event replay, Azure-backed telemetry, and accelerator backend registration. Demo 5 turns those components into test cases instead of ad hoc failure stories.
## The New Work Is the Harness
The new build is the failure harness itself:
- Central fault state.
- Reset and seed endpoints.
- Smoke-test runner.
- Failure Lab UI.
- Deterministic mock backend behaviors.
- Local telemetry when Azure is unavailable.
- Dashboard panels for denials, fallbacks, adapter errors, and reset status.
The smoke test should validate the contract the presenter needs:
```text
make demo-reset
make demo-seed
make demo-smoke-test
```
That test should cover local route, cloud-allowed fallback, local-only denial, malformed response handling, camera replay, RAG citation, and reset. When it passes, I stop worrying about whatever the venue's Wi-Fi is doing.
## Too Many Faults Ruin the Show
The failure lab can become too noisy. The audience should see two or three failures live, not every possible fault; a parade of toggles is its own kind of confusion. The best live sequence is:
1. Local backend down.
2. Restricted prompt denied.
3. Cloud blocked but local RAG still answers.
Everything else is useful for validation and backup, but not every control needs to be shown in a 45-minute talk.
It pays to be precise about what offline actually means here: local application behavior can continue after warmup, while live Azure management and cloud telemetry depend on connectivity and prior setup. Anything vaguer and someone walks away convinced the whole stack runs air-gapped forever.
## Signing Off on the Failure Lab
The lab is finished when every fault can be turned on and cleared from both the API and the UI, and when each failure produces a reason a person can read and a reason a query can find. Those two audiences are different: the user-facing text has to say what happened, and the telemetry has to say why the router decided what it decided. The rule underneath all of them stays fixed - a restricted prompt never reaches cloud, whatever combination of faults is active.
The other half is recoverability. `make demo-smoke-test` covers every primary failure path, at least one complete demo path runs with the network unplugged after warmup, and reset is designed to return the system to a known state in under a minute, which is roughly the length of a question from the audience. A demo you cannot recover from between segments is a demo you only get to run once.
## Related Posts
This is the credibility test for everything before it: the gateway from [One App, Many Places to Run AI](/blog/one-app-many-places-to-run-ai/), the assistants from [Private RAG That Cannot Leave the Edge](/blog/private-rag-that-cannot-leave-the-edge/) and [From Camera Events to Operator Guidance](/blog/from-camera-events-to-operator-guidance/), and the operations layer from [Edge AI You Can Actually Operate](/blog/edge-ai-you-can-actually-operate/). Build it before depending on real hardware or live cloud services in a session, because credibility is much cheaper to install up front.
## References
- [What is Foundry Local?](https://learn.microsoft.com/en-us/azure/foundry-local/what-is-foundry-local)
- [Best practices and troubleshooting guide for Foundry Local CLI](https://learn.microsoft.com/en-us/azure/foundry-local/reference/reference-best-practice)
- [Azure IoT Operations overview](https://learn.microsoft.com/en-us/azure/iot-operations/overview-iot-operations)
- [Process and route data with data flows](https://learn.microsoft.com/en-us/azure/iot-operations/connect-to-cloud/overview-dataflow)
---
# Specialized Hardware Without an App Rewrite
https://jaredrhodes.com/blog/specialized-hardware-without-an-app-rewrite/
New hardware is fun. Rewriting a working application to accommodate it is not. That trade shows up in almost every accelerator demo I have sat through: the board goes live, and quietly the app grows a special client library, then a special request shape, then a special set of apologies for whenever the board is having a bad day. If adding an accelerator means rewriting the app, the hardware lane has become an island.
Demo 6 keeps the application completely unchanged. Tenstorrent - or a mock accelerator that behaves like one - registers as another backend behind the AI on the Edge Gateway, and the routing policy decides what that is worth.
## How Hardware Becomes an Island
Accelerator demos tend to drift toward hardware-specific code paths:
- A different client library.
- A different request shape.
- A different health check.
- A different dashboard.
- A different fallback story.
Each step is defensible on its own during bring-up, and together they are bad for application architecture. The application should ask for a workload. The router should decide whether an accelerator is eligible, healthy, and preferred.
Nobody here is claiming one hardware path is always faster. The claim is narrower and more useful: specialized hardware can join the governed edge platform and stay part of it.
## One More Backend in the Registry
The whole trick is that the accelerator lane is just a backend registration, using the same registry schema as every other backend:
```json
{
"id": "tenstorrent-edge",
"kind": "OpenAICompatible",
"baseUrl": "http://tenstorrent-edge:8000/v1",
"families": ["chat"],
"models": ["accelerator-chat"],
"location": "edge",
"capabilities": ["chat", "streaming"],
"tags": ["local", "accelerator", "specialized-hardware"],
"priority": 5
}
```
From there the gateway treats Tenstorrent like any other OpenAI-compatible backend until it has a reason not to:
- Discover models through `/v1/models` or a configured model list.
- Record capabilities explicitly.
- Test chat, streaming, and embeddings independently.
- Track latency, status codes, saturation, selected count, and fallback count.
- Expose compatibility failures in the route trace.
The routing policy is `AcceleratorPreferred`, not `AcceleratorOnly`. If the accelerator is healthy and supports the requested model family, it wins. If it is unhealthy or saturated, the router picks another eligible local backend, and the audience never has to think about it.
One status caveat I want on the record: as of August 2026, Tenstorrent's documentation describes TT-Inference-Server for deploying LLM serving on its hardware, including container management, model downloads, serving configuration, and an OpenAI-compatible API endpoint. Model support still depends on the validated hardware and software combination, which is exactly why the gateway discovers and displays capability rather than assuming it.
## What the Demo Has to Prove
The proof the audience needs is that no application code changes. Everything else is staging:
1. Show the backend registry: Foundry Local, Azure Foundry, mock cloud, Tenstorrent, mock accelerator.
2. Ask the same operational question used in Demo 1.
3. Add workload metadata: `AcceleratorPreferred`.
4. Show the router selects `tenstorrent-edge` or `mock-accelerator`.
5. Stream the response through the same app and gateway.
6. Show metrics and backend health.
7. Mark the accelerator saturated.
8. Ask again.
9. Show fallback to another eligible local backend.
10. Show the app request did not change.
Step ten is the entire point. Steps two through nine exist to make step ten believable.
I also avoid benchmark claims unless the evaluation harness produced them. The architecture claim here is about portability and governance. Vague performance wins are exactly what a skeptical room smells first.
## What Is Actually Left to Build
Most of this lane is assembly work. The private cloud buildout already describes the Tenstorrent lab path and the mixed accelerator environment. The Demo 1 gateway already provides the abstraction that keeps the app unchanged, and the Demo 5 design supplies saturation and fallback controls. What remains is adapter hardening:
- Tenstorrent backend config profile.
- Capability discovery and display.
- Health check and timeout behavior.
- Compatibility tests for the supported API paths.
- Accelerator-preferred routing policy.
- Saturation fallback behavior.
- Optional hardware metrics later, starting with endpoint-level metrics now.
The mock accelerator is a requirement of the demo plan. Real hardware is valuable, and the session still has to work when the board is offline, in use by something else, or running a different model than the demo expects. A dependency I cannot reproduce on demand is a coin flip wearing a schedule.
## Where Overpromising Starts
Overpromising hardware support is how this lane goes wrong. OpenAI-compatible does not mean feature-complete: chat, streaming, embeddings, tool calls, batch behavior, and error semantics all need separate smoke tests, because each one is its own little contract the hardware may or may not honor.
So the gateway displays capability and denial explicitly instead of discovering the gap mid-request:
```json
{
"backendId": "tenstorrent-edge",
"eligible": false,
"reason": "Backend does not advertise embeddings capability."
}
```
An honest "no" from the router beats a mystery timeout from the hardware every time.
## Judging the Accelerator Lane
The lane works when a Tenstorrent endpoint or the mock accelerator registers as a backend like any other, the router prefers it for workloads tagged `AcceleratorPreferred`, and fallback happens on its own when the board is unhealthy or saturated. Metrics have to carry selected backend, latency, errors, and fallback count, since the only interesting question about an accelerator is how often the router actually chose it and what happened when it did not.
The criterion I watch is the one about the application: the app has to be byte-for-byte the same before and after the accelerator exists. The moment swapping a backend means touching application code again, this stopped being an architecture and became a science project. And no performance number appears anywhere unless the evaluation harness produced it, which is the same rule I would want applied to somebody else's hardware post.
## Related Posts
This post connects the [Tenstorrent private cloud buildout](/blog/home-lab-tenstorrent-buildout-multi-cloud-edge/) to the AI on the Edge gateway. The hardware is part of the architecture, but not the whole architecture - that distinction is why the application survived this demo untouched.
## References
- [Tenstorrent tools documentation](https://docs.tenstorrent.com/tools/index.html)
- [Deploy LLMs with TT-Inference-Server](https://docs.tenstorrent.com/getting-started/vLLM-servers.html)
---
# Building the AI on the Edge Demo System
https://jaredrhodes.com/blog/building-the-ai-on-the-edge-demo-system/
By this point in the series the demos exist as stories: routing, private RAG, camera operations, Azure governance, failure behavior, and accelerator backends. What the series still needed was the machine those stories run on. So this post is the engineering brief for building the presentation repo, written so another engineer - or an agent - can implement it without rediscovering the story first. The standard throughout is that the system should be boring to run. All of the excitement belongs on stage.
## Why the Repo Has to Be Boring
A conference demo that needs thirty manual steps is a liability. Miss one step in a hotel room the night before, and talk day turns into live-debugging in front of people who came for architecture. Determinism is not a preference here; it is the design constraint. The repo needs deterministic setup, seed data, reset behavior, smoke tests, local mode, edge mode, and clear health endpoints.
The target is not "works on my machine after I remember the sequence." The target is:
```text
make demo-laptop
make demo-edge
make demo-seed
make demo-reset
make demo-smoke-test
make infra-plan
make infra-apply
make teardown
```
The first five targets drive the demo itself; the last three manage the Azure-governed mode's resources. If those commands exist and mean something, the architecture can survive rehearsals, travel, hotel Wi-Fi, and last-minute hardware failures. I have watched enough talks die in the third minute to want the repo doing the remembering instead of me.
## Repo Layout and Shared Contracts
The repo is organized around service ownership and demo modes:
```text
ai-on-the-edge/
docs/
architecture/
decision-records/
diagrams/
session-material/
src/
AiOnTheEdge.Gateway/
AiOnTheEdge.Routing/
AiOnTheEdge.KnowledgeAssistant/
AiOnTheEdge.OperationsAssistant/
AiOnTheEdge.ControlDashboard/
AiOnTheEdge.Telemetry/
AiOnTheEdge.DemoScenarios/
infra/
azure/
kubernetes/
arc/
local/
dashboards/
policies/
samples/
documents/
camera-events/
prompts/
evaluations/
scripts/
demo/
setup/
test/
talks/
```
An honest caveat about that tree: it and the contracts below describe my private reference implementation. The repo is not public, so treat the layout as the specification an implementation should satisfy rather than a checkout you can clone.
Every service exposes the same operational endpoints as a floor:
```text
/healthz
/readyz
/metrics
/admin/demo/reset
/admin/demo/seed
/admin/demo/faults
```
Individual services add to that list rather than replacing it. The Knowledge Assistant carries `/admin/reindex` on top of the six; the Operations Assistant carries its replay controls. The six above are what a health check, a reset script, or a smoke test can assume without knowing which service it is talking to.
And every AI request emits the same route decision event shape (field values below are illustrative, not measurements):
```json
{
"timestamp": "2026-06-30T12:00:00Z",
"scenario": "private-rag",
"classification": "restricted",
"requestedModel": "local-chat",
"selectedBackend": "foundry-local",
"decision": "Allowed",
"policy": "LocalOnly",
"fallbackUsed": false,
"promptBodyLogged": false,
"latencyMs": 842,
"promptTokens": 640,
"completionTokens": 122,
"reason": "Restricted content must stay on edge."
}
```
`requestedModel` records the concrete model the router resolved the requested family to, which is why it reads `local-chat` rather than `chat`. That single event is the contract between the gateway, dashboard, metrics, logs, KQL queries, and the talk narrative. When something looks wrong on stage, this is the artifact that explains why.
## Three Ways to Run It
The implementation supports three modes. Laptop mode is the reliable conference fallback: .NET app, local or mock model runtime, local vector store, simulated camera events. Edge mode runs Kubernetes or k3s with the gateway, assistants, dashboard, MQTT, simulator, and observability. Azure-governed mode layers Arc, Azure Monitor, Managed Prometheus, Grafana, Key Vault, GitOps, optional Azure IoT Operations, and optional Azure Local on top.
Laptop mode is the default live path. Edge mode proves the system is deployable. Azure-governed mode proves the operating model.
## Build in Demo Order
Milestones go in the order they appear on stage, so every stretch of build time produces something demonstrable:
| Unlocks | Build |
| --- | --- |
| 1. Gateway demo | Gateway, mock backends, policies, dashboard, route events, `make demo-laptop`. |
| 2. Private RAG | Document ingestion, chunking, embeddings, vector store, citations, RAG evaluation. |
| 3. Operations assistant | Camera replay, MQTT ingest, event normalization, incidents, operator summaries. |
| 4. Azure operations | Infra, Kubernetes manifests, dashboards, KQL, GitOps, Key Vault, policy examples. |
| 5. Failure lab | Fault injection, cloud-blocked mode, smoke tests, reset controls. |
| 6. Accelerator lane | Tenstorrent adapter hardening, capability discovery, health checks, mock accelerator. |
Do not start with the portal. Start with the deterministic local path, then add cloud governance around it.
## How the 45 Minutes Actually Run
A 45-minute talk should not run every possible path live. The recommended flow:
| Time | Segment | Demo |
| ---: | --- | --- |
| 0:00-3:00 | Problem | Local AI is useful, unmanaged edge AI is model sprawl. |
| 3:00-7:00 | Architecture | Gateway, router, policy engine, Azure operations layer. |
| 7:00-15:00 | Live Demo 1 | One app, many model targets. |
| 15:00-24:00 | Live Demo 2 | Private RAG that cannot leave the edge. |
| 24:00-34:00 | Live Demo 3 | Camera fleet operations assistant. |
| 34:00-40:00 | Demo 4 | Azure governance and observability dashboard. |
| 40:00-43:00 | Failure cut-in | Disable backend, deny cloud fallback, show telemetry. |
| 43:00-45:00 | Close | Cloud-governed, locally executed. |
Optional cut-ins are Foundry Local on Azure Local, Tenstorrent hardware, AIO data flow to Event Hubs, and disconnected mode. They should be additive, not dependencies; the talk has to work with every one of them missing, which is also why nothing cloud-side gets installed live during the session.
## What This Post Locks In
The blog series now defines the acceptance criteria and audience moments, the private cloud post defines the physical environment, and the camera posts define the IoT workload; an implementation should treat all of that as requirement inputs. This post adds the implementation contract:
- The repo layout.
- The make targets.
- The common service endpoints.
- The route decision event.
- The build order.
- The presentation flow.
- The standard for deterministic demo behavior.
None of that is glamorous. It is the part that decides whether the demos behave the same way twice.
## The Pile of Disconnected Samples
There is a specific way this repo could fail while every individual piece works: seven services' worth of clever code that together demonstrate nothing. Every service should contribute to the same route decision, metrics, dashboard, and reset story.
If a feature does not help the session or make the system more repeatable, it can wait. It will still be there after the talk.
## Ready to Rehearse
The system is ready when the make targets mean what they say. `make demo-laptop` brings up the primary path with no cloud involved, `make demo-edge` deploys the same thing onto local Kubernetes, and `make demo-seed`, `make demo-reset`, and `make demo-smoke-test` respectively create the documents, camera events, backend config and policies, put all of it back to a known state, and prove that routing, RAG, incidents, faults, and accelerator fallback still behave. On the Azure side, `make infra-plan` and `make infra-apply` provision the governed mode repeatably and `make teardown` takes it back down without leaving anything billable behind.
Two smaller checks matter more than they look. Every service answers on health, readiness, metrics, seed, reset, and faults, so nothing in the demo needs a service-specific runbook. And the dashboard shows the current state before I say a word, which is how I find out whether the system is ready without narrating a diagnostic to the room. When all of that passes, the night before the talk is for sleeping, not for shell scripts.
## Related Posts
This is the build companion for the whole AI on the Edge series, starting from the gateway in [One App, Many Places to Run AI](/blog/one-app-many-places-to-run-ai/) and the failure harness in [When the Edge Has to Stand Alone](/blog/when-the-edge-has-to-stand-alone/). The final post, [the AI on the Edge reference architecture](/blog/ai-on-the-edge-reference-architecture/), turns the system into an evergreen reference.
## References
- [Azure Arc-enabled Kubernetes overview](https://learn.microsoft.com/en-us/azure/azure-arc/kubernetes/overview)
- [What is Foundry Local?](https://learn.microsoft.com/en-us/azure/foundry-local/what-is-foundry-local)
- [Azure IoT Operations overview](https://learn.microsoft.com/en-us/azure/iot-operations/overview-iot-operations)
- [Tenstorrent tools documentation](https://docs.tenstorrent.com/tools/index.html)
---
# The AI on the Edge Reference Architecture
https://jaredrhodes.com/blog/ai-on-the-edge-reference-architecture/
Everything in this series reduces to one principle I kept coming back to: local execution still needs a control plane.
Models can run on a laptop, an edge server, Azure Local, a cloud endpoint, or specialized local hardware. That flexibility is only useful when applications can use it without hardcoding placement decisions and when operators can see, secure, and govern what happened. This post is the reference architecture for the project - the stable one to bookmark or cite while the individual demo posts keep moving around it.
## Why Local AI Needs a Control Plane
Enterprises want local AI for good reasons:
- Keep private data near where it is generated.
- Reduce latency.
- Continue operating during network disruption.
- Control inference costs.
- Use local accelerators and edge hardware.
- Avoid sending every operational event to a cloud model.
I share every one of those motivations; they are why this project exists at all. The risk is unmanaged local AI: invisible endpoints, inconsistent model APIs, unclear fallback, missing telemetry, ad hoc secrets, and no proof that restricted data stayed local.
The architecture solves that by separating application intent from model placement.
## Components and Request Flow
The high-level components are:
| Component | Responsibility |
| --- | --- |
| Application | Sends AI requests to one gateway. |
| AI on the Edge Gateway | Exposes OpenAI-compatible chat, embeddings, models, health, and admin endpoints. |
| Router | Selects eligible backends by policy, health, requested model family, latency, classification, and fallback rules. |
| Policy engine | Enforces `LocalOnly`, `PreferLocal`, `CloudAllowed`, `AcceleratorPreferred`, `FallbackDisabled`, and `NoPromptLogging`. |
| Backend registry | Stores local, edge, cloud, Azure Local, Tenstorrent, and mock targets. |
| Knowledge Assistant | Ingests documents, embeds locally, retrieves chunks, cites sources, and routes answer generation. |
| Operations Assistant | Turns camera events and runbooks into incident summaries and recommended actions. |
| Control Dashboard | Shows backend health, route traces, privacy posture, latency, incidents, and failure controls. |
| Telemetry | Emits route decisions, metrics, logs, and KQL-friendly events. |
| Azure operations layer | Arc, GitOps, Monitor, Managed Prometheus, Grafana, Key Vault, Policy, and optional AIO. |
The request flow is deliberately short:
1. The application calls the gateway.
2. The gateway classifies the request or accepts classification metadata.
3. The router filters backends by policy, then by which ones serve the requested model family.
4. The router selects a backend or denies the request.
5. The gateway calls the selected backend through an adapter.
6. The gateway streams or returns the response.
7. Telemetry records the route decision and privacy posture.
8. Dashboards and KQL queries make the behavior visible.
Step three is where applications stop caring about model names. A request asks for a family - `chat` or `embeddings` - and each backend's registry entry lists the families it serves alongside the model name it uses for them, so the router does the translation and the application never learns that `local-chat` and `cloud-chat` are the same request in different places.
Eight steps, one place to look whenever anyone asks what happened to a request.
## Deployment Lanes
The same app should run across multiple lanes:
| Lane | Role |
| --- | --- |
| Laptop local | Conference-safe local path with Foundry Local or mocks. |
| Private cloud edge | Kubernetes or k3s deployment in the local lab. |
| Azure-governed edge | Arc-connected cluster with GitOps, Monitor, Prometheus, Grafana, Key Vault, and policy. |
| Azure Local | Enterprise edge inference path with Foundry Local on Azure Local where preview access and environment readiness exist. |
| Cloud fallback | Azure AI Foundry model endpoint for workloads that are allowed to leave the edge. |
| Accelerator lane | Tenstorrent or mock accelerator backend exposed through the gateway. |
The lanes are not interchangeable, and choosing between them is mostly a trade between evidence and independence. Laptop local is the one lane that never needs anything outside the machine, which is why it is the conference path, and the price is that none of the Azure-side evidence exists there - what you can prove is limited to what the local dashboard shows. Private cloud edge, described in the [Tenstorrent buildout](/blog/home-lab-tenstorrent-buildout-multi-cloud-edge/), buys the real deployment shape: multiple nodes, real networking, real failure modes, and telemetry that still stops at the cluster boundary.
Azure-governed edge is where the operating model becomes visible to people who are not in the room, and it is also the lane with a hard dependency: Arc and Azure Monitor need outbound connectivity and prior setup, so local application behavior survives a link failure while live management and cloud telemetry do not. Azure Local is the enterprise version of that same lane, gated on preview access rather than on effort. Cloud fallback is the only lane that is a policy decision before it is a deployment decision - a workload reaches it because its classification allowed it to, never because it was the healthiest option available. And the accelerator lane trades a capability question for a performance one: the gateway has to discover what the hardware actually serves before it can prefer it, which is why every accelerator claim in this series is hedged and every accelerator demo has a mock behind it.
Foundry Local is the on-device application runtime. Foundry Local on Azure Local is the enterprise edge inference lane and, as of September 2026, is treated as preview/request-access - re-check the linked overview before repeating that status, since it is exactly the kind of claim that ages fast. Tenstorrent is an accelerator backend, not a separate application architecture. Azure IoT Operations supplies the edge data-plane option for the camera workload.
## Six Policies That Do the Governing
The policy vocabulary is intentionally small - six values carrying the whole boundary story. `LocalOnly` and `PreferLocal` decide how hard the router tries to stay on the edge, `CloudAllowed` opens the cloud lane, `AcceleratorPreferred` biases toward specialized hardware when it is healthy and capable, `FallbackDisabled` stops the router from trying a second backend after the first one fails, and `NoPromptLogging` keeps bodies out of telemetry. The row-by-row behavior of each one is tabulated in [One App, Many Places to Run AI](/blog/one-app-many-places-to-run-ai/), and I would rather point at that table than print a second version of it that can drift.
This is not enough for every production system, and I would not pretend otherwise. It is enough to demonstrate the most important boundary: restricted data does not leave the edge just because the cloud is available.
## The Camera Fleet Workload
The camera fleet is the reference workload because it has real edge characteristics (and because anyone who has read this blog knows I have a soft spot for cameras that outlive their vendors). The three-part Azure IoT Operations series owns the details - [the camera control plane](/blog/azure-iot-operations-camera-control-plane/), [the MQTT broker and camera fleet](/blog/azure-iot-operations-mqtt-broker-camera-fleet/), and [data flows with the ONVIF connector](/blog/azure-iot-operations-dataflows-onvif-connector/) - and what makes that workload useful here is the shape of it:
- Distributed sites.
- Outbound-only device connectivity.
- MQTT topic contracts.
- Operational events and incidents.
- Local runbooks and private configuration.
- Azure IoT Operations as an optional broker and data-flow layer.
The operations assistant consumes the existing `cameras/#` stream, normalizes events, builds incidents, retrieves runbook snippets, and asks the gateway for a local summary. The camera control plane remains the owner of camera identity, commands, network model, and topic contract.
## Operating It Like Real Infrastructure
The operations model has to prove that edge AI can be run like real infrastructure:
- Git is the source of desired state.
- Arc brings edge Kubernetes into Azure management.
- Metrics show backend selection, latency, fallback, and denials.
- Logs show route decisions and incident summaries.
- Key Vault stores secrets in the governed path.
- Policy events explain why requests were allowed or denied.
- Reset and smoke tests keep demos repeatable, because local execution is not an excuse for local-only operations.
## The Case Where It Refuses
Every claim above collapses into one scenario. A `Restricted` RAG request arrives under `LocalOnly`, every device and edge backend is down, and a cloud backend is sitting there healthy. The gateway denies the request and the dashboard and logs carry the reason.
That is the architecture doing its job: it refused to answer, because answering would have violated policy. I would much rather stage that refusal during a demo than meet it for the first time in an audit.
## The Target an Implementation Has to Meet
The [build guide](/blog/building-the-ai-on-the-edge-demo-system/) specifies the implementation, and the status framing there applies to how much of it exists today. What that implementation is aiming at comes down to three things. Placement has to be invisible to application code, so moving a workload from a laptop runtime to an edge cluster to an accelerator changes configuration and nothing else. Every routing decision has to be explainable after the fact, with restricted requests structurally unable to reach a cloud backend and both assistants citing the local material their answers came from - source documents for RAG, structured events and runbooks for camera incidents.
The third is operational. Azure has to be able to observe routing, failures, policy denials, and backend health from outside the cluster, the same system has to come up in laptop-only mode and on an edge cluster without divergent code paths, and seed, reset, and smoke tests have to behave the same way every time. Accelerator hardware stays optional throughout, with a mock backend standing in for it, because an architecture that only works when a specific board is awake is a much smaller claim than the one this series is making.
## Related Posts
Use this post as the evergreen architecture link. Use [Building the AI on the Edge Demo System](/blog/building-the-ai-on-the-edge-demo-system/) as the implementation guide. Use the earlier posts for the individual demo slices - each one is the story of how a piece of this diagram earned its place. The two prerequisite series are [the Tenstorrent private cloud buildout](/blog/home-lab-tenstorrent-buildout-multi-cloud-edge/) for the environment and the [Azure IoT Operations camera control plane](/blog/azure-iot-operations-camera-control-plane/) for the workload.
## References
- [What is Foundry Local?](https://learn.microsoft.com/en-us/azure/foundry-local/what-is-foundry-local)
- [What is Foundry Local on Azure Local?](https://learn.microsoft.com/en-us/azure/azure-sovereign-clouds/private/foundry-local/overview)
- [Azure Arc-enabled Kubernetes overview](https://learn.microsoft.com/en-us/azure/azure-arc/kubernetes/overview)
- [Azure IoT Operations overview](https://learn.microsoft.com/en-us/azure/iot-operations/overview-iot-operations)
- [Process and route data with data flows](https://learn.microsoft.com/en-us/azure/iot-operations/connect-to-cloud/overview-dataflow)
- [Tenstorrent tools documentation](https://docs.tenstorrent.com/tools/index.html)
---
# Westworld of Warcraft: A Server That Plays Itself
https://jaredrhodes.com/blog/westworld-of-warcraft-a-server-that-plays-itself/
In 2005 I played a hunter who would not group with anyone who typed in all caps. I never learned his name. I remember the rule.
That is the thing worth building here. Not a bot that clears a dungeon - plenty of those exist. A **population**. A server where the other characters have habits, prices, grudges, and schedules, and where a human logging in at two in the morning can find five of them willing to run Wailing Caverns.
Westworld of Warcraft is that server. This series is how it is built and why each part is shaped the way it is.
## Why One Bot Was Never the Point
"Make bots that play WoW" is a solved and boring problem. "Make a server that behaves like it has a thousand people on it" is neither.
The gap between those two sentences is where all the engineering lives:
- One bot grinding boars is a state machine. A thousand bots grinding boars is a **scheduling and economy problem**.
- One bot pathing to a vendor is A\*. A thousand bots pathing across Azeroth is a **mesh generation and caching problem**.
- One bot casting Fireball is a rotation. A thousand bots casting Fireball with identical timing is a **detectable signal** that no human population produces.
- One bot answering a whisper is a template. A thousand bots answering whispers is a **rate-limiting and anti-griefing problem**.
I keep one north star for the whole project: a new human player logging in cannot tell, from gameplay observation alone, that the population is machine-controlled.
## What "Alive" Actually Means
Vague goals produce vague systems, so before writing anything I made myself define "alive" as four testable properties:
- **Always-available activities.** Any legal activity - questing zone, dungeon, raid, battleground, profession route, world event, world boss - has participants available inside the activity's normal group-form window. A human request for a level-appropriate dungeon group resolves in under five minutes.
- **Continuous progression.** Bots not serving a human request advance toward their own roster goals: level, gear, attunement, reputation, profession, gold, mount, PvP rank. An idle bot is a bug.
- **A living economy.** The auction house shows posting and bidding activity around the clock. Vendors see traffic. Banks see deposits. Mail moves. The economy reaches steady state without seeding.
- **Operator clarity.** The console shows me the highest-volume errors, the active activities, the population, and the scaling pressure points. Choosing my next engineering task is a query, not a guess.
Notice what is *not* on that list. There is no requirement that bots fake incompetence - misspelled trade chat, aimless wandering, theater. Social texture itself is absolutely in scope (the storyline and social-fabric posts depend on it); what is out of scope is performing incompetence to seem human. Indistinguishability here is a property of timing and routing.
## Three Thousand Characters, On Purpose
The target population is 3,000 characters, and I picked its distribution deliberately.
Those 3,000 are not all logged in at once. Every character carries its own online window, so a typical hour has roughly a thousand of them in the world. Where this series does per-hour arithmetic - trade posts, mail volume, chat budgets - it runs at a thousand bots and means that number. The 3,000 is the roster; the thousand is the crowd.
| Dimension | Target |
| --- | --- |
| Faction split | Roughly 50/50, configurable per realm |
| Class and spec coverage | Every race, class, and spec combination present at every five-level bracket, weighted toward level 60 |
| Professions | Every primary profession represented at 300 skill; cooking, first aid, and fishing universal |
| PvP | Enough queue depth for Warsong Gulch at 10v10, Arathi Basin at 15v15, and Alterac Valley at 40v40 inside bracket boundaries |
| Raids | Enough attuned level 60s for one concurrent raid in each tier: Onyxia, Molten Core, Blackwing Lair, Zul'Gurub, AQ20, AQ40, Naxxramas |
A `RosterPlanner` owns account-level decisions and enforces the coverage rules, in order. The counts below are the vanilla 1.12.1 roster; the later clients add a class and professions to both.
1. Faction bootstrap. If the plan needs a shaman and the account has no Horde characters, a Horde character gets created first.
2. Class coverage. All nine classes reach 60 before any class is duplicated at 60.
3. Profession coverage. All nine primary professions distributed; none left unrepresented at 300.
4. Spec diversity. Each class fields at least one of each role it can fill.
5. PvP rank. The roster holds characters at each rank band Alterac Valley objectives need.
This is why the server does not end up as 3,000 fury warriors. Somebody has to be the enchanter.
## What Is Actually Running
The stack reads from the bottom up. `Exports/GameData.Core` holds the game interfaces and shared contracts with zero dependencies - it is the bottom of the stack on purpose, because everything else stands on it. `Exports/BotCommLayer` carries protobuf over TCP with length framing, along with the `.proto` sources and their generated C#. `Exports/BotRunner` is the behavior engine itself: task stack, objective decomposition, shared by both runtimes. `Exports/WoWSharpClient` is a pure C# implementation of the WoW protocol - packets, opcodes, auth, movement. `Exports/Navigation` wraps C++ Detour pathfinding plus the `PhysicsEngine.dll` collision target, and `Exports/Loader` with `Exports/FastCall` provide the C++ CLR-injection bootstrap and structured-exception-wrapped fast calls.
The service tier does the coordinating. `Services/WoWStateManager` is the orchestrator: bot lifecycle, foreground injection, IPC listeners, activity registry, legality. `Services/PathfindingService` runs A\* routes over the native navigation layer, and `Services/SceneDataService` feeds collision and scene geometry to background bots. `Services/DecisionEngineService` produces advisory recommendations for objectives, rewards, rotations, threat, chat, and personality; `Services/PromptHandlingService` hosts the persona and dialogue runtime plus the storyline graph store. `BotProfiles` carries the per class and spec combat rotations.
On top sit the loopback-only Blazor Server consoles, `UI/OperatorConsole` and `UI/StorylineManager`, on ports 5167 and 5157, with the storyline runtime API alongside them on 5147, and `UI/Systems/Systems.AppHost`, which does the .NET Aspire orchestration of the Docker stack and the services.
The dependency direction is strict, and a test enforces it:
```text
GameData.Core -> BotCommLayer -> BotRunner -> WoWSharpClient -> Services -> UI
```
Interfaces live in the lower layers. Implementations live in the higher ones. An `Exports/` project may never reference `Services/`, `UI/`, or `Tests/`. When someone tries, `ProjectLayeringTests` fails the build.
## Two Ways to Drive a Character
There are exactly two runtimes, they share the behavior engine and the game interfaces, and neither is a fallback for the other.
The foreground runtime injects a native loader into a real `WoW.exe`, bootstraps the .NET runtime in-process, and drives the character through direct memory reads and writes plus Lua. You reach for it when you need true client parity: rendering, exact physics, packet captures that serve as parity baselines.
The background runtime is headless. A pure C# implementation of the WoW protocol connects to the world server with no game client at all, which is how you get many bots cheaply, or CI without a GUI.
Both are real, both ship. The next post takes them apart.
## Why a Legacy Private Server
This question comes up immediately and it deserves a direct answer. The supported clients are Vanilla 1.12.1, Burning Crusade 2.4.3, and Wrath of the Lich King 3.3.5a, running against a locally hosted MaNGOS-family world server. Modern retail WoW is not supported and is not a goal.
Four reasons, in roughly this order.
**Consent.** Everyone on the server is either the operator or something the operator started. Nobody's competitive experience is being degraded.
**Stability.** 1.12.1 is a fixed target. Memory offsets, opcodes, and physics constants do not move under you between patches.
**Observability.** The operator owns the world database, the server logs, and the SOAP command interface. You can ask the world questions directly.
**Research value.** The interesting problems - coordination, economy, planning, indistinguishability - do not require the newest client to be interesting.
The stated purpose is intellectual exploration. That is a stronger position when the environment is one you own outright.
## The Invariants
These survive every refactor. Breaking one is a priority-zero bug, and most of the rest of this series is downstream of them.
| Invariant | Why |
| --- | --- |
| No blind sequences | Counters, sleeps, and fixed repeat-N-times loops are banned for state validation. Gate on memory, packet, snapshot, or explicit API state. A bot that waits three seconds and hopes is not a bot, it is a superstition. |
| Foreground is ground truth | When the foreground and background runtimes disagree about physics or movement, the foreground is right and the background is wrong. |
| StateManager owns orchestration | Tests, the UI, and external callers never bypass it to talk to a bot directly. |
| Geometry has exactly two owners | The pathfinding and scene-data services answer every world-geometry question. Bot code does not load map tiles. |
| Tests assert through snapshots | A test that reaches into internal bot state instead of reading a published snapshot is testing the wrong thing. |
| No skipping for "resource not found" | If a fishing pool exists in the world database and the bot cannot find it, that is a detection or pathfinding bug, not a reason to skip the test. Walk further. |
| The catalog drives legality | Every rejection of an illegal activity cites a specific catalog field. No ad-hoc legality logic inside the behavior engine. |
The one that changes the most code is the first. "No blind sequences" is why every task in the system carries a verification predicate, and why the behavior hierarchy in [Activity, Objective, Task, Action](/blog/activity-objective-task-action/) looks the way it does.
## Where This Series Goes
Four groups. Foundations covers how a character gets driven, how behavior is structured, and how movement is made correct. Population covers where personality comes from, who the standing cast is, how they talk, and how the economy forms. World and intelligence covers server-wide time, the boundary around machine learning and language models, and how a human asks the world for something. Proof covers how you test a world, and the synthesized reference architecture.
The population posts are the ones I would read first if I were you. Architecture is the substrate; the cast is the point.
## The Idle Bot
Every failure worth designing against on this project is loud except one, and the quiet one is **the idle bot**.
1. A level 34 rogue completes its zone quest chain in Stranglethorn Vale.
2. The progression planner has no next objective because the bracket's catalog rows are incomplete.
3. The bot stands in Booty Bay.
4. Nothing errors. Nothing alerts. The dashboard is green.
That is worse than a crash. A crash tells you where it hurts; a standing rogue tells you nothing until a human wanders past and sees a statue. That is why "an idle bot is a bug" sits in the definition of alive at the top of this post, and why the operator console surfaces population activity distribution as a first-class panel.
## How I Will Know It Worked
Most of the finish line is unglamorous, and I expect to hit it quietly. Every activity in the catalog gets an automated test that drives a request through to a real group and a real completion. All 27 class and spec combat profiles pass live validation in both runtimes. The operator console renders population, active activities, top errors, and queue depth, and picks up config changes without a restart. Reproducible client crashes get a hardening fix or a written mitigation. None of that is interesting once it passes; it is only interesting while it fails.
Three of the criteria carry an actual argument. The staged load run has to reach 3,000 concurrent bots with snapshot latency holding under half a second at the ninety-ninth percentile, because the population is the product and a design that only works at fifty bots is a different design. Normal-operation logs have to be quiet enough that any warning is signal, because the idle bot above is invisible inside a noisy log. And every pattern that landed has to be written down as a technique someone could reuse, with an eye toward whether it transfers past this one game. That last one matters more than it looks. If none of this transfers to another game, then what got built is a WoW bot, not a method.
## Related Posts
Start here, then read [Two Ways to Wear a Character](/blog/two-ways-to-wear-a-character/) for the runtimes and [Activity, Objective, Task, Action](/blog/activity-objective-task-action/) for the behavior model. The [project page](/projects/westworld-of-warcraft/) carries the original 2018 goals and how far they have moved.
## References
- [Westworld (HBO)](https://www.hbo.com/westworld)
- [VMaNGOS world server](https://github.com/vmangos/core)
- [Recast and Detour navigation toolkit](https://github.com/recastnavigation/recastnavigation)
- [.NET Aspire overview](https://learn.microsoft.com/en-us/dotnet/aspire/get-started/aspire-overview)
- [Ollama](https://ollama.com)
---
# Two Ways to Wear a Character
https://jaredrhodes.com/blog/two-ways-to-wear-a-character/
There are two ways to make a character in a virtual world do something. You can move the hands that hold the controller, or you can be the controller.
Westworld of Warcraft does both, on purpose, and the tension between them is the most productive constraint in the codebase.
## Pick One and You Lose Something
**Inject into the real client only.** Every bot needs a `WoW.exe` process, a window, a GPU context, and roughly a gigabyte of address space. Thirty bots is a heroic machine. Three thousand is a data center. Continuous integration on a headless Linux runner is off the table permanently.
**Emulate the protocol only.** Now a bot is cheap - hundreds per machine, no GUI, trivially scriptable in CI. But you have inherited the entire client. Movement physics, collision, transport state, spell timing, update-field semantics: all of it now lives in code you wrote, and the only way to know whether you got it right is to compare against the thing you were trying to avoid running.
So both ship. The foreground runtime is the **oracle**. The background runtime is the **fleet**.
## One Engine, Two Bodies
| | Foreground | Background |
| --- | --- | --- |
| Process | Inside a live `WoW.exe` | Its own headless process |
| Game state | Direct memory reads and writes, plus the client's own Lua | Parsed from `SMSG_*` packets into an object manager |
| Movement | The client's real physics | `PhysicsEngine.dll`, ported from the client binary |
| Cost per bot | One full game client | A socket and a state machine |
| Runs in CI | No | Yes |
| Authority | Ground truth | Must match ground truth |
What they share is everything above the seam: `GameData.Core` interfaces, the `BotRunner` behavior engine, the class and spec rotation profiles, and the protobuf transport. A task like `GoToTask` has no idea which runtime it is executing in. That is the whole design goal - one behavior engine, two ways of reaching the world.
## Getting Inside the Client
The foreground path is process injection with a .NET twist, and the twist is the interesting part.
The host side is conventional Windows work:
1. `WoWStateManager` launches or locates the client process.
2. It waits for a real window and a real world state - no fixed sleeps, per the no-blind-sequences rule.
3. `OpenProcess`, then allocate memory inside the target.
4. Write the path to `Loader.dll` into that allocation.
5. Point `CreateRemoteThread` at `LoadLibrary` with that path.
The in-process side is where .NET 8 changes the old recipe. The classic injection tutorial uses `mscoree.dll` and the .NET Framework hosting API. That API still exists on Windows; what it cannot do is host .NET 8. `Loader.dll` instead uses **hostfxr**:
```text
Loader.dll entry point
-> resolve hostfxr via nethost
-> hostfxr_initialize_for_runtime_config(ForegroundBotRunner.runtimeconfig.json)
-> get_function_pointer(load_assembly_and_get_function_pointer)
-> load ForegroundBotRunner.dll
-> invoke ForegroundBotRunner.Loader::Load
```
Three consequences fall out of that, and each one bit me before it got written down:
1. **A `runtimeconfig.json` is mandatory.** Hosting a modern runtime means initializing it from a declared configuration. Ship the config next to the assembly or nothing happens.
2. **The entry point signature is fixed.** A static method with the exact expected shape. Get it wrong and you get a null function pointer with no diagnostic.
3. **Bitness is not negotiable.** The 1.12.1 client is 32-bit, so `Loader` and `FastCall` build as x86. The native navigation and physics library builds x64 because it lives in the services. Two toolchains, one solution, and the build script tells you which one is missing.
Bootstrap runs on its own thread rather than in `DllMain`, because doing real work under the loader lock is how you deadlock a game client. A shutdown event is signaled on process detach so teardown is deterministic.
Once managed code is live inside the process, the bot has what no protocol client can have: the client's own object manager, the client's own Lua state, and the client's own physics already computed. It reads the player's position out of memory rather than deriving it, and calls game functions directly through structured-exception-wrapped thunks so a bad call surfaces as an error instead of taking the process with it.
Warden, the legacy anti-cheat, is disabled on injection. On a private research server with no competitive stake this is housekeeping, not evasion - the alternative is the client terminating itself mid-experiment.
### Two Operational Rules Learned the Hard Way
**Kill the client before you build.** The injector loads native DLLs from the build output directory. A running client holds a lock on them, and MSBuild reports it as a file-copy error that looks nothing like the actual cause. I lost more time to that one message than I care to admit.
**Version the offsets.** Memory offsets are specific to exact client builds - 1.12.1 build 5875, 2.4.3 build 8606, 3.3.5a build 12340. A bot that logs in and then does nothing intelligible is almost always a client-build mismatch.
## Being the Client Instead
The background runtime never touches a game client. `WoWSharpClient` is a pure C# implementation of the wire protocol: well over a hundred distinct opcodes handled in each direction.
Here is the stack it has to reproduce:
- **Auth** - SRP6 challenge and proof against the realm daemon, then the realm list.
- **World handshake** - session-key proof and header encryption on the world connection.
- **Object updates** - parse `SMSG_UPDATE_OBJECT` and its update masks into a live object graph.
- **Movement** - emit `MSG_MOVE_*` with correct flags, and pair server acknowledgements with the state transitions that caused them.
- **Transport** - track boat, zeppelin, and elevator state so a bot on a moving object has coherent coordinates.
The movement layer is where the difficulty concentrates, because movement is the one thing the server actively checks. The parity contract is explicit:
- The background runtime sends the same opcode, at the same flag state, with the same payload the real client would send.
- Timing tolerance is +/-100 ms for self-initiated movement and +/-10 ms for server-initiated movement such as a forced root, a forced speed change, or a teleport.
- Server acknowledgements are paired by opcode and state transition. A mismatched acknowledgement is a bug.
Ten milliseconds for server-initiated movement sounds severe until you watch a bot get rooted and answer with the wrong acknowledgement. The server's correction fights the client's state, and the character stutters in place like a bad connection. Which, from the server's point of view, is exactly what it is.
## The Parity Discipline
Two implementations of the same behavior will drift. The only question is whether you find out from a test or from a screenshot.
The rule is short: **when the runtimes disagree, the foreground is right.** The background implementation is a port of the client's behavior, so a difference is by definition a porting defect.
That rule needs teeth, and the teeth are what counts as proof. A parity row closes on decompilation evidence naming a specific routine in the client binary, plus a canary that fails before the fix and passes after it. A recorded session that replays without visible error, a test asserting that a named route completes, and a screenshot of a bot standing in the right place can all be true while the port is still wrong. The split gets its row-by-row treatment in [Teaching a Bot to Walk](/blog/teaching-a-bot-to-walk/), because the physics port is where it has to hold.
Packet capture and movement recording from the foreground runtime are still valuable, as **observation**. A capture tells you something differs. It does not tell you which routine differs, and it cannot close an implementation row on its own.
This distinction is the difference between a port that converges and a port that oscillates forever. Replay harnesses feel like proof because they are red and then green. They are actually a very expensive way to notice that something changed.
## The Slope That Looked Like Success
The divergence that made me write the parity rule down never raised anything: a background bot climbed a Redridge slope the real client refuses, arrived, verified its task, and left a clean snapshot, and the disagreement only surfaced weeks later when a foreground bot on the same route took the long way around and blew a group-form timeout. I tell that story properly in [Teaching a Bot to Walk](/blog/teaching-a-bot-to-walk/), where the physics argument lives.
What it settles here is the direction of blame. The cheap runtime was wrong in a way that looked like success, so widening the timeout would have buried the only signal I had. The disagreement itself is the artifact worth keeping: reduce it to a slope-threshold canary against the client's own collision behavior, fix the native side, and let the timeout stand.
Most of the operational rules on this project fall out of that same instinct. When the background moves where the foreground cannot, the fix goes into the background physics rather than into the mesh that would hide it. When foreground offsets stop working, confirm the exact client build before touching a line of logic. When security software blocks injection, allow the build output rather than weakening the loader. When the native DLL copy fails during a build, find the specific client process holding the lock and kill that one. And when the background's acknowledgement stops matching after a forced root, it is a movement-protocol bug, not server flakiness.
## When the Two Bodies Agree
Most of what I check is plumbing. A behavior task compiles and runs unchanged in both bodies. Foreground injection is reliable against all three supported client builds. A background bot logs in, enters the world, moves, fights, and logs out with no client present, and its movement holds the packet parity contract inside the stated timing tolerances. The whole background suite runs in continuous integration with no GUI anywhere near it.
Two of the criteria are the ones that decide whether the oracle is worth having. Every closed physics parity row has to cite a specific routine in the client binary and carry a canary that fails without the fix, because a row closed on a passing replay is a row that will quietly reopen. And a disagreement between the runtimes always opens a defect against the background implementation. That is a promise about where blame goes, and keeping it is what makes the foreground worth trusting.
## Related Posts
The behavior engine both runtimes share is the subject of [Activity, Objective, Task, Action](/blog/activity-objective-task-action/). The physics port introduced here gets its own treatment in [Teaching a Bot to Walk](/blog/teaching-a-bot-to-walk/). For the wider system, start with [A Server That Plays Itself](/blog/westworld-of-warcraft-a-server-that-plays-itself/).
## References
- [Write a custom .NET host to control the .NET runtime](https://learn.microsoft.com/en-us/dotnet/core/tutorials/netcore-hosting)
- [.NET runtime configuration files](https://learn.microsoft.com/en-us/dotnet/core/runtime-config/)
- [CreateRemoteThread function](https://learn.microsoft.com/en-us/windows/win32/api/processthreadsapi/nf-processthreadsapi-createremotethread)
- [Dynamic-link library best practices](https://learn.microsoft.com/en-us/windows/win32/dlls/dynamic-link-library-best-practices)
- [Secure Remote Password protocol](https://datatracker.ietf.org/doc/html/rfc2945)
---
# Activity, Objective, Task, Action
https://jaredrhodes.com/blog/activity-objective-task-action/
Every agent system eventually invents the same vocabulary and then ruins it. Somebody says "task," somebody else says "action," a third person says "behavior tree node," and within a month all three words mean all three things and nobody can review a pull request. I have watched it happen more times than I want to count.
Westworld of Warcraft has four words. They are load-bearing and they are not synonyms.
## One Sentence, Four Kinds of Thing
Take one sentence a person might say about a game: *"I ran Upper Blackrock Spire last night."*
Unpack it and you get four completely different kinds of thing:
- **The run itself** - hours long, involved nine other people, had a name.
- **Getting to the entrance** - a discrete goal with a definite end state, composed of many smaller things.
- **Walking through the Burning Steppes** - a repeating loop with stuck detection, re-pathing, and a way to give up.
- **Pressing the forward key for one frame** - the smallest thing a player can actually do.
They differ in duration by six orders of magnitude, they differ in who decides them, and - critically - they differ in whether anything outside the bot process needs to know about them. Flatten them into one concept and you get a system where a test cannot tell whether it is asserting on a strategy or a keystroke.
## The Four Layers
| Layer | Definition | Crosses the wire |
| --- | --- | --- |
| **Activity** | A major, usually dynamic event supporting any number of characters: a raid, a battleground, a dungeon run, a multi-hour farm. | No |
| **Objective** | One high-level state change, composed of tasks. Travels as `ObjectiveMessage`. | **Yes - the only one** |
| **Task** | One behavior-tree node on a last-in-first-out stack, driving a single state change with verification and failure handling. Pushes child tasks. | No |
| **Action** | An atomic local primitive: one memory read, one bit write, one opcode send, one key press. | No |
The single most useful line in the whole system is the wire column. Exactly one layer is observable from outside the bot process, and everything about testing, debugging, and service boundaries follows from that.
### Where People Get It Wrong
The recurring mistake is putting compound operations in the Action layer because they *feel* atomic from the caller's side.
| Looks atomic | Actually is | Why |
| --- | --- | --- |
| `MoveToCoord(coord)` | A Task | Loops position reads, movement bit writes, and heartbeat opcodes over many ticks with stuck detection |
| `UseAbility(id, target)` | A Task | Checks the global cooldown, sets the target, sends the cast opcode, then verifies the cast result |
| `InviteToParty(player)` | A Task | Sends the invite, then polls group membership until accepted or timed out |
| `LootCorpse()` | A Task | Opens the loot window, enumerates slots, takes items, verifies bag deltas |
The rule that settles every argument: **an Action cannot fail partway through.** It either happened or it did not. If a thing can be half-done, it is a Task and it needs verification.
Convenience wrappers on the object manager - `MoveToAsync`, `UseAbilityAsync`, `TurnInQuestAsync` - are all Task-level. They exist because writing the same seven-Action sequence in twelve places is worse than naming it once. Naming it does not make it atomic.
## Why the Wire Layer Is Deliberately Expensive
The set of objective types a state manager can request is a closed enum. Adding one costs five coordinated edits:
1. Add the value to the protobuf definition.
2. Add the mirrored value in the managed enum.
3. Add the mapping in the dispatcher.
4. Add the sequence builder for both runtimes.
5. Regenerate protobuf for every consumer.
That is annoying on purpose. Every time someone reaches for a new objective type, the cost forces the question: *could this be a new Task that composes existing objectives instead?* Almost always, yes.
The alternative - an open-ended wire vocabulary - produces a protocol that grows one verb per feature until nobody can enumerate what a bot can be asked to do. A closed set of verbs that everyone can read is a feature - twenty-six defined today, with IDs reserved through sixty-three for the ones the roadmap will want.
Here is the current shape of that vocabulary:
```csharp
public enum ObjectiveType
{
Travel = 0, // arrive at a named-location position
Interact = 1, // open conversation, click an NPC
AcceptQuest = 2,
TurnInQuest = 3,
Kill = 4, // kill N of a creature entry
Collect = 5, // gather N of an item
UseGameObject = 6, // chest, door, lever, herb, ore, fishing pool
CastSpell = 7,
Escort = 8,
EncounterTrash = 9, // a dungeon or raid trash leg
EncounterBoss = 10,
Loot = 11,
Queue = 12, // battleground or dungeon queue
Cap = 13, // node or flag capture
Hold = 14, // node defense
Craft = 15,
Train = 16,
Bank = 17,
Mail = 18,
Auction = 19,
Vendor = 20,
Rebind = 21, // hearthstone bind
Equip = 22,
Loop = 23, // gathering route, hotspot loop, any "until X" sweep
GroupForm = 24,
WorldEventStage = 25,
// reserved through 63
}
```
Read that list and you can predict what the server population is capable of without reading any implementation. That is the point.
## From a Sentence to a Keypress
Take the dungeon run from the opening and trace it all the way down.
```text
Activity dungeon.ubrs
+- Objective ubrs.reach-flame-crest <- ObjectiveMessage { Type = Travel }
+- Task TravelToTask(coord)
+- Task GoToTask <- the universal child
|- Action ReadPlayerPosition()
|- Action WriteMovementBit(forward, true)
|- Action SendOpcode(MSG_MOVE_HEARTBEAT, payload)
|- Action SendOpcode(MSG_MOVE_STOP, payload)
+- Action ReadPlayerPosition() <- verify: inside radius
```
Five things worth noticing.
**`GoToTask` is the universal child.** Almost every task in the system eventually needs to be somewhere else first, so movement is factored out once. If you are writing a new task and you find yourself writing pathing, stop.
**One Action, two completely different implementations.** In the foreground runtime `ReadPlayerPosition` is a plain memory read off the client's own object manager. The background runtime has no memory to read, so coordinates come from the movement block of `SMSG_UPDATE_OBJECT` and the `MSG_MOVE_*` traffic, and its object manager holds the latest value. Neither one reaches for an update field, because position has never been one. The task above does not know or care which implementation answered.
**The last Action is a verification read.** Arriving somewhere is exactly the kind of operation where a naive implementation sends the movement opcodes and then sleeps for the estimated travel time. That is a blind sequence, and blind sequences are banned. The task is not arrived until a position read puts the character inside the radius. The same shape covers the interactive objectives: a `UseGameObject` task sends `CMSG_GAMEOBJECT_USE` at a chest or a lever and then reads that gameobject's own state byte, rather than assuming the click landed.
**Only one line crossed a process boundary.** The state manager said "reach Flame Crest." It did not say how, and it never hears about the re-path around the Burning Steppes patrols.
**Tasks push children; objectives do not.** An objective builds exactly one head task. That task may push a whole subtree. This keeps the recursion in one place instead of spread across two layers.
## Objectives Are Generated, Not Written
Here is the part that surprises people.
The activity catalog is **86 hand-authored rows** - data only, no logic. A row declares what an activity is and leaves the how to the composer:
```csharp
public sealed record ActivityDefinition
{
public required string Id { get; init; } // "dungeon.wc"
public required ActivityFamily Family { get; init; }
public required string Location { get; init; } // "Wailing Caverns"
public required LevelRange LevelRange { get; init; } // 17-24
public required FactionPolicy FactionPolicy { get; init; }
public required RoleTemplate RoleTemplate { get; init; } // tank, healer, 3 dps
public required EntryRequirements EntryRequirements { get; init; }
public required TravelTarget TravelTarget { get; init; }
public required TimeSpan ExpectedDuration { get; init; }
public required HumanJoinPolicy HumanJoinPolicy { get; init; }
public required BotSelectionPolicy BotSelectionPolicy { get; init; }
public required IReadOnlyList Rewards { get; init; }
public required string TaskFamily { get; init; }
}
```
The **objective sequence** for that row gets composed at runtime, per bot, from four inputs:
- **The catalog row**, which contributes shape, legality gates, travel target, and role template.
- **The world database**, which knows which quests exist, who gives them, what drops where, which spawns are nearby, and what the trainer teaches.
- **The bot's snapshot**: level, class, race, faction, reputation, completed quests, inventory, keys, attunements, position.
- **The unlock graph**, which says which objectives open which other objectives.
The composer reads the world server's own tables - quest templates and their relations, creature and gameobject templates and spawns, item templates, vendor and trainer lists, area-trigger teleports, loot templates - and synthesizes an objective list for *this* bot at *this* tick. Then it prepends precondition objectives for anything the entry requirements demand but the bot does not have.
The consequence is worth stating plainly: **nobody wrote a script for Wailing Caverns.** Two bots assigned the same catalog row get different objective sequences, because one already did the pre-quest and the other did not, and because one is a druid who can skip a fight the other has to take.
That is also why the world database is read-only from the bot side. Every mutation goes through the server's own administrative interface. The composer treats the world as a fact source, and a fact source you write to is not a fact source.
## Tasks, Verification, and Failure
A task is a behavior-tree node with three responsibilities: drive one state change, verify it, and fail informatively.
```csharp
public interface IObjective
{
string Id { get; } // "ubrs.reach-flame-crest"
ObjectiveType Type { get; }
IObjectiveEndState EndState { get; } // predicate over the snapshot
IReadOnlyList Gates { get; } // start-time preconditions
IBotTask BuildHeadTask(BotTaskContext ctx);
bool CheckCompletion(WoWActivitySnapshot snapshot);
void OnHeadTaskTerminal(BotTaskStatus terminal, string? reason);
}
public interface IObjectiveEndState
{
bool IsSatisfied(WoWActivitySnapshot snapshot);
string DiagnosticLabel { get; } // "QuestLog[slotForQ132].Counter >= 8"
}
```
`DiagnosticLabel` is the small detail that pays for itself weekly. When a bot stalls, the operator console does not say "task failed." It says the bot was waiting on `QuestLog[slotForQ132].Counter >= 8` and the counter is at 5. That is the difference between an hour of log archaeology and a ten-second answer.
The stack discipline is equally deliberate. Tasks push and pop on a last-in-first-out stack. A parent pushes `GoToTask`, `GoToTask` completes and pops, the parent resumes. There is no global "what is the bot doing" variable to get out of sync - the top of the stack is the answer, and it is published on every snapshot.
## The Contract with Tests
Because objectives are the only thing on the wire, they are the only thing a test may legally drive, and snapshots are the only thing a test may legally read.
A test declares an activity, lets the composer and the resolver do their work, and asserts on published snapshot fields:
```text
current_activity_id // "dungeon.ubrs"
current_objective_id // "ubrs.reach-flame-crest"
current_objective_type // Travel
current_task_name // top of the task stack
advice_log[] // what was suggested, and whether it was used
```
That last field is the advisory layer's paper trail, and it gets its own post in [Advisory, Not Authoritative](/blog/advisory-not-authoritative/).
A test that constructs an `ObjectiveMessage` in its own body and dispatches it is not testing the bot. It is remote-controlling it, and it has silently skipped every layer that decides *what to do* - which is where the interesting regressions live. [Proving a World Is Alive](/blog/proving-a-world-is-alive/) works through what that leaves you with; the point here is that the rule falls straight out of the layer model.
## How a Vocabulary Rots
Nothing about this model breaks loudly. It rots, one reasonable-looking pull request at a time, and it starts with a new contributor adding an objective type because that was the shortest path.
1. A quest requires using a specific item on a specific corpse.
2. Rather than compose `UseGameObject` and `Interact`, someone adds `UseItemOnCorpse` to the enum.
3. It works. It ships.
4. Six months later the enum has 140 values, twelve of which are near-duplicates, and the dispatcher has a switch nobody will refactor.
The system has not gained a capability. It has gained a synonym. And because the enum is on the wire, every synonym is permanent - field numbers are never reused, so the cost is paid forever.
| Situation | Correct response |
| --- | --- |
| A behavior does not fit an existing objective type | Write a Task that composes existing types |
| A task needs to be somewhere first | Push `GoToTask`; do not write pathing |
| A task cannot tell whether it succeeded | The end state is missing; write one |
| An objective needs to push its own children | It does not; its head task does |
| A test needs to force a specific action | It belongs in the action-dispatch suite, not in live validation |
## Four Words, Still Four Meanings
The vocabulary is holding when every objective declares an end-state predicate with a human-readable diagnostic label, no task validates state with a sleep or a counter or a fixed repeat count, the snapshot publishes the activity, the objective, and the top of the task stack on every tick, and the composer reads the world database without ever writing to it. Those I check the way you check a lock: by trying the door occasionally and moving on.
The measure I actually watch is the ratio. The objective enum has to grow more slowly than the task library, because the moment it does not, somebody has started encoding features in the wire vocabulary and the rot above has begun. The other one is diagnostic: a stalled bot has to be explainable from its snapshot alone, without attaching a debugger to anything. If I have to attach a debugger to find out what a bot is waiting on, the four words have collapsed back into one and I have written the system I opened this post complaining about.
## Related Posts
The runtimes that execute all of this are in [Two Ways to Wear a Character](/blog/two-ways-to-wear-a-character/). The universal child task depends on the navigation stack in [Teaching a Bot to Walk](/blog/teaching-a-bot-to-walk/). How the composer breaks ties is covered in [Advisory, Not Authoritative](/blog/advisory-not-authoritative/).
## References
- [Protocol Buffers language guide (proto3)](https://protobuf.dev/programming-guides/proto3/)
- [Protocol Buffers: updating a message type](https://protobuf.dev/programming-guides/proto3/#updating)
- [Behavior trees in robotics and AI](https://arxiv.org/abs/1709.00084)
- [Hierarchical task network planning](https://www.cs.umd.edu/~nau/papers/nau2003shop2.pdf)