Previously, we discuss TrueNAS NFS for Proxmox. Now that Proxmox is using TrueNAS for storage, a Cloud Sync Task can be used to copy the TrueNAS NFS to Azure Blob Storage as a backup. The following steps are required:
- Create Azure Blob Storage Account
- Create TrueNAS Cloud Credentials
- Create Cloud Sync Tasks
Create Azure Blob Storage Account
Create a storage account
Every storage account must belong to an Azure resource group. A resource group is a logical container for grouping your Azure services. When you create a storage account, you have the option to either create a new resource group, or use an existing resource group. This article shows how to create a new resource group.
A general-purpose v2 storage account provides access to all of the Azure Storage services: blobs, files, queues, tables, and disks. The steps outlined here create a general-purpose v2 storage account, but the steps to create any type of storage account are similar. For more information about types of storage accounts and other storage account settings, see Azure storage account overview.
Portal
To create a general-purpose v2 storage account in the Azure portal, follow these steps:
- On the Azure portal menu, select All services. In the list of resources, type Storage Accounts. As you begin typing, the list filters based on your input. Select Storage Accounts.
- On the Storage Accounts window that appears, choose Add.
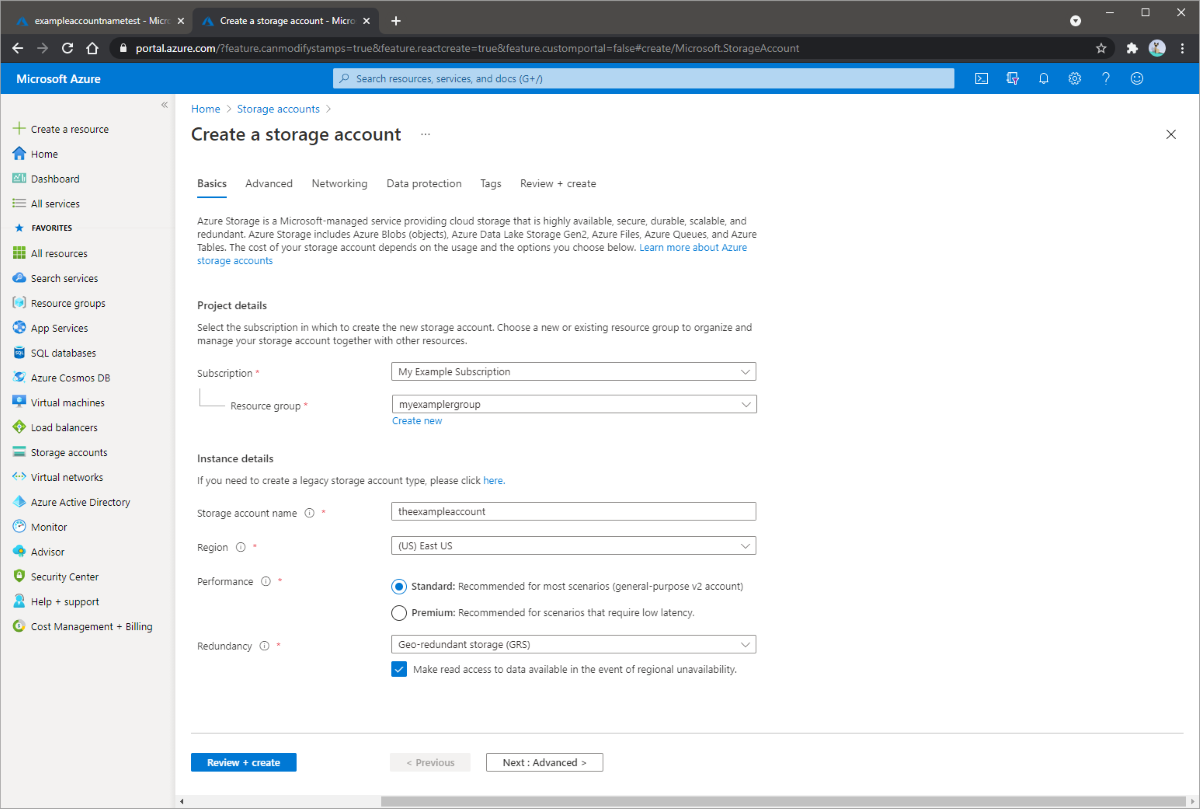
- On the Basics tab, select the subscription in which to create the storage account.
- Under the Resource group field, select your desired resource group, or create a new resource group. For more information on Azure resource groups, see Azure Resource Manager overview.
- Next, enter a name for your storage account. The name you choose must be unique across Azure. The name also must be between 3 and 24 characters in length, and may include only numbers and lowercase letters.
- Select a location for your storage account, or use the default location.
- Select a performance tier. The default tier is Standard.
- Set the Account kind field to Storage V2 (general-purpose v2).
- Specify how the storage account will be replicated. The default replication option is Read-access geo-redundant storage (RA-GRS). For more information about available replication options, see Azure Storage redundancy.
- Additional options are available on the Networking, Data protection, Advanced, and Tags tabs. To use Azure Data Lake Storage, choose the Advanced tab, and then set Hierarchical namespace to Enabled. For more information, see Azure Data Lake Storage Gen2 Introduction
- Select Review + Create to review your storage account settings and create the account.
- Select Create.
The following image shows the settings on the Basics tab for a new storage account:

Create a container
To create a container in the Azure portal, follow these steps:
- Navigate to your new storage account in the Azure portal.
- In the left menu for the storage account, scroll to the Blob service section, then select Containers.
- Select the + Container button.
- Type a name for your new container. The container name must be lowercase, must start with a letter or number, and can include only letters, numbers, and the dash (-) character. For more information about container and blob names, see Naming and referencing containers, blobs, and metadata.
- Set the level of public access to the container. The default level is Private (no anonymous access).
- Select OK to create the container.

Create TrueNAS Cloud Credentials
To begin integrating TrueNAS with a Cloud Storage provider, register the account credentials on the system. After saving any credentials, a Cloud Sync Task allows sending or receiving data from that Cloud Storage Provider.
Saving a Cloud Storage Credential
Transferring data from TrueNAS to the Cloud requires saving Cloud Storage Provider credentials on the system.
It is recommended to have another browser tab open and logged in to the Cloud Storage Provider account you intend to link with TrueNAS. Some providers require additional information that is generated on the storage provider account page. For example, saving an Amazon S3 credential on TrueNAS could require logging in to the S3 account and generating an access key pair on the Security Credentials > Access Keys page.
To save cloud storage provider credentials, go to System > Cloud Credentials and click Add.

Using the Azure Portal we can retrieve our access keys.

Create Cloud Sync Tasks
TrueNAS can send, receive, or synchronize data with a Cloud Storage provider. Cloud Sync tasks allow for single time transfers or recurring transfers on a schedule, and are an effective method to back up data to a remote location.
Go to Tasks > Cloud Sync Tasks and click Add.

Give the task a memorable Description and select an existing cloud Credential. TrueNAS connects to the chosen Cloud Storage Provider and shows the available storage locations. Decide if data is transferring to (PUSH) or from (PULL) the Cloud Storage location (Remote). Choose a Transfer Mode:
Next, Control when the task runs by defining a Schedule. When a specific Schedule is required, choose Custom and use the Advanced Scheduler.Advanced Schedulerexpand
Unsetting Enable makes the configuration available without allowing the Schedule to run the task. To manually activate a saved task, go to Tasks > Cloud Sync Tasks, click to expand a task, and click RUN NOW.
The remaining options allow tuning the task to your specific requirements.Specific Optionsexpand
Transfer
| Name | Description |
|---|---|
| Description | Enter a description of the Cloud Sync Task. |
| Direction | PUSH sends data to cloud storage. PULL receives data from cloud storage. Changing the direction resets the Transfer Mode to COPY. |
| Transfer Mode | SYNC: Files on the destination are changed to match those on the source. If a file does not exist on the source, it is also deleted from the destination. COPY: Files from the source are copied to the destination. If files with the same names are present on the destination, they are overwritten. MOVE: After files are copied from the source to the destination, they are deleted from the source. Files with the same names on the destination are overwritten. |
| Directory/Files | Select the directories or files to be sent to the cloud for Push syncs, or the destination to be written for Pull syncs. Be cautious about the destination of Pull jobs to avoid overwriting existing files. |
Remote
| Name | Description |
|---|---|
| Credential | Select the cloud storage provider credentials from the list of available Cloud Credentials. |
Control
| Name | Description |
|---|---|
| Schedule | Select a schedule preset or choose Custom to open the advanced scheduler. |
| Enabled | Enable this Cloud Sync Task. Unset to disable this Cloud Sync Task without deleting it. |
Advanced Options
| Name | Description |
|---|---|
| Follow Symlinks | Follow symlinks and copy the items to which they link. |
| Pre-Script | Script to execute before running sync. |
| Post-Script | Script to execute after running sync. |
| Exclude | List of files and directories to exclude from sync. Separate entries by pressing Enter. See rclone filtering for more details about the --exclude option. |
Advanced Remote Options
| Name | Description |
|---|---|
| Remote Encryption | PUSH: Encrypt files before transfer and store the encrypted files on the remote system. Files are encrypted using the Encryption Password and Encryption Salt values. PULL: Decrypt files that are being stored on the remote system before the transfer. Transferring the encrypted files requires entering the same Encryption Password and Encryption Salt that was used to encrypt the files. Additional details about the encryption algorithm and key derivation are available in the rclone crypt File formats documentation. |
| Transfers | Number of simultaneous file transfers. Enter a number based on the available bandwidth and destination system performance. See rclone –transfers. |
| Bandwidth limit | A single bandwidth limit or bandwidth limit schedule in rclone format. Separate entries by pressing Enter. Example: 08:00,512 12:00,10MB 13:00,512 18:00,30MB 23:00,off. Units can be specified with the beginning letter: b, k (default), M, or G. See rclone –bwlimit. |
Scripting and Environment Variables
Advanced users can write scripts that run immediately before or after the Cloud Sync task. The Post-script field is only run when the Cloud Sync task successfully completes. You can pass a variety of task environment variables into the Pre- and Post- script fields:
- CLOUD_SYNC_ID
- CLOUD_SYNC_DESCRIPTION
- CLOUD_SYNC_DIRECTION
- CLOUD_SYNC_TRANSFER_MODE
- CLOUD_SYNC_ENCRYPTION
- CLOUD_SYNC_FILENAME_ENCRYPTION
- CLOUD_SYNC_ENCRYPTION_PASSWORD
- CLOUD_SYNC_ENCRYPTION_SALT
- CLOUD_SYNC_SNAPSHOT
There also are provider-specific variables like CLOUD_SYNC_CLIENT_ID or CLOUD_SYNC_TOKEN or CLOUD_SYNC_CHUNK_SIZE
Remote storage settings:
- CLOUD_SYNC_BUCKET
- CLOUD_SYNC_FOLDER
Local storage settings:
- CLOUD_SYNC_PATH
Testing Settings
Test the settings before saving by clicking DRY RUN. TrueNAS connects to the Cloud Storage Provider and simulates a file transfer. No data is actually sent or received. A dialog shows the test status and allows downloading the task logs.

Cloud Sync Behavior
Saved tasks are activated according to their schedule or by clicking RUN NOW. An in-progress cloud sync must finish before another can begin. Stopping an in-progress task cancels the file transfer and requires starting the file transfer over.
To view logs about a running or the most recent run of a task, click the task status.
Cloud Sync Restore
To quickly create a new Cloud Sync that uses the same options but reverses the data transfer, expand () an existing Cloud Sync and click RESTORE.

Enter a new Description for this reversed task and define the path to a storage location for the transferred data.
The restored cloud sync is saved as another entry in Tasks > Cloud Sync Tasks.
Azure Azure Blob storage Proxmox Truenas
Last modified: June 21, 2021


